Creating Conversations
There are five main steps involved in creating a Conversation:
- Create a new campaign and select the campaign channel.
- Select a Conversation template and add your content.
- Define the target audience for your Conversation and set the Conversation trigger rules.
- Select custom goals to report the engagement or conversion of users following exposure to the Conversation.
- QA test your Conversation (optional) and, finally, schedule or launch your Conversation.
For some hints and tips about creating Conversations, see Conversations best practices.
Create new campaign and select campaign channel
To access the campaign workflow and select the campaign channel:
Step 1: In the Campaigns center, select Create campaign.
Step 2: On the Choose your marketing channel screen, select Conversation.
Step 3: To proceed to the campaign workflow, select Continue.
Step 4: In the Add Conversation Title box, enter a name for your campaign. Press Enter or select to confirm the title. To edit the campaign name at any time, select Edit .

Add campaign content
The Conversations campaign workflow now consists of two main screens: Content and Target and Preview and test. To select a template and add your campaign content, complete the following:
Step 1: On the Content and Target screen, under Campaign Content, select Add Content.
Step 2: In the Select a Conversation Template dialog, choose the template you want to use as the basis for your campaign, and then select Continue. For more information about the Conversation template options, see About Conversation templates.

Step 3: Depending on the template you selected in the previous step, use the WYSIWYG editor and options available to add your campaign content. For more information on the types of content you can include and editing options available, see Editing Conversations.
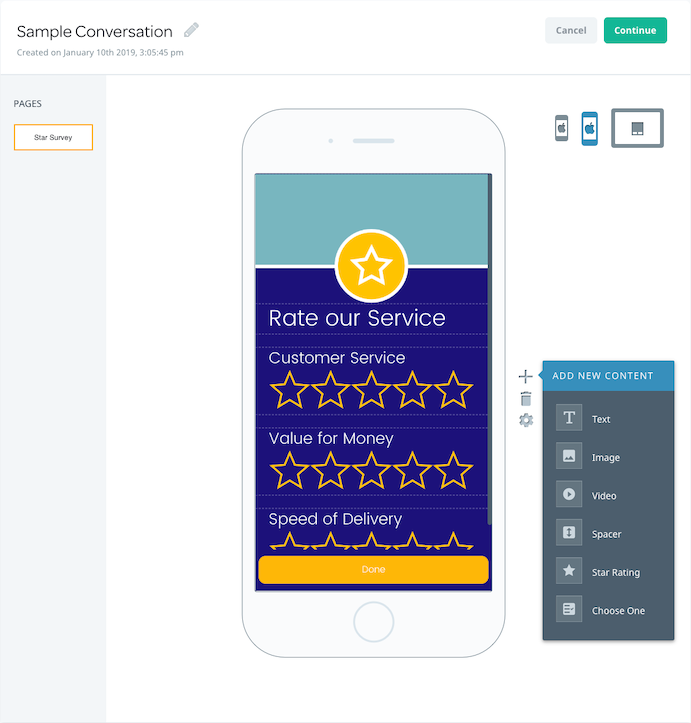
To edit or add content:
- To add a new content block, select Add (+) and then select the type of content:
- Text – adds a text box to the page. To edit a text element, select the text box.
- Image – adds a section to the page for an image. To add an image, select the image placeholder.
- Video – adds a section to the page for embedding a video (YouTube only). To add the video link, select the video placeholder.
- Spacer – adds a section to the page for inserting space between other elements. To edit the spacer height, select the placeholder.
- Star Rating – adds a section to the page for including a star rating survey. To edit the rating title or star style, select the placeholder.
- Choose One – adds a section to the page for including a single question survey. Select the survey heading or buttons to edit the text, or select +Add to add additional responses as needed.
- To edit a content block, select the block and then select Settings . The options available for editing depend on the content type. For more information on how to edit specific types of content, see Editing Conversations.
- If the page includes any buttons, enter the button text and configure the related actions. The options are:
- Continue Conversation – takes the user to a new page in the Conversation.
- Call a Number – prompts the user to call a specific phone number, for example, a support line.
- Go to Web Page – directs the user to a URL in their default device browser.
- Go to Deeplink – directs the user to a deeplink within the app.
- Request Device Permission (iOS only) – prompts the user to authorize permission for push notifications, or grant access to Contacts, Photos, Camera, and Location.
- End Conversation – ends the Conversation and returns the user to the app.
For more information on configuring button options, see Editing Conversations.
- If you add additional pages, the preview displays in the editor and prompts you to select a template for the new page, similar to the Conversation templates. You can navigate between pages using the navigation in the top left corner of the screen.
Step 4: After you have added your desired pages and content, select Continue to proceed.
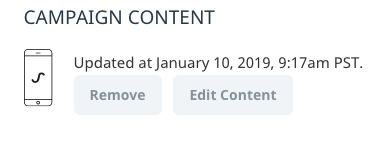
To save your work at any time, select Continue. You are returned to the Content and Target screen and the Campaign Content section is updated to show when the content was last updated. To return to the content editor, select Edit Content. To remove all content, select Remove.
Set targeting and display triggers
By default, a Conversation is targeted at all users. In the Define Target Audience section, select from the options to add additional criteria to your target audience and specify when the Conversation is displayed.
To set the target audience and Conversation trigger rules:
Step 1: Under the Define Target Audience section of the screen, select the audience option you want to use for the campaign:
- All Users – send the campaign to all users.
- Custom Audience – build a custom audience using any combination of user profile and user behavior filters. For more information on building a custom audience, see Targeting campaign audiences.
- External Audience – use an audience from an external source (for example, Salesforce Marketing Cloud, Facebook) or a linked push notification campaign. For more information, see Linking campaigns.
Step 2: In the Set Display Triggers section, select the app events that trigger your message:
- Include this message in the Message Center – select this check box if your app has an inbox-type feature and you want the message to be triggered from the message center.
Note: This feature requires use of the Swrve Message Centre API (see the Swrve Message Center API guide for more information) and may not be available depending on your agreement with Swrve. If you would like to use it, please contact your CSM at support@swrve.com. - When the user launches the app – select this check box if you want the Conversation to be displayed when targeted start a new app session.
- When the user triggers the event(s) – select this check box if you want the Conversation to be displayed when targeted users trigger specific events. Swrve provides an auto-complete feature; enter the event name in the search box and then select the event from the displayed list. For examples of triggers to use for Conversations, see Conversations best practices.
- Optional: After you select an event, you can add further conditions to the trigger if the event includes payload values. To include payload conditions, hover your mouse over the event and select Add condition. In the Enter payload parameter box, enter the payload key as configured in your app, and then enter the payload value. You can include additional conditions as needed, edit existing conditions, or remove a condition. Multiple trigger conditions are based on an AND operator; it is not possible to include an OR operator at this time.
Step 3 (Optional): To define Conversation-level display rules, select Conversation display rules, select the check boxes of the rules that you want to apply, and then complete the selected rule statements, as required. You can define the following:
- The number of seconds of app usage that must elapse before a Conversation can be displayed.
- The maximum number of times that the Conversation is displayed to a user in all app sessions.
- The number of seconds after Conversation dismissal that must elapse before a new Conversation is displayed.
- Priority of the campaign over others with the same triggers. A lower number means higher priority over other campaigns.
You can also configure Conversation display rules at app level on the Messaging Display Rules screen. If you have configured both app-level and Conversation-level rules, the most restrictive of the two is applied. For more information about configuring Conversation display rules at app level, see Intro to Conversations.
Select campaign goals
The attribution period for Conversation campaigns is 24 hours (that is, campaign goals are attributed back to the user if they achieve the goal within 24 hours from the time they first see the message). Swrve automatically tracks certain goals, such as engagement rate and subsequent time the user spends in the app. The Select Campaign Goals section enables you to select additional reporting goals.
To select custom reporting goals:
Step 1: In the Select Campaign Goals section, select the Primary Goal for your campaign. This is the initial event or purchase you want users to make after being exposed to the Conversation.
- Event – use to track engagement with a specific feature you are promoting in your Conversation. Select an event from the event name list.
- In-App Purchase (using real currency) – use to track in-app purchases of promotional items featured in your Conversation. Select of any item or of a specific item, and if required, select the specific item from the item name list.
- Purchase (using virtual currency) – use to track virtual currency purchases of promotional items featured in your Conversation. Select of any item or of a specific item, and if required, select the specific item from the item name list.
Step 2: If required, select the Secondary Goal for your campaign. This might be an event or purchase you want users to make further downstream. For example, the primary goal of the Conversation might be to have users purchase virtual currency for your app and then the secondary goal would be to track users spending the virtual currency.
Step 3: Select Save and Exit to save a draft of your campaign or select Next to proceed to the Preview & Test screen of the workflow.
Test and launch your campaign
To QA test and launch the Conversation:
Step 1: On the Preview and test screen, if required, QA test your Conversation before launching it. For more information, see QA testing Conversations.
Step 2: If you are happy with the preview of your Conversation, perform one of the following actions:
- To launch the Conversation immediately, select Launch as soon as possible.
- To define the Conversation activation period:
- In the Schedule launch section, specify the Start date of the Conversation activation period.
- If required, specify the End date of the Conversation activation period. If you do not specify an end date, the Conversation activation period is open-ended (ongoing) by default.
- Select Launch on <scheduled date>.
If you launch the Conversation (without scheduling), its status is set to Active. If you schedule the Conversation to be deliverable from a particular date, its status is set to Pending until this time is reached.
To create a copy of the Conversation, on the individual campaign summary card, select Duplicate campaign from the Actions menu. You can edit and launch the copy according to your needs.
Next steps
- QA test your Conversation. For more information, see QA testing Conversations.
- View the Conversation and its report details on the individual Conversation screen. For more information, see Managing Conversations.
- Change the status of your Conversation using the options on the individual Conversation screen. For example, you can edit, launch, pause or finish a Conversation depending on its current status. For more information, see Managing Conversations.