User acquisition tracking
From the Swrve perspective, attribution is treated like a normal user update event, and we populate our User Acquisition report with data from specific user attributes: Swrve.referrer_id and Swrve.referrer_cost.
The User Acquisition report shows important details on your attribution networks. The report is enabled on a per-dashboard basis. If enabled, it displays under the Analytics menu on the Swrve dashboard. If you would like this feature enabled, contact support@messagegears.com.
The User Acquisition report contains per campaign details on how much money users from any given campaign are spending and supplies calculations to easily identify how successful each campaign has been.
Beyond the User Acquisition report, you can use the campaign ID and referrer cost as an audience targeting filter or a condition for a segment. This means you can track the real behavior of users from a given ad campaign or referral source.
Follow the instructions detailed in the tabs below according to the required implementation for your app type:
- iOS
- Android
- REST
- Facebook Canvas
- Mobile App Tracking
- AppsFlyer
- Adjust
- Kochava
iOS
Apple has removed access to unique device identifiers for iOS devices, so tracking acquisition for iOS applications can be tricky. In addition, no referral information is passed from the app store to your app, so you must partner with a third party ad network or attribution service to get ROI data for iOS. The possible options are outlined below.
Option 1: Use MobileAppTracking
Swrve has partnered with MobileAppTracking, from HasOffers, to make tracking as simple as changing one line of code in your app and setting up a postback with Hasoffers. The integration procedure is outlined on the Mobile App Tracking tab.
Option 2: Integrate with a third party network that uses the same IDs as Swrve
Your ad network must support postbacks, which means they send a request to a particular URL after each install. Set up a postback with your ad network that includes your API key, the Swrve user ID, referrer information, and optionally, referrer cost. The URL should be similar to the following:
US data center
https://<app_id>.api.swrve.com/1/user?api_key=[api_key]&user=[swrve_user_id]&user_initiated=false&swrve.referrer_id=PublisherName.CampaignName&swrve.referrer_cost=1
EU data center
https://<app_id>.eu-api.swrve.com/1/user?api_key=[api_key]&user=[swrve_user_id]&user_initiated=false&swrve.referrer_id=PublisherName.CampaignName&swrve.referrer_cost=1
Note that this only works if your ad network is using the exact same ID as your Swrve ID. Swrve recommends using ID for Vendors and discourages the use of ID for Advertisers as users can opt-out of this or reset their ID, causing inaccuracies in tracking data.
Option 3: Integrate with a third party network that uses IDs different to Swrve
Your ad network must support postbacks and custom user parameters. In your app, send your user’s Swrve ID to the ad network as a custom user parameter, and then set up a postback with your ad network that includes your API key, the Swrve user ID, referrer information, and optionally, referrer cost. The URL should look like the following:
US data center
https://<app_id>.api.swrve.com/1/user?api_key=[api_key]&user=[swrve_user_id]&user_initiated=false&swrve.referrer_id=PublisherName.CampaignName&swrve.referrer_cost=1
EU data center
https://<app_id>.eu-api.swrve.com/1/user?api_key=[api_key]&user=[swrve_user_id]&user_initiated=false&swrve.referrer_id=PublisherName.CampaignName&swrve.referrer_cost=1
Option 4: Manually upload data exported from ad network
You can upload a CSV file with user acquisition data to populate the User Acquisition Report. This is only supported for apps with less than two million users.
To upload user acquisition data:
Step 1: On the Analytics menu, select User Acquisition.
Step 2: On the User Acquisition Report screen, select Upload Acquisition Costs.
Step 3: Create a CSV file of up to 1,000 lines formatted as user id, acquisition cost. The first column of the CSV file must contain the Swrve user IDs, while the second must contain the acquisition cost (in dollar cents) for these users. For example, a CSV file with the line 12345, 7.5 indicates that the acquisition cost for the user with ID 12345 was $0.075.
Step 4: Select Choose File and select the CSV file you want to upload.
Step 5: Ensure the ID selected in the Referrer channel and Referrer campaign list is the same as that used in your CSV.
Step 6: Select Submit.
Android
As of Swrve Android SDK v4.6, by default the SDK does not catch the com.android.vending.INSTALL_REFERRER broadcast from the Google Play store containing the referrer details.
To get the referrer details, add the following snippet to your AndroidManifest.xml:
<receiver
  android:name="com.swrve.sdk.SwrveInstallReferrerReceiver"
  android:exported="true">
    <intent-filter>
      <action android:name="com.android.vending.INSTALL_REFERRER" />
    </intent-filter>
 </receiver>
How to disable Referrer ID on SDK v4.5 and lower
If you want to disable the collection of the referrer ID by the Swrve Android SDK, you must stop Swrve’s BroadcastReceiver from receiving the com.android.vending.INSTALL_REFERRER broadcast. To do so, add the following to your manifest:
First, add a tools namespace:
<manifest xmlns:android="http://schemas.android.com/apk/res/android"
 xmlns:tools="http://schemas.android.com/tools"
 package="com.yourawesomeapp">
Then, add following line to remove the SwrveInstallReferrerReceiver:
<receiver android:name="com.swrve.sdk.SwrveInstallReferrerReceiver" tools:node="remove"/>
For more information on the Android Manifest Merger, see the Android Gradle Plugin User Guide.
REST
Assigning a referral source to a particular user is straightforward. You simply need to send a message to <app_id>.api.swrve.com (or <app_id>.eu-api.swrve.com for EU-configured apps), with the following information:
- Swrve User ID
- Referral source
- (Optional) referral campaign
- (Optional) cost of acquired user
When a user installs your app, send a GET or POST request to:
US data center
https://<app_id>.api.swrve.com/1/user?api_key=[api_key]&user=[swrve_user_id]&user_initiated=false&swrve.referrer_id=PublisherName.CampaignName&swrve.referrer_cost=1
EU data center
https://<app_id>.eu-api.swrve.com/1/user?api_key=[api_key]&user=[swrve_user_id]&user_initiated=false&swrve.referrer_id=PublisherName.CampaignName&swrve.referrer_cost=1
The parameters in the URL are as follows:
- api_key – the api key for your app.
- user_initiated=false – this specifies that the user did not trigger this call to the API, so it does not affect DAU metrics.
- swrve.referrer_id – this includes the publisher name (or publisher name and campaign name) of the user acquisition source. For example, this might be swrve.referrer_id=TapJoy.HolidayCampaign.
- swrve.referrer_cost – this optional parameter indicates the cost of acquiring this user.
This request can be sent from either the server or the client. All Swrve requires is to see a request for that URL with the appropriate parameters. For more information on the user property message to the Swrve API, see the Swrve Events API guide.
FB Canvas apps
You can track ROI for Facebook Canvas apps using the Swrve REST API.
To do this, perform the following steps:
Step 1: Include the necessary referral information in the URL directing users to your application on Facebook. For example:
https://apps.facebook.com/swrvetester/?swrve.referrer_string=Publisher.Campaign
Step 2: Pull these parameters from the HTTP request headers using the following code:
if 'swrve.referrer_string' in request.GET:
    swrve_referrer_string = request.GET['swrve.referrer_string']
Step 3: Send an HTTP request to the Swrve API including these parameters in addition to the Swrve user ID and API key. For example, with swrve ID abc123 and referrer string Facebook.HolidayCampaign.
US data center
urllib2.urlopen("https://<app_id>.api.swrve.com/1/user?api_key=[api_key]&user=abc123&swrve.referrer_id=Facebook.HolidayCampaign")
EU data center
urllib2.urlopen("https://<app_id>.eu-api.swrve.com/1/user?api_key=[api_key]&user=abc123&swrve.referrer_id=Facebook.HolidayCampaign")
Mobile App Tracking
MobileAppTracking (MAT) from HasOffers integrates with the Swrve User Acquisition report to make it possible to easily measure the return on investment from acquisition campaigns. To get this to work, you need to change to a single line of code and add a postback in your MAT dashboard. This single line of code informs MAT of the Swrve user identifer for the acquired users.
MAT sends user acquisition data to the Swrve User Acquisition report in order to link acquisition data with users’ post-install actions and revenue.
For iOS, the flow of data in MAT is as follows:
- The user taps an ad for your app (in some external app); a request is sent to MAT with IDFA (Identifier For Advertising) and campaign info.
- MAT stores the IDFA for the user and transparently redirects the user to the Apple app store to install your app.
- On first launch, your app sends the IDFA and Swrve ID to MAT, correlating the IDFA with the swrve ID and making it possible to see which installs came from which traffic sources.
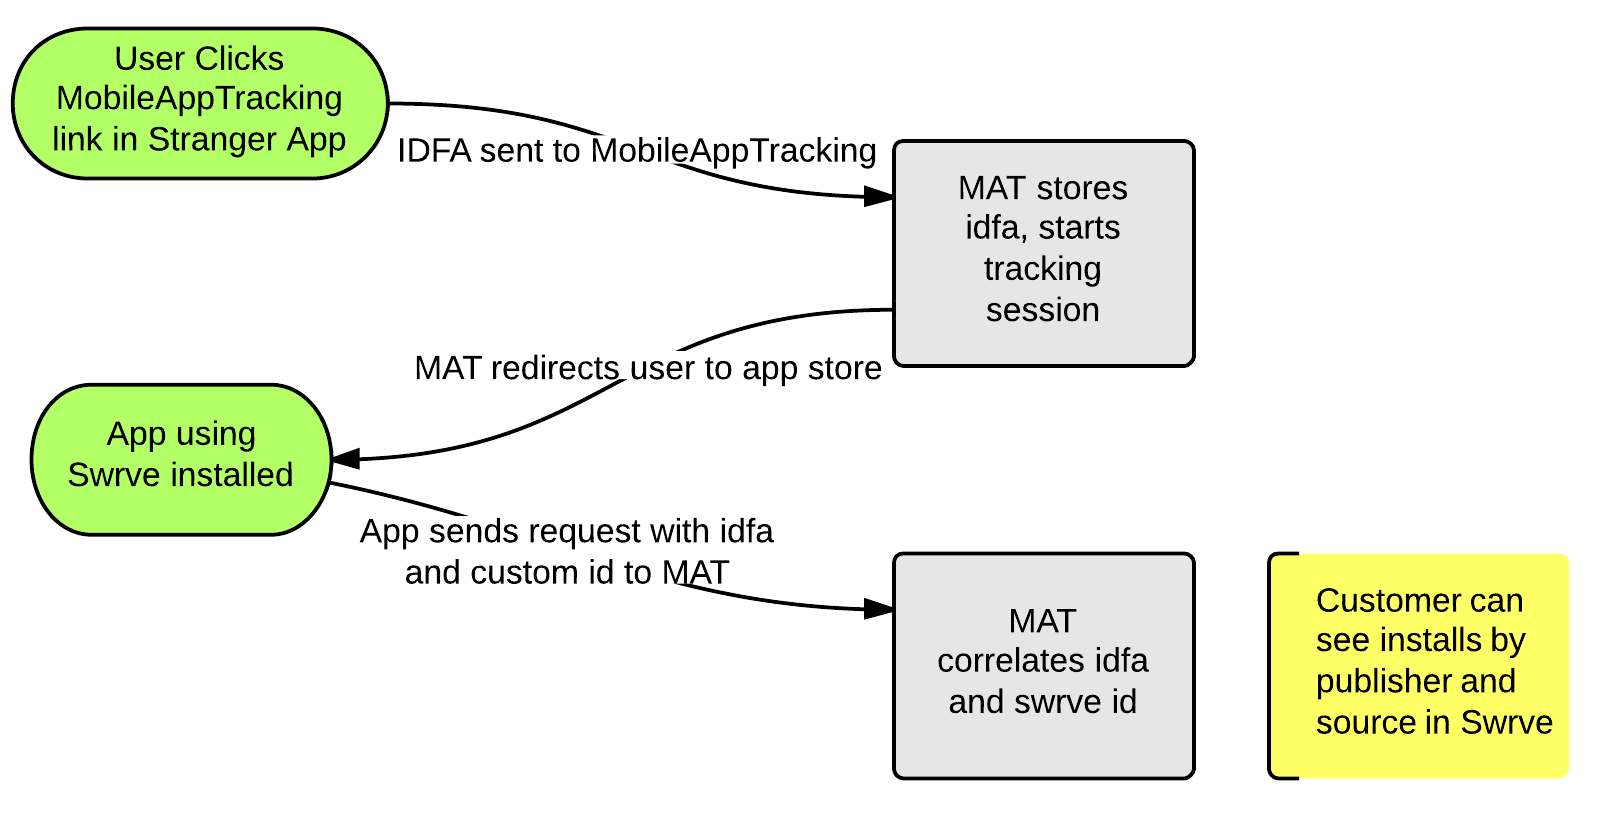
Android apps go through a similar data flow, but with the Play store instead of the Apple app store.
To integrate with MAT, do the following:
Step 1: Add the following line to your app below where you initialize the MAT SDK:
For iOS
 // swrveUserId is the Swrve User ID. We recommend using identifierForVendor
  [MobileAppTracker sharedManager] setUserId:swrveUserId;
For Android
// swrveUserId is the same as the user id used for Swrve.
  mobileAppTracker.setUserId(swrveUserId);
Step 2: Navigate to your MAT dashboard and set the postback URL to the following:
US data center
https://<app_id>.api.swrve.com/1/user?api_key=YOUR_SWRVE_API_KEY&user={user_id}&user_initiated=false&swrve.referrer_id={publisher_name}.{campaign_name}&swrve.referrer_cost={payout}
EU data center
https://<app_id>.eu-api.swrve.com/1/user?api_key=YOUR_SWRVE_API_KEY&user={user_id}&user_initiated=false&swrve.referrer_id={publisher_name}.{campaign_name}&swrve.referrer_cost={payout}
Prefacing additional parameters with UA makes it easy to see these are populated by user acquisition data sources.
Step 3: Select the All radio button in the Data section on the MAT dashboard.
AppsFlyer
If you are using AppsFlyer in your app, you can set up a postback that allows Swrve to track LTV and user behavior for different acquisition sources.
To integrate with AppsFlyer, do the following:
Step 1: After initializing Swrve, set the Partner Data via the Appslflyer SDK passing the Swrve user ID as the identifier:
Android
Map<String, Object> swrveData = new HashMap();
partnerData.put("puid", SwrveSDK.getUserId());
AppsFlyerLib.getInstance().setPartnerData("swrve_int", partnerData);
iOS
NSString* swrve_user_id = [[Swrve sharedInstanceWithAppID:appId apiKey:apiKey] userID];
NSDictionary *partnerInfo = @{ @"puid": swrve_user_id };
[[AppsFlyerLib shared] setPartnerDataWithPartnerId: @"swrve_int" partnerInfo:partnerInfo];
Unity
Unity doesn’t support setting the Partner Data so you need to set the Customer User Id instead:
Appsflyer.setCustomerUserID(SwrveComponent.Instance.SDK.UserId);
Step 2: Set a postback in your AppsFlyer dashboard by performing the following actions:
- Select your app in the AppsFlyer dashboard.
- On the left navigation panel, select Integrated Partners.
- In the search box, enter Swrve and select the Swrve icon to view the configuration window.
- On the Integration tab, under General Settings, there are two possible ways to authenticate depending on the identifier you are sending to Swrve.
Note: To view your App ID and API keys in Swrve, on the Settings menu, select Integration Settings. Ensure you use the App ID and API key for the correct app instance (normally, this is the production instance of your app).
Enter the App ID and API key for your Swrve app.

- If your Swrve app uses EU data storage and URL endpoints (that is, you log into the Swrve dashboard at https://eu-dashboard.swrve.com), select EU.
- Select Advanced Data Sharing to send the following additional information to Swrve: cost_value, channel, keywords, siteID and c (campaign).
- AppsFlyer can send automatic postbacks to Swrve following user installs. To send postbacks for any user that downloads the app to Swrve, under Default Postbacks, select Sending Option, and then select Events attributed to any partner or organic.
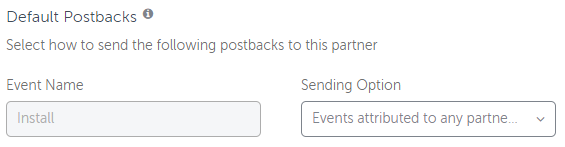
- To complete the integration, select Save.
Once saved, AppsFlyer begins sending the following data to Swrve for every organic and non-organic install:
- api_key
- customer_user_id as set in the SDK
- Media Source
- Campaign Name
Adjust
Adjust has an excellent way of handling attribution on the device, without requiring a post back URL being setup in the dashboard. Attribution handling is not synchronous, and time to fire these attribution callbacks can vary depending on attribution partner.
Implement the below Adjust callback methods, with Swrve integrated to send a Swrve user update event directly from the client device.
iOS
- (void)adjustAttributionChanged:(ADJAttribution *)attribution {
    NSString *referrer = [NSString stringWithFormat:@"%@.%@", attribution.network, attribution.campaign];
    [[Swrve sharedInstance] userUpdate:@{ @"swrve.referrer_id" : referrer }];
}
For more information on using the Adjust callback method above, see the Adjust iOS SDK Developer’s Guide.
Android
AdjustConfig config = new AdjustConfig(this, appToken, environment);

config.setOnAttributionChangedListener(new OnAttributionChangedListener() {
    @Override
    public void onAttributionChanged(AdjustAttribution attribution) {
        Map<String, String> referrer = new HashMap<String, String>();
        referrer.put("swrve.referrer_id", attribution.network + "." + attribution.campaign);
        SwrveSDK.userUpdate(attributes);
    }
});

Adjust.onCreate(config);
For more information on using the Adjust callback method above, see the Adjust Android SDK Developer’s Guide.
We recommend initializing the Swrve SDK before attempting to use the userUpdate() method.
Replace the @“publisher_name.campaign_name” with the actual publisher and campaign from the attribution object.
Unity
// Initialize Adjust with a new config
AdjustConfig adjustConfig = new AdjustConfig ("{Your App Token}", AdjustEnvironment.Sandbox);
adjustConfig.setLogLevel (AdjustLogLevel.Verbose);
adjustConfig.setAttributionChangedDelegate (this.attributionChangedDelegate);Adjust.start (adjustConfig);

void attributionChangedDelegate (AdjustAttribution attribution)
{
    Dictionary<string, string> referrer = new Dictionary<string, string>();
    referrer.Add("swrve.referrer_id", attribution.network + "." + attribution.campaign);
    SwrveComponent.Instance.SDK.UserUpdate(referrer);
}
The Swrve SDK must be initialized before attempting to user the UserUpdate() method. Beyond putting Swrve initialization earlier in your code, changing the execution order of the Swrve SDK may be needed if you see null reference errors in your console. In Unity, select Edit > Project Settings > Script Execution Order to select Swrve and put it higher in the execution order.
Kochava
Kochava has an excellent way of handling attribution on the device, without requiring a post back URL being setup in the dashboard. Attribution handling is not synchronous, and time to fire these attribution callbacks can vary depending on attribution partner.
The Swrve SDK and Kochava SDK are required to use the below method.
Implement the below Kochava callback methods, with Swrve integrated to send a Swrve user update event directly from the client device.
iOS
- (void)Kochava_attributionResult:(NSDictionary *)attributionResult {
    NSString *referrer = [NSString stringWithFormat:@"%@.%@", attributionResult.network, attributionResult.campaign];
    [[Swrve sharedInstance] userUpdate:@{@"swrve.referrer_id": referrer}];
}
For more information on using the Kochava callback method above, see the Kochava iOS SDK Integration Guide.
Android
@Override
public void handleMessage(Message msg)
{
    String attributionDataString = msg.getData().getString(Feature.ATTRIBUTION_DATA);
    JSONObject attData = new JSONObject(attributionDataString);

    Map<String, String> attributes = new HashMap<String, String>();
    attributes.put("swrve.referrer_id", attData.getString("network") + "." + attData.getString("campaign"));
    SwrveSDK.userUpdate(attributes);
}
For more information on using the Kochava callback method above, see the Kochava Android SDK Integration Guide.
The Swrve SDK must be initialized before attempting to use the userUpdate() method.
Unity
static void AttributionCallback(string data)
{
    // depending on your choice of JSON parsing library...
    JSONObject attribution = new JSONObject(data);
    String referrer = attribution["network"] + "." + attribution["campaign"];

    Dictionary<string, string> attributes = new Dictionary<string, string>();
    attributes.Add("swrve.referrer_id", referrer);
    SwrveComponent.Instance.SDK.UserUpdate(attributes);
}
For more information on using the Kochava callback method above, see the Kochava Unity SDK Integration Guide.
The Swrve SDK must be initialized before attempting to use the UserUpdate() method. Beyond putting Swrve initialization earlier in your code, changing the execution order of the Swrve SDK may be needed if you see null reference errors in your console. In Unity, select Edit > Project Settings > Script Execution Order to select Swrve and put it higher in the execution order.
QA of user acquisition data
There are two recommended ways to review data coming from your attribution partners: by reviewing the User Acquisition Report and by creating referrer-specific segments.
User Acquisition report
This report is updated every 24 hours. If the attribution data has been sent correctly to Swrve more than 24 hours ago, it appears here. To view the User Acquisition report, on the Analytics menu, select User acquisition.
The information provided in the UserDB Downloads is also updated every 24 hours, and contains referrer attribution data that was sent to Swrve more than 24 hours ago. To view this information, on the Analytics menu, select User DB Downloads, and then download the Swrve User Properties CSV file (for more information, see Manually downloading user DBs). This table includes a column for the swrve_referrer_id property, which contains any referrer information that has been properly sent to Swrve.
Referrer-specific segments
If you need to confirm that data that has been sent to Swrve within the last 24 hours, you can confirm this with the Swrve segment tool. You will need to know the name of the network or campaign being sent to Swrve.
First, create a new segment:
- On the Manage menu, select Segments.
- On the Segments screen, select Create Segment.
- Enter the segment Name, and in the Add Filters to Your Segment section, select the Properties tab.
- In the Select Filter Type list, select Referrer ID, contains, and then enter the expected network in the Enter Value field.
- Select Add to save the filter.
- Select Save Segment to save the segment.
After you create the segment, install and launch your app after installing from the referrer network. The Segments screen updates with user information within 15 minutes, so if the attribution data has been received by Swrve with the referrer name you used in the segment filter, DAU for this segment will increase.
Troubleshooting
Swrve treats referrer data like any other user attribute. If it is received, it appears on the User Acquisition report and in the User DB downloads. If it does not appear, either:
- The referrer attribute is being rejected by Swrve due to an incorrect API key, user ID, or app ID.
- The referrer attribute is not being sent to Swrve.
- If you are using a postback URL setup in another tool’s dashboard, check the API key and endpoint where data is being sent. Ensure that this third party tool is collecting the Swrve User ID, to apply this referrer to the user’s profile. In many cases postback URLs will need to be setup in this attribution tool’s dashboard for any new app title your company has.
- Ensure that you are using the name swrve.referrer_id for sending the referrer to Swrve. If the name is misspelled, the referrer details do not appear on the User Acquisition report, and are not included in the available Referrer ID filters on the Engagement tab of the audience builder. To check if the name was misspelled, on the Manage menu, select Segments. Then check for any misspellings under the Properties list.
- Confirm with your third party attribution tool to see if the Terms of Service of your ad network allows re-attribution. In the case of some social networks or ad partners, this transfer of data to another tool is not allowed, and attribution data will appear as “Organic”, “Unknown”, or simply not sent to a third party like Swrve.
- Most partners do not include synchronous user attribution. In other words there is no guarantee that when a user launches the app for the first time, that this user is attributed at this time. This can pose issues when testing whether user acquisition is working or not, as you won’t be able to see the user acquisition details when launching the app on the QA logging page like all other events.
- If all else fails, confirm that the install is being correctly attributed in your third party tool first before being sent to Swrve. You can request logs of the requests being sent to Swrve from your partner to see if this data is being rejected for a reason other than mentioned above, and then contact support@messagegears.com for assistance.