Managing APNs keys and certificates
Swrve uses the Apple Push Notification service (APNs) to send push notifications to iOS devices (iPhone, iPad). To send a push notification to an iOS user, Apple requires an authentication token (.p8 file) or TLS certificate (.p12 file) that you must provide in the Integration settings screen of your app. Swrve now supports using either an authentication token or TLS certificate with APNs.
Once Swrve has a copy of your authentication token or push certificate, we can send messages to your users on your behalf. For more information about managing push notifications in Swrve, see Intro to push notifications.
Using an authentication token (.p8 file)
Apple’s token-based authentication offers a faster way to communicate with APNs than certificate-based connections. There are other advantages to token-based authentication:
- You can use one token to distribute notifications for all of your company’s apps.
- The signing key works for both sandbox and production environments.
- Token signing keys never expire, unlike iOS push certificates.
There are two main steps involved in retrieving a token signing key and uploading it to Swrve:
- Generate the authentication token and download it as a .p8 file.
- Upload the token signing key to Swrve.
Generating the authentication token
To create a private key for APNs, complete the following:
Step 1: In your Apple Developer Account, navigate to Certificates, Identifiers & Profiles
Step 2: In the sidebar, select Keys, and then select add (+).
Step 3: Under Key Description, enter a unique Name for the key.
Step 4: Under Key Services, select APNs, then select Continue.
Step 5: Review the key configuration, then select Confirm.
Step 6: To generate and download the key, select Download. The key is saved as a text file with a .p8 file extension in your Downloads folder.
Uploading token signing keys
Generally, you upload your push key in Swrve when configuring the Integration Settings screen as part of the Swrve onboarding process.
To upload your push key in Swrve:
Step 1: On the Settings menu, select Integration settings. The Apple push notification settings are available under Push Notifications, in the Apple APNS P8 Key section.
Step 2: Select upload new signing key to display the p8 key settings.
Step 3: Select Choose file and then navigate to your saved push key and select it.
Step 4: Enter your app’s Key ID, Team ID, and APNs Topic (App ID / Bundle ID).
Step 5: To use the signing key to send push notifications to your production apps, select Production.
Step 6: To start using the .p8 key to authorize push notifications sent from Swrve, select the Use P8 Key box.
Step 7: Select Upload. After you receive a successful confirmation message, the push key displays in the Apple APNS P8 Key section.
Step 8: Test the push certificate by sending a test push notification to one of your QA devices. To send a test push notification:
- Select your device from the Select QA device list.
- Select Send Test Push.
If you have difficulty uploading a push key, take note of the on-screen feedback provided and consult the following list for more information:
- Credential Format error: This message indicates that Swrve could not parse the p8 file. This may be because the file is not encoded in the expected p8 format.
- APNS Credentials error: This message indicates that the certificate was properly interpreted but was not accepted by Apple’s APNS push system. This could happen for a number of reasons, consult Apple’s documentation for more information.
Using a TLS certificate (.p12 file)
You link the push certificate to the app when you publish the app for distribution – this allows the app to receive push notifications.
There are three main steps involved in retrieving a TLS certificate for your app and uploading it to Swrve:
- If your app is not enabled for push notifications, create a push certificate.
- Export the push certificate to a .p12 file.
- Upload the push certificate to Swrve.
Creating push certificates
To create a push certificate:
Step 1: On the Apple Developer site (https://developer.apple.com/), log on to the Member Center.
Step 2: Select Certificates, Identifiers & Profiles.
Step 3: Select Identifiers in the left-hand navigation, then select App IDs.
Step 4: In the app list, select your app.
If your app is push-enabled but you have not created a certificate, the Push Notifications status shows as Configurable:

If your app is not push-enabled, the status shows as Disabled:

Step 5: If push notifications are disabled, select Edit and enable push notifications.
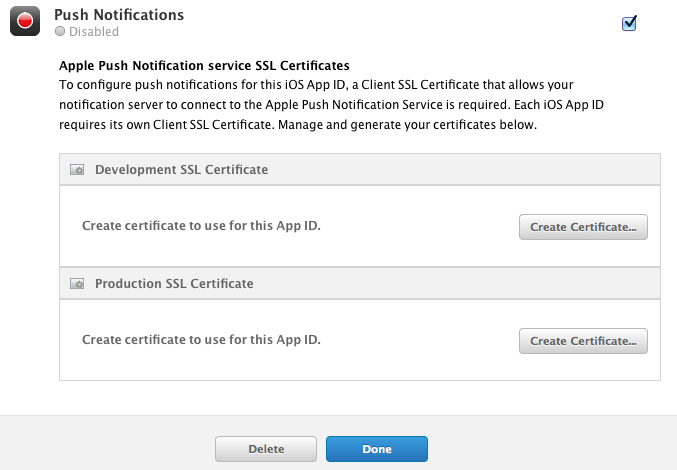
Step 6: Select Create Certificate for the Production SSL Certificate. The screen describes how to generate a Certificate Signing Request which is then passed to Apple to generate the certificate. It is good practice to use the production SSL certificate (even during development) as it is easy to forget to update the certificate at app launch. The summary details how you can work with the production certificate:
- Provision your app with the production certificate.
- Archive your development app for ad-hoc distribution.
- Load the app onto your device.
- Connect the device to Xcode.
- Continue to develop and test.
If you decide to use the Development SSL Certificate (for example, to test your push notifications), ensure that you update the certificate with the production version when you launch your app.
Step 7: To generate a Certificate Signing Request:
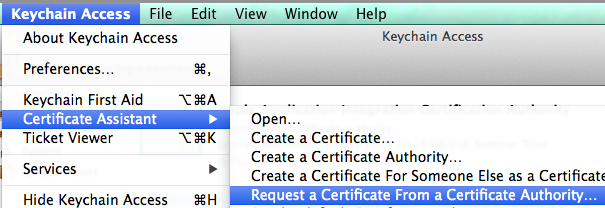
- Open Keychain Access (in the Applications > Utilities sub-folder).
- Navigate to Keychain Access > Certificate Assistant > Request a Certificate From a Certificate Authority.
- Populate the certificate information with your email address. Use your own name for the Common Name. Leave CA Email Address blank and ensure that Saved to disk is selected.
- Select Continue, enter a filename and a destination, and then select Save. This saves the file to the requested location, with an extension .certSigningRequest.
Step 8: Return to the Apple Member Center and select Continue.
Step 9: Select Choose File to upload the .certSigningRequest file.
Step 10: Select Generate to generate your push certificate. A screen is displayed stating that your push certificate is ready.
Step 11: Select Download.
Step 12: In your Downloads folder, locate and double-click the aps_development.cer file.
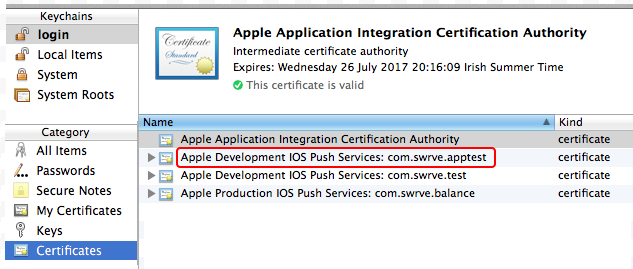
Step 13: Return to your Keychain Access and navigate to the Certificates category of the login keychain to locate the push certificate for your app.
Exporting push certificates
After you create your push certificate and log it with your Keychain Access, export the push certificate to a file:
Step 1: Open Keychain Access (in the Applications > Utilities sub-folder).
Step 2: Navigate to your push certificate in the Certificates category of the login keychain.
Step 3: Right-click the certificate and select Export from the context menu.
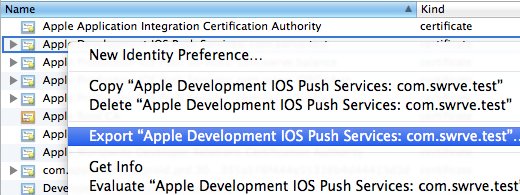
Step 4: Enter an appropriate name for the file, leaving Tags empty and leaving the file format as .p12, and then select Save. You are prompted to encrypt the certificate with a password.
Step 5: Either encrypt the certificate with a password (recommended) or leave it blank.
Step 6: Select OK to export the certificate.
Uploading push certificates
Generally, you upload your push certificate in Swrve when configuring the Integration Settings screen as part of the Swrve onboarding process. iOS push certificates are valid for 12 months and you should replace them annually to avoid interruptions to your push service. You can edit the settings on this screen later on if required.
To upload your push certificate in Swrve:
Step 1: On the Settings menu, select Integration settings. The Apple push notification settings are displayed under Push Notifications, in the Apple APNS Certificate section.
Step 2: Select upload new certificate to display the push certificate settings.
Step 3: Select Choose File and then navigate to your saved development or production push certificate and select it.
Step 4: If you encrypted the push certificate when you saved it, enter the password in the Password field.
Step 5: Select Upload. After you receive a successful confirmation message, the push certificate displays in the Apple APNS Certificate section.
Step 6: Test the push certificate by sending a test push notification to one of your QA devices. To send a test push notification:
- Select your device from the Select QA device list.
- Select Send Test Push.
If you have difficulty uploading a push certificate, take note of the on-screen feedback provided and consult the following list for more information:
- Date Error – APNS certificates are valid for one year from the date they are created and must be changed annually. This notification indicates that the certificate you are trying to upload has an invalid date stamp, where today’s date is not within the certificate’s date range. You may need to create a new certificate.
- Certificate or Password Error – This message indicates that Swrve could not parse the certificate file. This may be because the certificate is not encoded in the expected p12 format, or because the password provided was incorrect. Please retry your upload, paying particular attention to the password you use.
- APNS Certificate Refused Error – This message indicates that the certificate was properly interpreted but was not accepted by Apple’s APNS push system. This could happen for a number of reasons, consult Apple’s documentation for more information.
APNS certificate expiration
iOS push certificates are valid 12 months from the day they are created. When the certificate is due to expire, Swrve attempts to notify you through dashboard notifications and emails. If you encounter these messages, it is important that you act quickly to replace your push certificates as all iOS push notifications, including your scheduled and recurring push notifications, stop functioning once the certificate expires.
You can easily create a new certificate by repeating the steps outlined above.