Unity
Swrve is a single integrated platform that delivers everything you need to drive mobile engagement and create valuable customer relationships on mobile. The Swrve Unity SDK enables your app to use all of the features available. This guide contains all the information you need to integrate the SDK into your app.
Requirements
- Unity must be pre-installed on your development machine. We recommend using the latest version of Unity, but the minimum supported version is Unity 2021.
- A bug exists in certain versions of the Unity Engine (2021 and 2022), which breaks the Swrve SDK. Therefore, Swrve Assets will fail to download. Please ensure you are using a version greater than Unity 2021.1.25f1 or 2022.1.0. This bug does not exist in Unity 2019 or 2020.
- Unity has deprecated the iOS Notifications Services API and we have migrated to the Mobile Notifications Package to ensure support for push notifications in Unity 2022. To use push notifications on Unity iOS, you must now install the package.
- The App ID and API Key for your app. This information is available in Swrve on the Integration Settings screen (on the Settings menu, select Integration settings).
Supported platforms
- Android
- iOS (iPhone and iPad only)
iOS 10 and above are supported, as well as Android level 16 and above. The SDKs will handle on older versions of the OS with a dummy SDK.
Installing the SDK
Swrve has an open-source SDK repository. There are two options for downloading the latest public Swrve Unity SDK:
- Download the SDK from the GitHub public repository.
- Download a .zip file of the latest Unity SDK.
Amazon SDK dependency
If compiling the Amazon-flavored SDK for Unity from source, it is necessary to also download the Amazon SDK from the Amazon Developer portal to get the Amazon Device Messaging (ADM) jar support file (amazon-device-messaging-1.0.1.jar). Add the ADM jar file to your project in the appropriate folders (normally native/android/SwrveSDKPushSupport/providedLibs/). NOTE: Never put the JAR inside Assets/Plugins/Android, if you do then it will always complain about stub implementations even when running on an Amazon device.
The corresponding project build.gradle files refer to the jar file using the “provided” directive, which, when combined with the Amazon flavor SDK, becomes amazonProvided as follows:
dependencies {
    amazonProvided files('providedLibs/amazon-device-messaging-1.0.1.jar')
}
The providing directive tells the library or plugin to compile against the jar but not include the class implementations. They are simply stub implementations and will fail if actually executed. The runtimes exist on the Kindle device.
Initializing the SDK
To initialize the SDK, complete the following steps:
Step 1: Unzip the Unity SDK, Depending on the intended messaging service your project will use, import the following:
Firebase – To integrate the Firebase-flavored SDK, import the Swrve.unityPackage into your project
Amazon – To integrate the Amazon-flavored SDK, import the SwrveAmazon.unityPackage into your project instead. The SwrveAmazon.unityPackage differs from the Swrve.unityPackage in that it contains a different ADM version of the SwrveSDKPushSupport Android plugin and doesn’t include Firebase support plugins.
Step 2: Add the SwrvePrefab component to your scene and Initialize the Swrve component in a global script and call the .Init() function from the Start() of that script. Replace <app_id> and <api_key> with your app ID and API key.
using SwrveUnity;

public class GlobalScriptInitialisation : MonoBehaviour
{
    void Start()
    {
        SwrveConfig config = new SwrveConfig();
        // To use the EU stack, include this in your config.
        // config.SelectedStack = SwrveUnity.Stack.EU;

        #if PRODUCTION_BUILD
        SwrveComponent.Instance.Init(<production_app_id>, "<production_api_key>", config);
        #else
        SwrveComponent.Instance.Init(<sandbox_app_id>, "<sandbox_api_key>", config);
        #endif //PRODUCTION BUILD
    }
}
Step 3: By default, the Android Push Provider is Firebase Cloud Messaging. For Amazon, set the Config-> AndroidPushProvider value to AMAZON_ADM and set the Config-> AppStore to amazon.
You can now compile and run your project in Unity.
Step 4: Go to Edit > Project Settings > Script Execution Order and move the global script containing the SwrveComponent to a higher priority in the list. This prevents you from getting a NullReferenceException that can occur if Swrve is called before the SDK has finished initializing.
Step 5: Create or modify your Plugins/Android/AndroidManifest.xml file so the SDK native code is called on Application launch by setting a custom Application class (for more information about AndroidManifest.xml on Unity, see the Unity documentation for Android Manifest):
<?xml version="1.0" encoding="utf-8"?>
<manifest xmlns:android="http://schemas.android.com/apk/res/android">
    <application android:icon="@drawable/app_icon" android:label="@string/app_name" android:theme="@style/UnityThemeSelector" android:debuggable="true" android:isGame="true" android:banner="@drawable/app_banner" android:name="com.swrve.sdk.SwrveUnityApplication">
    </application>
</manifest>
From Unity 7.1 the SDK will prompt you to generate one of these AndroidManifest.xml files for your Plugins/Android/ directory when running Android PreBuild from the Swrve menu options in the Unity Editor.
Alternatively, you can call the following method from your custom Application class inside the onCreate method:
SwrveUnityCommon.onCreate(this);
Reducing app size or excluding features
By default, the Swrve.unityPackage now includes all native plugins. If you want to reduce the size of your app or exclude certain features, refer to the following sections.
Remove push libraries in Android
To remove Firebase Cloud Messaging (FCM) or push from your Android build, you can remove the following files from Assets/Plugins/Android:
- com.google.firebase.*
- SwrveSDKPushSupport
Manage how you track user behavior
Swrve provides the following APIs to help you manage how you track user activity across app sessions and multiple devices.
- Identify – Makes a call to Swrve to determine if the current user has an existing Swrve user ID, by checking to see if the external user ID they provide is already linked to a known user ID in Swrve.
- Stop tracking – Stops all tracking of the current user’s activity. After this call is made, the SDK runs silently in the background and does not track user activity again until you call the
IdentifyorStartAPI. - Start – Resumes tracking user activity after you call the
StopTrackingAPI.
This section explains how to use these APIs to manage how you track anonymous users, known users (that is, a user logs in and the SDK identifies them based on an external user ID), and users for whom you want to stop tracking activity (for example, a user logs out). For more information on how to identify users and then track and target them safely across multiple devices, platforms, and channels, see Tracking your users with Swrve User Identity.
External user ID
The external user ID is a non-discoverable key that identifies your user across multiple channels and platforms. To ensure app security, Swrve does not accept email or other personally identifiable information (PIIs) as the external user ID and rejects them on the server side. Before you implement the Identify service, please consult with your CSM at support@swrve.com for some guidance on best practices to follow in your integration.
The external user ID should always be unique to each user. Using a shared external user ID across users may have adverse consequences on user segmentation, reporting, audiences, and QA device behavior.
Identify pre-existing users
Use the Identify API to find pre-existing user identities that an app has logged, either on a single device or multiple devices. To use the Identify API, initialize the SwrveComponent in a global script as normal:
SwrveConfig config = new SwrveConfig();
SwrveComponent.Instance.Init(<app_id>, "<api_key>", config);
Create and define some custom callbacks that will be called on either a successful or unsuccessful Identify call:
// Custom success callback
private void OnIdentifySuccessCallback(string statusCode, string swrveId)
{
// Successful, continue with your logic
}

// Custom error callback
private void OnIdentifyErrorCallback(long httpErrorcode, string errorMessage)
{
// Error should be handled
}
When you are ready, call the Identify API with your external user ID and above callbacks:
SwrveComponent.Instance.SDK.Identify("<external_user_id>", OnIdentifySuccessCallback, OnIdentifyErrorCallback);
If the call fails, the user’s activity is not linked to an existing user ID in Swrve’s backend system, which might affect reporting and audiences where the user is logging in on multiple devices. We recommend not queuing or sending events after calling Identify until the Identify call completes.
Delay tracking activity until user is identified
By default, once the SDK initializes it automatically starts tracking user activity. If you use the Identify API on its own, when a user first installs the app, Swrve tracks any activity that takes place prior to calling the Identify API as anonymous. For subsequent sessions, it attributes activity to the last known user.
To delay tracking until you’ve identified the user, use the AutoStartLastUser configuration property. If you set AutoStartLastUser to false, the SDK does not start tracking until you identify the user. Use this option if you do not want to track any anonymous user activity.
using SwrveUnity;

public class GlobalScriptInitialisation : MonoBehaviour
{
    void Start()
    {
        SwrveConfig config = new SwrveConfig();
        config.AutoStartLastUser = false;
        SwrveComponent.Instance.Init(<app_id>, "<api_key>", config);
    }
}

// Later at a certain point in your app when you want to start the SDK
SwrveSDK.identify("<external_user_id>")
If you set the AutoStartLastUser configuration property to false, the SDK:
- Only tracks user activity once you call the
IdentifyAPI. - Does not automatically start tracking user activity if the app cannot call the
StopTrackingAPI for some reason (for example, if the user hard-closes the app before theStopTrackingAPI call is complete). - Does not display in-app message campaigns that are linked to a push notification.
- Attributes push notification engagement metrics to the last user the SDK was tracking.
To check if the SDK is started before calling regular APIs when AutoStartLastUser is false, use the SwrveSDK.IsStarted API.
Stop tracking user activity
As of Unity SDK version 8.1.0, it is possible to stop the SDK from tracking user activity and logging events. To stop tracking the current user’s activity, call the StopTracking API:
SwrveComponent.Instance.SDK.StopTracking();
After you call the StopTracking API, the SDK:
- Disables most APIs and returns empty strings or null objects as defaults.
- Does not start tracking user behavior again until you call the
StartorIdentifyAPI. - Continues to display push notifications, except those you restrict to display only for identified users. The SDK attributes engagement metrics to the last user the SDK was tracking.
- Does not display in-app message campaigns, including those that are linked to a push notification.
- Continues to process background app updates.
Resume tracking user activity
To resume tracking after you call the Stop API, call the Start or Identify API:
SwrveComponent.Instance.SDK.Start();
If you call the Start API, by default the SDK resumes tracking against the last known user ID. If you don’t want to assume it’s the same user, call the Identify API.
Custom Swrve user ID
If your integration uses a custom Swrve user ID, there are additional steps you need to take to manage the SDK intitialization and user activity tracking. For more information, contact your CSM at support@swrve.com.
Push notifications
Swrve’s push notification campaigns enable you to send personalized messages to your app users while they’re outside of your app or to send silent background app updates. Swrve Push Notifications are available for iOS and Android. For more information, see Intro to push notifications.
Push notifications are disabled by default. To enable them, complete the following steps:
SwrveConfig object must occur before calling SwrveComponent.Instance.Init.Step 1: Enable push notifications in the SwrveConfig object. Select the relevant tab for the platforms or devices your app supports.
iOS
config.PushNotificationEnabled = true;
Android: Firebase
config.PushNotificationEnabled = true;
Android: Amazon
config.PushNotificationEnabled = true;
#if UNITY_ANDROID
config.AndroidPushProvider = AndroidPushProvider.AMAZON_ADM;
// Amazon flavor uses the same configuration properties as FCM
#endif // UNITY_ANDROID
Step 2: Configure the push notification permission request.
- For Unity Android, set the targetSdk to at least API Level 33 to ensure the permission prompt is not displayed upon install for Android users.
- The
SwrveConfig.PushNotificationPermissionEventsAPI captures a HashSet of string event names. Configure the API with a list of special event names to trigger the prompt:HashSet<string> pushNotificationPermissionEvents = new HashSet<string>(); pushNotificationPermissionEvents.Add("custom_event"); config.PushNotificationPermissionEvents = pushNotificationPermissionEvents; - When a user triggers one of the events, the SDK attempts to display the permission prompt.
Step 3: If you want to perform custom processing of the push notification payload, create the following class and add this code to the SDK initialization:
public class CustomPushNotificationListener : ISwrvePushNotificationListener {

#if UNITY_IPHONE
    public void OnRemoteNotification(Unity.Notification.iOS.iOSNotification notification) {
        // Custom code here
    }
#endif // UNITY_IPHONE

#if UNITY_ANDROID
    public void OnNotificationReceived(Dictionary<string, object> notificationJson) {
        // Code to process received push notifications
    }

    public void OnOpenedFromPushNotification(Dictionary<string, object> notificationJson){
        // Code to process opened push notifications
    }
#endif // UNITY_ANDROID

}
config.PushNotificationListener = new PushNotificationListener();
If you would like to use a custom key-value pair with a notification, for example, to reward a user with points or a new tier, it would make sense to use the Custom Push Notification listener:
public class CustomPushNotificationListener : ISwrvePushNotificationListener {

#if UNITY_IPHONE
    public void OnRemoteNotification(Unity.Notification.iOS.iOSNotification notification)
    {
        if (notification.UserInfo.Contains("tier_status"))
        {
            string tier = notification.userInfo["tier_status"] as string;
            rewardMethod(tier);
        }
    }
#endif // UNITY_IPHONE

#if UNITY_ANDROID
    public void OnNotificationReceived(Dictionary<string, object> notificationJson) {
        // this *should* be called when the notification is received,
        // whether the app is open or not
    }

    public void OnOpenedFromPushNotification(Dictionary<string, object> notificationJson){
        // Use any custom key-value from the notification JSON here
        if (notificationJson.ContainsKey("tier_status")) {
            string tier = notificationJson["tier_status"] as string;
            // Call your own code here
            rewardMethod(tier);
        }
    }
#endif // UNITY_ANDROID

}
Step 4: Follow the platform specific steps below for iOS, Android and Amazon.
Platform-specific steps for iOS
Provisional authorization for push
In iOS 12, Apple added a feature for provisional authorization of push notifications. This feature enables you to send push notifications as soon as a user opens your app for the first time, without requiring the user to opt-in. The notification is delivered directly to the device’s Notification Center and when the user views the notification, the message automatically includes a built-in prompt asking if they want to continue to receive notifications.
By default, the Swrve SDK requests full push permission the first time the user launches your app. To implement provisional authorization, set different events for both the provisional and full authorization in your SDK configuration.
HashSet provisionalPushNotificationEvents = new HashSet();
provisionalPushNotificationEvents.Add("custom_event");
config.ProvisionalPushNotificationEvents = provisionalPushNotificationEvents;
Creating and uploading your iOS certificate
To enable your app to send push notifications to iOS devices, you require a push certificate. A push certificate authorizes an app to receive push notifications and authorizes a service to send push notifications to an app. For more information, see How do I manage iOS push certificates?
Provisioning your app
Each time your app is published for distribution, you must provision it against the push certificate that has been created for the app.
Adding a service extension
To display rich push notifications in your app and track the delivery of those push notifications, iOS uses a notification service app extension. You must add a notification service extension to make use of the following SDK features:
-
- Rich media options, including custom response buttons. Rich push notifications are available in iOS SDK versions 4.11 and above.
- Push notification delivery. As of version 6.4, the Swrve iOS SDK automatically tracks and logs when a push notification is delivered to the device.
This section describes how to add a service extension to your app. It also covers how to add an app group to handle tracking delivery and influenced users of rich push notifications and how to process notification responses, if required.
Creating a notification service extension
The Unity SDK generates an app extension in Xcode as part of the iOSPostProcess.cs class, using the PlayerSettings.ApplicationIdentifier (formerly PlayerSettings.bundleIdentifier in earlier Unity versions) and PlayerSettings.iOS.appleDeveloperTeamID to generate and certify the bundle. To ensure maximum compatibility and ease of use, please ensure you have set the app bundle identifier. To view the bundle identifier in a standard Unity 2017.1 project, on the Edit menu, select Project Settings, then select Player. Ensure you set both the Bundle Identifier and Team ID.

On iOS 10, there is an intermittent issue with notification service extensions where, in some debugging instances, the rich media attachment is not displayed. This is a common issue that has been raised with Apple, but should not affect the production version
If you are managing provisioning profiles for your app, you must create one for your service extension as well.
Adding an app group to your service extension
Complete the steps in this section to make use of the following SDK features:
- Influenced metrics for rich notifications and background (silent) updates. Influenced reporting is useful for seeing how many of your users who didn’t interact directly with a push notification later opened the app in a certain window after receiving the notification. Influenced reporting is available in iOS SDK versions 4.10 and above.
- Push notification delivery. As of Swrve Unity SDK version 7.1.0, Swrve automatically tracks and logs when a push notification is delivered to the device.
To track delivery of and influence from rich media push notifications or background (silent) updates, the application needs to share stored information with the service extension. An app group enables the service extension to save and load the delivered and influenced data to a shared container that the main app can access on startup. Provide a iOSAppGroupIdentifier key that the SDK will use in the postprocess.json file.
To add an app group
To add an app group and specify the iOSAppGroupIdentifier key:
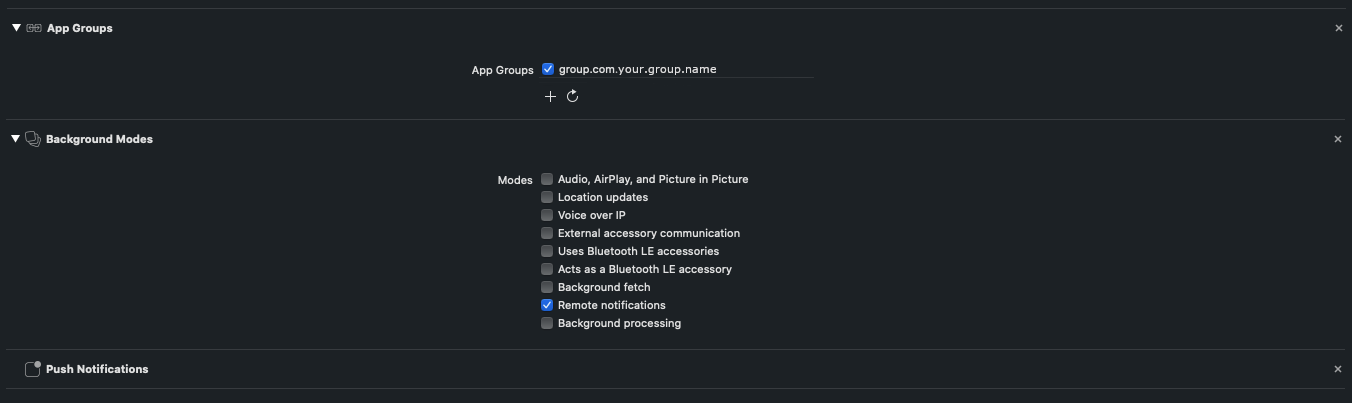
Step 1: In the Apple Developer portal, create a new App Group. Enter the description and name as group.BundleID (the BundleID is the same as the PlayerSettings.ApplicationIdentifer).
Step 2: On the portal, go to your app ID for your main app, add the App Group capability and select your new App Group in the checkbox provided.
When you check the Application Services on the portal, App Groups should be enabled.

Step 3: Repeat the above step for the app extension.
Step 4: If your provisioning profiles are not handled by Xcode, you will need to regenerate them as adding an app groups will make them invalid. For example:

Select the profile, select Edit and then select Generate. It is not necessary to make a new provisioning profile, as the status will change to Valid after you select Generate.
Step 5: Add the following key and app group identifier (that you created in Step 1) to the postprocess.json file located in unity3d/Assets/Swrve/Editor directory of the SwrveSDK.
"iOSAppGroupIdentifier": "group.com.your.group.name"
Step 6: Build your Unity project for iOS. In the resulting Xcode project, you should see a new target for the service extension and the app group set in the capabilities section. Ensure that the provisioning profiles and capabilities are set correctly.
Step 7: Run the application.
Send a rich push notification to your QA device, do not interact with it but open the app directly and you should see influenced events coming in to your reporting. (Test push notifications have the ID of 0).
Required Xcode Capabilities
When using the push service, you must enable the Push Notifications capability in the main target of your generated Xcode project.
Push delivered and influenced events
To track push delivery and influenced events, you must also add the following capabilities to your project target:
- App Groups – select the relevant app group name.
- Background Modes – select Remote Notifications.
iOS notification categories
The Swrve Unity SDK uses the UserNotifications.framework introduced in iOS 10. This requires the use of the new UserNotifications objects provided by Apple. In the SwrveSDK, we have added a new class to handle UNNotificationCategories, which can be grouped as a list and passed into the new SwrveConfig property notificationCategories. If you still want to support pre-iOS 10 notifications, you can still make UIUserNotificationCategories and pass them into pushCategories as you did before. They have not been affected.
config.NotificationCategories = List<UNNotificationCategories>();
config.PushCategories = List<UIUserNotificationCategories>();
Swrve includes a C# version of the notification categories defined by Apple. For more information on each individual function, please see the Apple UNNotification Category documentation.
Platform-specific steps for Android
Unity Android uses a native Android plugin provided as part of the Unity SDK located under Assets/Plugins/Android/.
By default, the config-> AndroidPushProvider value is set to GOOGLE_FIREBASE. If you are using Amazon Device Messaging (ADM), use AMAZON_ADM.
Unity does not automatically replace the ${applicationId} with your app’s package name. To do that we offer a tool in the menu Swrve-> Android Prebuild in AndroidManifests. You can also manually replace the value with the package name of your app.
Firebase Cloud Messaging
Complete the following steps:
Step 1: Use one of our GitHub samples or create an Android Library project that will generate an .aar file.
Step 2: Add or edit the following file with the correct details extracted from your Firebase Console under src/main/res/values/values.xml:
<?xml version="1.0" encoding="utf-8"?>
<resources>
    <!-- Required for the Firebase plugin to connect to the correct configuration -->
    <!-- https://developers.google.com/android/guides/google-services-plugin -->
    <string name="gcm_defaultSenderId" translatable="false">YOUR_SENDER_ID</string>
    <string name="google_app_id" translatable="false">YOUR_APP_ID</string>
    <string name="google_api_key" translatable="false">YOUR_GOOGLE_API_KEY</string>
    <string name="project_id" translatable="false">YOUR_PROJECT_ID</string>
</resources>
Step 3: Build the project into an .aar or .jar and place it under your project’s Assets/Plugins/Android.
Using a custom FCM push receiver
If you are already using push notifications, follow the MultipleFCMProviders GitHub sample to integrate Swrve’s push notification functionality along with your other providers.
No custom Main Activity
If you don’t provide a custom MainActivity, point to Swrve’s MainActivity in your AndroidManifest.xml that resides :
Firebase
<activity android:name="com.swrve.unity.firebase.MainActivity"
          android:label="@string/app_name">
    <intent-filter>
        <action android:name="android.intent.action.MAIN" />
        <category android:name="android.intent.category.LAUNCHER" />
    </intent-filter>
    <meta-data android:name="unityplayer.UnityActivity" android:value="true" />
</activity>
Amazon
<activity android:name="com.swrve.unity.adm.MainActivity"
          android:label="@string/app_name">
    <intent-filter>
        <action android:name="android.intent.action.MAIN" />
        <category android:name="android.intent.category.LAUNCHER" />
    </intent-filter>
    <meta-data android:name="unityplayer.UnityActivity" android:value="true" />
</activity>
Custom Main Activity
If you have a custom MainActivity, call the following functions onCreate and onResume:
Firebase
public class CustomMainActivity extends UnityPlayerActivity {
    @Override
    protected void onCreate(Bundle arg0) {
        super.onCreate(arg0);
        com.swrve.unity.firebase.MainActivity.processIntent(
            getApplicationContext(),
            getIntent()
        );
    }

    @Override
    protected void onResume() {
        super.onResume();
        com.swrve.unity.firebase.MainActivity.processIntent(
            getApplicationContext(),
            getIntent()
        );
    }
}
Amazon – Replace any instances of firebase with adm
public class CustomMainActivity extends UnityPlayerActivity {
    @Override
    protected void onCreate(Bundle arg0) {
        super.onCreate(arg0);
        com.swrve.unity.adm.MainActivity.processIntent(
            getApplicationContext(),
            getIntent()
        );
    }

    @Override
    protected void onResume() {
        super.onResume();
        com.swrve.unity.adm.MainActivity.processIntent(
            getApplicationContext(),
            getIntent()
        );
    }
}
Advanced Android push
This section describes how to configure advanced options for Unity SDK push notification integration.
Using custom icons
To change the icon for push notifications and your app, place a file called app_icon.png under Assets/Plugins/Android/res/drawable/. You can also provide multiple resolutions for the same asset. Please consult the Android documentation on how to do so.
You can also specify the resource to be used for the normal and Material icon with the following configuration properties
#if UNITY_ANDROID
// Optional configuration
config.AndroidPushNotificationIconId = "ic_launcher";
config.AndroidPushNotificationMaterialIconId = "ic_launcher_material";
config.AndroidPushNotificationLargeIconId = "ic_launcher_material";
config.AndroidPushNotificationAccentColorHex = "#000000"; // Black color
#endif // UNITY_ANDROID
Configuring Android O notification channels
With Android O, Google has introduced the concept of notifications channels. As of Swrve Unity SDK 4.11+, you can configure your default Android O channel. To do so, create an AndroidChannel and set it before initializing the SDK in your SwrveConfig object:
config.DefaultAndroidChannel = new AndroidChannel("id", "name", AndroidChannel.ImportanceLevel.Default);
Using custom sounds
You can send push notifications with custom sounds. To do so, place your custom sound under Assets/Plugins/Android/res/raw and set your sounds in the Swrve service. For more information about adding custom sounds in Swrve, see Intro to push notifications.
Platform-specific steps for Amazon
Application signing
If you do your own application signing, you need to add the Amazon api_key.txt to the Android plugins folder of your project. To get this key from Amazon, follow this guide on Obtaining Amazon Device Messaging Credentials.
Copy your Amazon api_key.txt file to unity folder Assets/Plugins/Android/assets.
Note the keystore and password relate to those used in PlayerSettings (Android) > Publishing Settings > Keystore > Browse Keystore.
Amazon namespace
As of version 5.4.+, Unity does not automatically include non-Android namespaces (xmlns:) and their elements from plugin manifests in the final Unity-generated APK Android manifest. You need to manually add the Amazon namespace and enable-feature element to the root manifest in Assets/Plugins/Android.
<?xml version="1.0" encoding="utf-8"?>
<manifest
    ...
    xmlns:amazon="http://schemas.amazon.com/apk/res/android"
    ...>
    <application>
 ...
        <amazon:enable-feature
            android:name="com.amazon.device.messaging"
            android:required="true" />
       ...
  </application>
</manifest>
If you don’t have a root manifest, the default debug Unity manifest looks like the following as of Unity version 5.4.1 (including the Amazon modifications). You would also need to alter the activity name to point to either a custom Main activity or the Swrve Main activity (see the previous Android sections for details).
<?xml version="1.0" encoding="utf-8"?>
<manifest
    xmlns:android="http://schemas.android.com/apk/res/android"
    xmlns:amazon="http://schemas.amazon.com/apk/res/android"
    package="com.swrve.unity.amazon"
    android:installLocation="preferExternal"
    android:versionName="3.5"
    android:versionCode="1">
    <uses-sdk android:minSdkVersion="10" android:targetSdkVersion="23" />
    <supports-screens
        android:smallScreens="true"
        android:normalScreens="true"
        android:largeScreens="true"
        android:xlargeScreens="true"
        android:anyDensity="true" />
    <application
        android:theme="@style/UnityThemeSelector"
        android:icon="@drawable/app_icon"
        android:label="@string/app_name"
        android:debuggable="true">
        <amazon:enable-feature
            android:name="com.amazon.device.messaging"
            android:required="true" />
        <activity
            android:name="com.unity3d.player.UnityPlayerActivity"
            android:label="@string/app_name">
            <intent-filter>
                <action android:name="android.intent.action.MAIN" />
                <category android:name="android.intent.category.LAUNCHER" />
            </intent-filter>
            <meta-data android:name="unityplayer.UnityActivity" android:value="true" />
        </activity>
    </application>
</manifest>
Creating and entering the Amazon Client ID and Client Secret
To enable your app to send push notifications to Amazon devices, you need the Client ID and Client Secret for your app. For information on how to get these credentials, see Obtaining Amazon Device Messaging Credentials.
Generally, you enter the Client Id and Client Secret on the Swrve dashboard when configuring the Integration Settings as part of the Swrve onboarding process. You can edit the settings on this screen later on if required.
Step 1: On the Settings menu, select Integration settings.
Step 2: Under the Push Notifications section, in the Amazon Device Messaging Service section, enter your Client Id and Client secret.
Step 3: Test the server key by sending a test push notification to one of your QA devices. To send a test push notification:
- Select your QA device from the list of available devices.
- Select Send Test Push.
Configuring silent notifications
To enable silent push notifications in your app, complete the following steps for the relevant platform.
Android (FCM and ADM)
Step 1: If using FCM you can use the same Android Library project from before that will generate an .aar. If using Amazon, you will need to make an Android Project that outputs an .aar file before moving on to step 2.
Step 2: Create a BroadcastReceiver class to listen to the Swrve Silent Push payload:
package com.yourpackage;

import android.content.BroadcastReceiver;
import android.content.Context;
import android.content.Intent;
import org.json.JSONException;
import org.json.JSONObject;
import com.swrve.sdk.SwrvePushConstants;

public class SwrveSilentPushBroadcastReceiver extends BroadcastReceiver {
    @Override
    public void onReceive(Context context, Intent intent) {
        // Obtain the Swrve payload
        Bundle bundle = intent.getExtras();
        if (bundle != null) {
            // Parse the Swrve payload into a JSONObject
            String payloadJson = bundle.getString(SwrvePushConstants.SILENT_PAYLOAD_KEY);
            JSONObject json = new JSONObject();
            if (payloadJson != null) {
                try {
                    json = new JSONObject(payloadJson);
                } catch (JSONException e) {
                    SwrveLogger.e("Could not parse silent push payload");
               }
            }

            // NOTE: Do not call the SDK from this context
            // Your code here
        }
    }
}
Step 3: Build your project and copy the .aar file from outputs into Plugins/Android. If you have already made an .aar for FCM previously, you can replace that with this one as it will have all the same credentials in its values.xml file.
Step 4: Add a reference to the BroadcastReceiver in your AndroidManifest.xml in Plugins/Android:
<manifest ...>
    <application ...>
        <receiver android:name="com.yourpackage.SwrveSilentPushBroadcastReceiver"
        android:exported="false">
            <intent-filter>
                <action android:name="com.swrve.SILENT_PUSH_ACTION" />
            </intent-filter>
        </receiver>
    </application>
</manifest>
iOS
Step 1: In your Plugins/iOS folder, create a file called SwrveSilentPushListener.h:
/*! Silent push listener. */
@interface SwrveSilentPushListener : NSObject
+(void)onSilentPush:(NSDictionary*)userInfo;
@end
Step 2: In your Plugins/iOS folder, create a file called SwrveSilentPushListener.mm:
#import "SwrveSilentPushListener.h"

@implementation SwrveSilentPushListener
+(void)onSilentPush:(NSDictionary*)userInfo
{
    // NOTE: Do not call the Swrve SDK from this context

    // Your code here
}
@end
In-app messages and Conversations
Swrve’s in-app messages and Conversations campaigns are available by default. Conversations require a few extra steps to set up—see the following section for instructions. These features enable you to send personalized messages to your app users while they’re using your app. For more information, see Intro to in-app messages and Intro to Conversations.
To test in-app messages or Conversations in your app, you need to first create the campaign in Swrve. For more information, see Creating in-app messages and Creating Conversations.
Unity has no understanding of an active window state, therefore you must include code to pause the app when an in-app message is displayed and resume it as soon as it is closed.
class CustomMessageListener : ISwrveMessageListener {
    public void OnShow (SwrveMessageFormat format) {
        // Pause app, disable clicks on other UI elements

        // Optionally: custom message display (for example: transparent background)
        // format.Message.BackgroundAlpha = 0f;
    }
    public void OnShowing (SwrveMessageFormat format) {
        // Message displaying, UI elements must continue to be disabled
    }
    public void OnDismiss (SwrveMessageFormat format) {
        // Resume app and clicks in other UI elements
    }
}
SwrveInAppMessageConfig inAppConfig = new SwrveInAppMessageConfig();
inAppConfig.MessageListener = new CustomMessageListener();
config.InAppMessageConfig = inAppConfig;
Conversations campaigns
Conversations campaigns in Unity Android and Unity iOS use native code. To enable them correctly, follow the below integration steps.
Android
The SDK uses the AAR libraries shared with the native Android SDK. These are distributed as AAR and expanded AAR files within .unityPackage.
Replace ${applicationId} in the libraries with your application ID. Even the latest version of Unity doesn’t support modern features from Android, such as the use of ${applicationId} in AndroidManifest.xml files. Due to this, any Swrve plugins that contain ${applicationId} are set up as an Android Library Project Folder in Unity, and before building for Unity, you must run SwrveBuildComponent.AndroidPrebuild(), which replaces ${applicationId} with your project’s bundle ID. If you’re running continuous integration (CI) builds, it’s best to call this before every Android build.
There is also a helper menu item to do this: Swrve -> Android Prebuild in AndroidManifests.
If you encounter problems while building for Android, it’s most likely due to packaging issues around the AAR files. Use the latest version of Unity to fix these issues.
Beware that if your builds have different application IDs, you will have to rerun this process.
In-app message and Conversation deeplinks
When creating in-app messages and Conversations in Swrve, you can configure message buttons to direct users to perform a custom action when clicked. For example, you might configure a button to direct the app user straight to the app store to provide a rating.
Swrve’s default deeplink behavior is to treat custom actions as URLs, therefore use your existing custom URL scheme. Custom URL schemes need to be configured on a per-platform basis.
- iOS – Apple Custom URL scheme documentation
- Android – Custom URL schemes are defined in your
AndroidManifest.xml
If you would like to process the custom action completely on your own, you must add a custom listener to the Swrve SDK before its initialization.
In-app message custom actions
For in-app messages, it is also possible to override this behavior of treating custom actions as URL deeplinks and integrate custom actions to direct users to a sale, website or other target when they click on an in-app message. Use the following callback:
private class CustomButtonListener : ISwrveCustomButtonListener {
    public void OnAction (string customAction) {
        // Custom button logic
    }
}
SwrveInAppMessageConfig inAppConfig = new SwrveInAppMessageConfig();
inAppConfig.CustomButtonListener = new CustomButtonListener();
config.InAppMessageConfig = inAppConfig;
For example, to send Swrve events using custom actions, add a customButtonCallback like this:
private class CustomButtonListener : MonoBehaviour, ISwrveCustomButtonListener
{
    private IEnumerator DelayedNamedEvent(string eventName, Dictionary<string, string> payload = null) {
        yield return new WaitForEndOfFrame();
        SwrveComponent.Instance.SDK.NamedEvent(eventName, payload);
    }

    private void HandleDeeplink(string deeplink) {
        try {
            Uri uri = new Uri (deeplink);
            if (uri.Scheme == "swrve") {
                NameValueCollection query = new NameValueCollection();
                foreach (string vp in Regex.Split(uri.Query.TrimStart ('?'), "&")) {
                    string[] singlePair = Regex.Split(vp, "=");
                    if (singlePair.Length == 2) {
                        query.Add(singlePair[0], singlePair[1]);
                    }
                    else {
                        query.Add(singlePair[0], string.Empty);
                    }
                }

                string eventString = query.Get("event");
                if (!string.IsNullOrEmpty(eventString)) {
                    StartCoroutine(DelayedNamedEvent(eventString));
                }
            }
            else {
                Application.OpenURL(deeplink);
            }
        }
        catch(UriFormatException exception) {
            // log bad uri
        }
    }

    public void OnAction (string customAction) {
        // Custom button logic
        HandleDeeplink(customAction);
    }
}
In-app message text
If required, set the default color of the font, background, and text of your buttons and text boxes via the Swrve Config. In the absence of these settings, the SDK defaults to a transparent background, black text color, and default system font of the OS. Currently, this styling applies to all text that’s displayed.
The font must be provided as part of your resources.
SwrveInAppMessageConfig inAppConfig = new SwrveInAppMessageConfig();
    inAppConfig.PersonalizedTextBackgroundColor = Color.red;
    inAppConfig.PersonalizedTextForegroundColor = Color.yellow;
    inAppConfig.PersonalizedTextFont = Resources.GetBuiltinResource(typeof(Font), "Papyrus.ttf") as Font;
    inAppConfig.DefaultBackgroundColor = Color.green;
Embedded campaigns
Swrve’s embedded campaigns give you complete control over how you deliver, handle, and display content on your app, while still letting you use our powerful audience targeting and event triggering system to deliver the campaign. This opens up scenarios where you can deliver JSON to your application, targeted to specific users, triggered by specific situations, like a campaign, and then use this JSON to custom render a visual in your own application code. For more information see Embedded campaigns.
The Swrve SDK has direct access to the most recent version of the realtime user properties values in Swrve. When your app makes an embedded campaign callback, the contents of the personalizationProperties argument in the embedded message include the realtime user properties retrieved during the process of triggering the campaign.
To implement embedded campaigns in your integration, pass the SwrveEmbeddedMessageConfig config object prior to initialization. To use Swrve’s tracking, holdout groups, and personalization, there are methods you can call within the SwrveEmbeddedListener. Use these methods to send impression and click events for your own embedded campaigns and use Swrve’s targeting, segmentation, and goal tracking. For example:
class CustomEmbeddedMessageListener : ISwrveEmbeddedListener
{
  public void OnMessage(SwrveEmbeddedMessage message, Dictionary<string, string> personalizationProperties, bool isControl)
  {
     if (isControl) {

          // this campaign should not be shown to user, to help with reporting you should use the api below
         // to send an impression event
         SwrveComponent.Instance.SDK.EmbeddedControlMessageImpressionEvent(message);

    } else {

      // if you have applied personalization to your embedded campaign
      // returns the message data with personalization resolved. It will be null if it could not resolve.
      string resolvedMessageData = sdk.GetPersonalizedEmbeddedMessageData(embeddedMessage,    personalizationProperties);

      // if you want to track an impression event
      SwrveComponent.Instance.SDK.EmbeddedMessageWasShownToUser(message);

      // The message object returns a list of strings representing the button options.
      // In this example we are taking out the first button from the list and sending a click event
      string buttonName = message.getButtons().First();
      SwrveComponent.Instance.sdk.EmbeddedMessageButtonWasPressed(message, buttonName);
    }
  }
}
Events
The Swrve SDK automatically sends certain events and also enables you to track user behavior by sending custom events. (For a list of default Swrve events, see Segment and audience filters, Events.) In turn, you can use app-generated events to trigger in-app messages, while both app- and server-generated events help you define segments and perform in-depth analytics.
Custom events
To send a custom event, include the below example in a method where you want to send an event to Swrve.
SwrveComponent.Instance.SDK.NamedEvent("custom.event_name");
Requirements for sending custom events:
- Do not send the same named event with different case. For example, if you send
tutorial.start, then ensure you never sendTutorial.Start. - Use a period (.) in your event names to organize their layout in the Swrve dashboard. Each ‘.’ creates a new branch in the Event name column of the Events report, and groups your events so they are easy to locate.
- Do not send more than 1000 unique named events.
- Do not add unique identifiers to event names. For example,
Tutorial.Start.ServerID-ABDCEFG - Do not add timestamps to event names. For example,
Tutorial.Start.1454458885
- Do not add unique identifiers to event names. For example,
- Do not use the
swrve.*orSwrve.*namespace for your own events. This is reserved for Swrve use only. Custom event names beginning withSwrve.are restricted and cannot be sent.
Event payloads
You can add and send an event payload with every event. This allows for more detailed reporting around events and funnels.
Notes on associated payloads:
- The associated payload should be a dictionary of key/value pairs; it is restricted to string and integer keys and values.
- There is a maximum cardinality of 500 key-value pairs for this payload per event. This parameter is optional, but only the first 500 payloads are displayed in the dashboard. The data is still available in raw event logs and for audience filtering.
- If you want to use event payloads to target your campaign audiences, you can configure up to 10 custom events with a maximum of 20 payloads per event for audience filtering purposes. For more information, see Targeting your audience by event payloads.
Dictionary<string,string> payload = new Dictionary<string,string>() {
    {"key1", "value1"},
    {"key2", "value2"}
};
SwrveComponent.Instance.SDK.NamedEvent("custom.event_name", payload);
For example, if you want to track when a user starts the tutorial experience, it might make sense to send an event named tutorial.start and add a payload time that captures how much time it took the user to complete the tutorial.
Dictionary<string, string> payload = new Dictionary<string, string>();
payload.Add("time", "100");
payload.Add("step", "5");
SwrveComponent.Instance.SDK.NamedEvent("tutorial.start", payload);
Custom user properties
The Swrve SDK sends certain user properties by default and also enables you to assign custom properties to update the user’s status. (For a full list of the default user properties, see Assigning user properties.)
For example, you could create a custom user property called premium, and then target non-premium users and premium users in your campaigns.
Example of group of user properties
Dictionary<string, string> attributes = new Dictionary<string, string>();
attributes.Add("premium", "true");
attributes.Add("level", "12");
attributes.Add("balance", "999");
SwrveComponent.Instance.SDK.UserUpdate(attributes);
Example of single date-typed user property
Use the DateTime object to send a DateTime user property; for example, the current date at the time of a user purchase:
SwrveComponent.Instance.SDK.UserUpdate ("last_purchase", DateTime.UtcNow);
Virtual economy events
To ensure virtual currency events are not ignored by the server, make sure the currency name configured in your app matches exactly the Currency Name you enter in the App Currencies section on the App Settings screen (including case-sensitive). If there is any difference, or if you haven’t added the currency in Swrve, the server will ignore the event and return an error event called Swrve.error.invalid_currency. Additionally, the ignored events are not included in your KPI reports. For more information, see Add your app.
If your app has a virtual economy, send the purchase event when users purchase in-app items with virtual currency.
string item = "some.item";
string currency = "gold";
int cost = 99;
int quantity = 1;
SwrveComponent.Instance.SDK.Purchase(item, currency, cost, quantity);
Send the currency given event when you give users virtual currency. Examples include initial currency balances, retention bonuses and level-complete rewards.
string givenCurrency = "gold";
double givenAmount = 99;
SwrveComponent.Instance.SDK.CurrencyGiven(givenCurrency, givenAmount);
In-app purchase events and validation
If your app has in-app purchases (IAPs), send the IAP event when a user purchases something with real money.
- For iOS devices, Apple returns a receipt including multiple purchases. To identify what was purchased, Swrve needs to be sent the
transactionIDof the item purchased (seeSKPaymentTransaction::transactionIdentifier). - If
paymentProviderwas Apple, use eitherBase64EncodedReceiptorRawReceipt, depending on whether the receipt is already encoded. Third party Unity IAP plugins can return the receipt already encoded. - For Google Play, the
receiptandreceiptSignatureshould be provided. - For other platforms (including Amazon), no receipt validation is available.
IapRewards rewards = new IapRewards(<rewardCurrency>, <rewardAmount>);

#if UNITY_IPHONE
SwrveComponent.Instance.SDK.IapApple(quantity,
                                     productId,
                                     <localCost>,
                                     <localCurrency>,
                                     rewards,
                                     Base64EncodedReceipt.FromString(base64Receipt),
                                     transactionId);
#elif UNITY_ANDROID
SwrveComponent.Instance.SDK.IapGooglePlay(productId,
                                          <localCost>,
                                          <localCurrency>,
                                          rewards,
                                          receipt,
                                          receiptSignature);
#else
// no receipt validation
SwrveComponent.Instance.SDK.Iap(quantity,
                                productId,
                                <localCost>,
                                <localCurrency>,
                                rewards);
#endif
If the purchase is of an item, and not a currency, you can omit the rewards argument:
SwrveComponent.Instance.SDK.Iap(1, "bird", 9.99, "USD");
The correct Apple bundle ID (iOS) or the Google Server Validation Key (Android) should be added to the Integration Settings screen in Swrve. This allows Swrve to validate purchases made in the app.
Resource A/B testing
Integrating Swrve’s resource A/B testing functionality enables you to use Swrve to test how users respond to changes to the native app content. For more information about resource A/B testing, see Intro to resource A/B testing.
To get the latest version of a resource from Swrve using the Resource Manager, use the following:
// Get the SwrveResourceManager which holds all resources
SwrveResourceManager resourceManager = SwrveComponent.Instance.SDK.ResourceManager;

// Then, wherever you need to use a resource, pull it from SwrveResourceManager.
// For example:
string welcomeScreen = resourceManager.GetResourceAttribute<string>(
    "new_app_config",
    "welcome_text",
    "Welcome!"
);
If you want to be notified whenever resources change, you can add a callback function as follows:
SwrveComponent.Instance.SDK.ResourcesUpdatedCallback = delegate() {
    // Callback functionality
};
Testing your integration
After you’ve completed the above, the next step is to test the integration. For more information, see Testing your integration.
Upgrade instructions
If you’re moving from an earlier version of the Unity SDK to the current version, see the Unity SDK upgrade guide for upgrade instructions.
SDK samples
For sample integrations of the Swrve Unity SDK, see the Swrve Unity SDK samples on Github.