Creating a multi-platform push campaign
Swrve’s streamlined campaign workflow gives you several options to create and manage your push notification campaigns. It supports creating scheduled one-time or recurring campaigns and notifications that are triggered by an external event from a third-party system, for both your mobile and web platforms. Presently, Geo push is the only notification type that still uses the old workflow.
Create a new campaign
The first steps for setting up a push notification campaign are the same as other channels, with a few extra actions.
- To create a new campaign from your Campaigns center, select Create campaign.
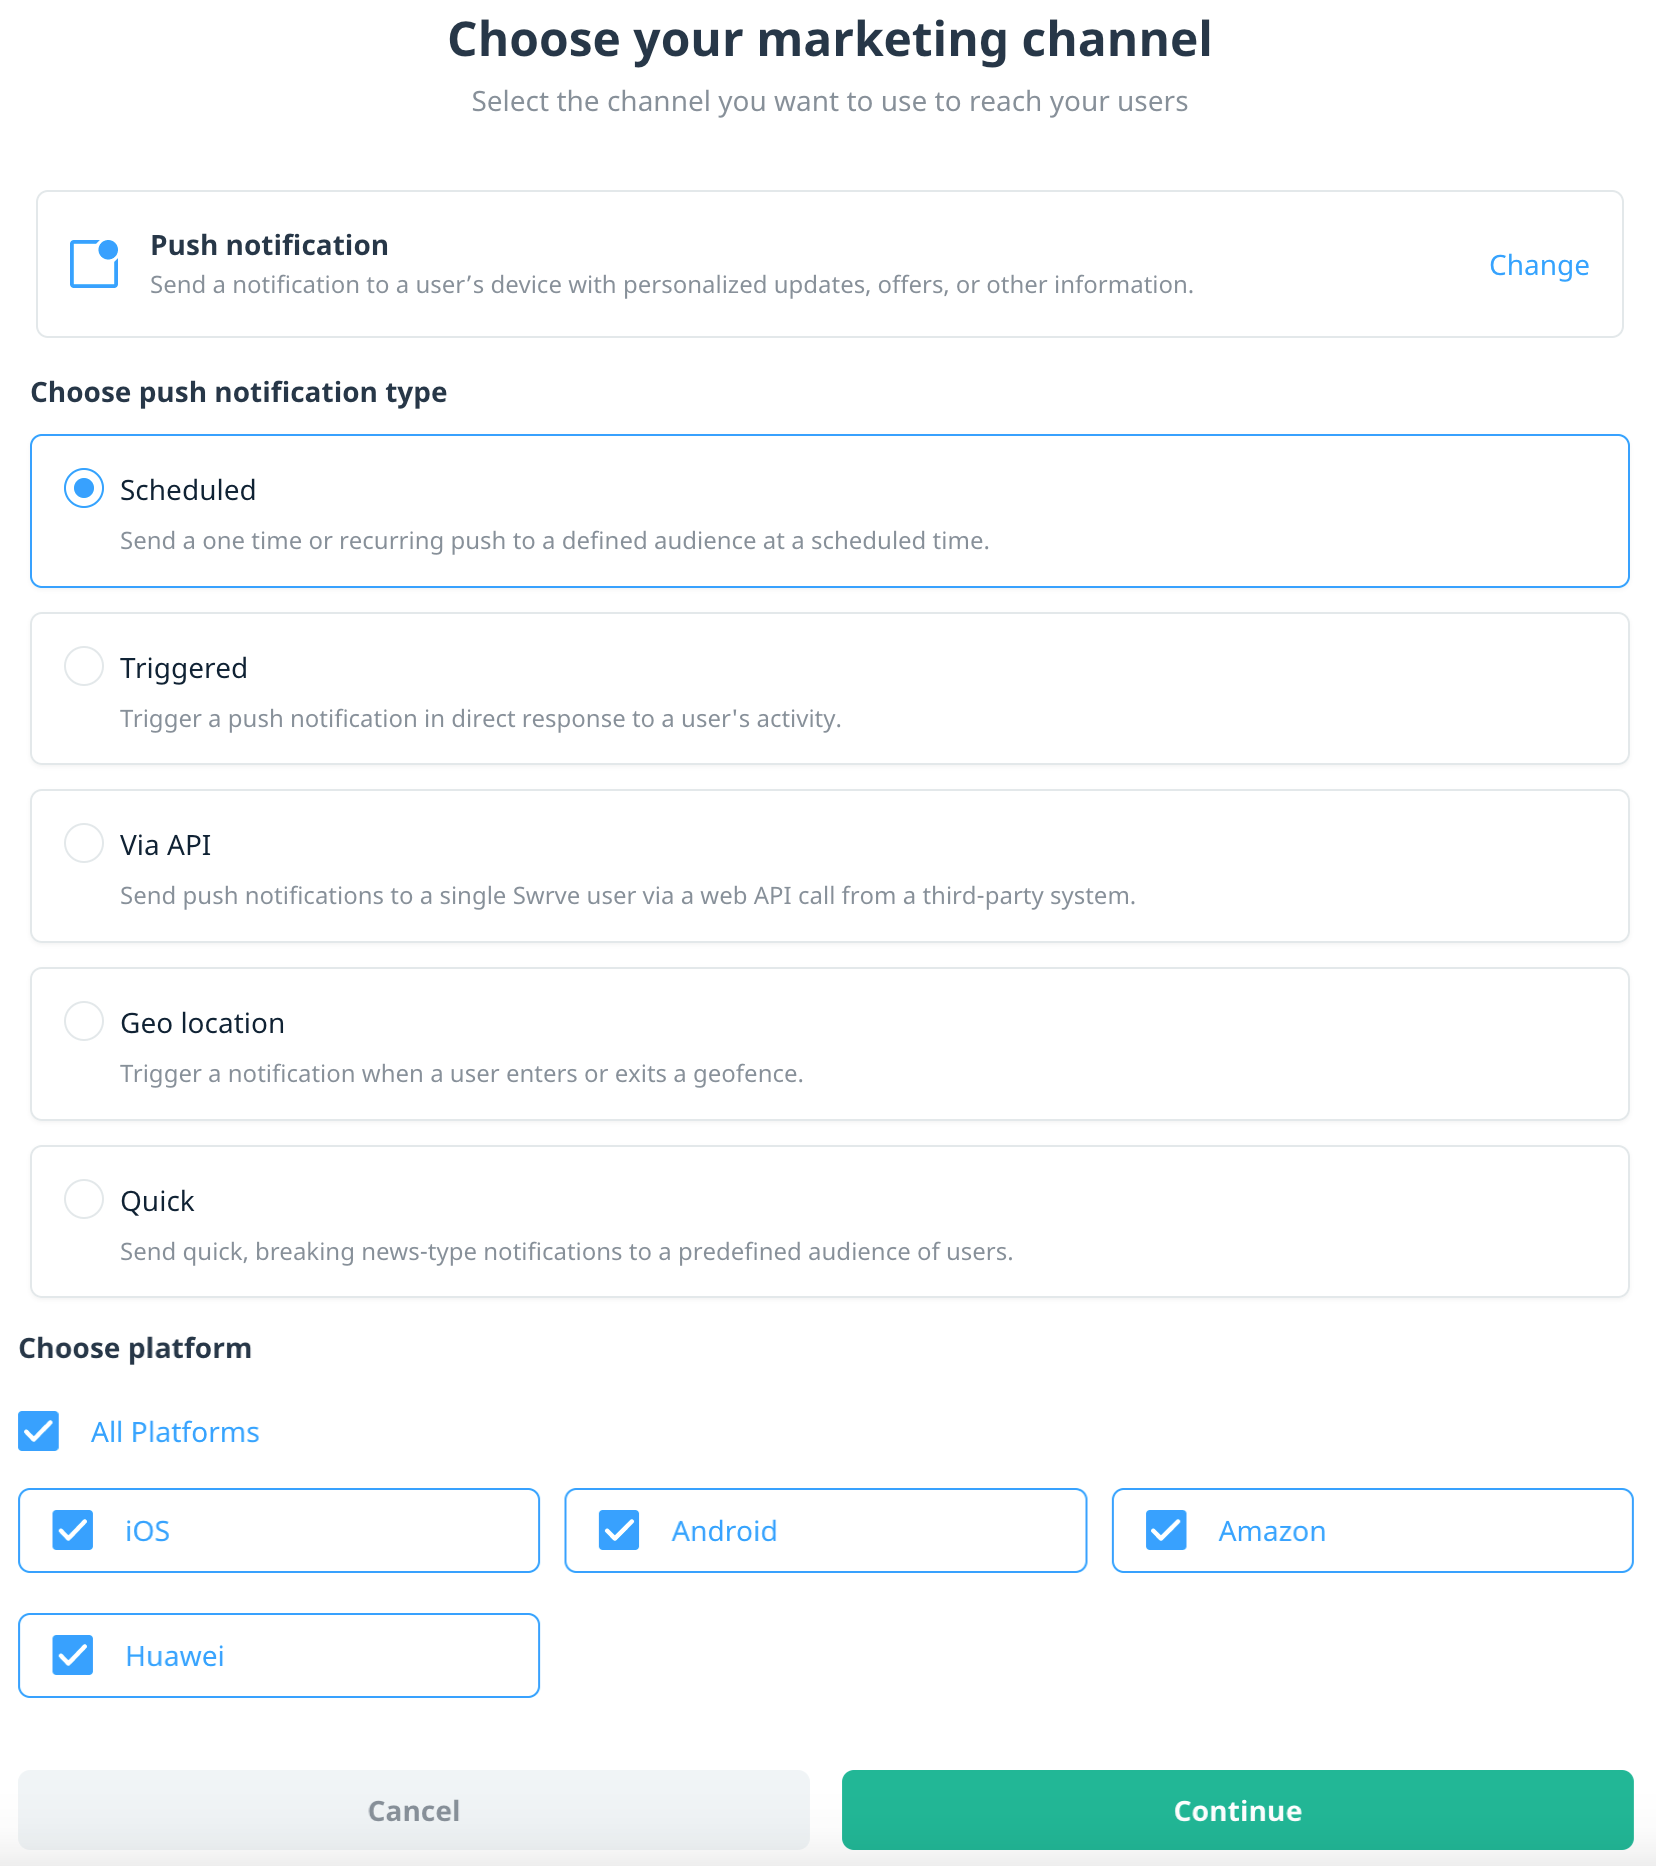
- On the Choose your marketing channel screen, select Push notification.
- Under Choose push notification type, select the push notification type:
- Scheduled – Select to create a scheduled one-time or recurring campaign.
- Triggered – Select to create a triggered push campaign based on specific user behavior.
- Via API – Select to create a campaign that’s triggered via an external event from a third-party system. The main steps for creating a push API campaign are the same as scheduled push, except for a a few differences with audience and scheduling. For more information, see Push via API.
- Geo location – Select to create a campaign that’s triggered by geographic location.
- Quick – Select to create a quick campaign for a predefined audience.
For Geo location campaigns, follow the steps for the geo campaign workflow. For all other campaign channels, proceed to step 4.
- Under Choose platform, the default selection is All Platforms. If you need to create a platform-specific campaign, select the individual platform(s).
- Check Include in inbox to make a customized version of the notification available for display inside your app:

- Note: The inbox version of the notification is sent to All platforms, regardless of the platforms you select in step 4. For more information, see Notification inbox and Swrve Inbox API.
- For Triggered and Via API push campaigns, there is an additional delivery option to set the device reach. Depending on the platforms you selected in the previous step, select an option to specify which device to send the notification to:
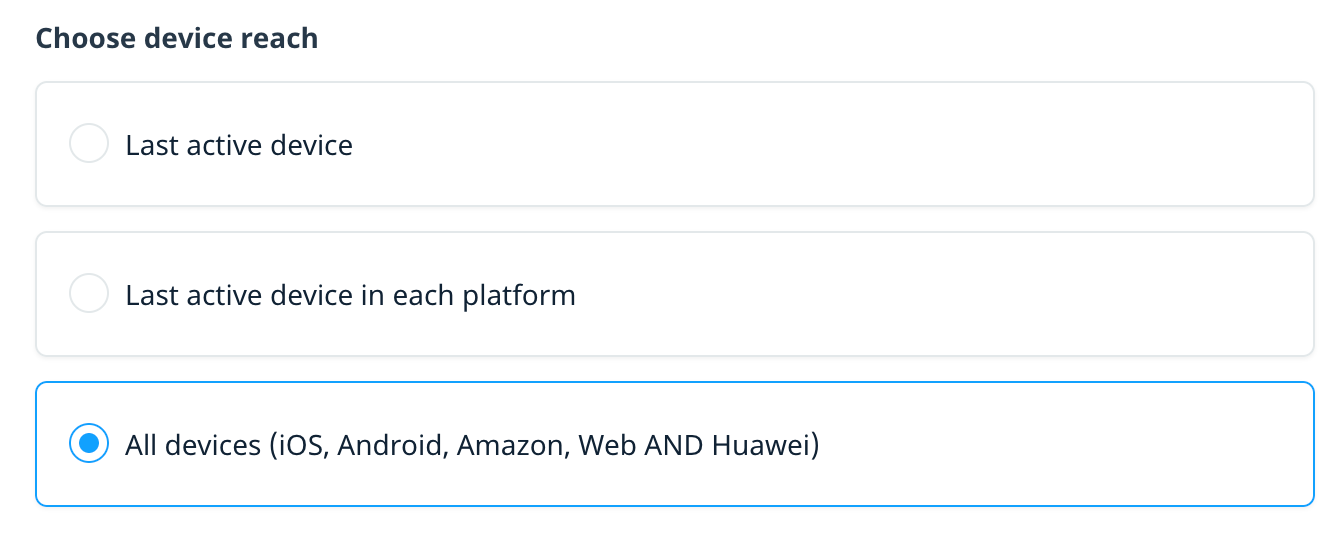
- Last active device – Sends a push notification to the last device the user was active on regardless of platform.
- Last active device per platform – Sends a push notification to the last device the user was active on each individual platform.
- All devices – Sends a push notification to all of the user’s devices.
- To continue to the Campaign overview screen, select Continue.
- Enter the Campaign name, Description, and Tags, then select Save to go to the campaign builder.
The blocks on the campaign screen guide you through building your campaign, but you can complete them in any order. For more information about the basic campaign workflow or other campaign channels, see Campaign overview and channels. In the next few sections, we’ll focus on how to add the content for a multi-platform push campaign.
Personalize your content
Create a more relevant message by including dynamic, personalized content in your notification—for example, the customer’s name or a flight destination city. For more information on personalizing push notification content, see Campaign personalization.
Add your notification content
To add or edit your push notification content from the campaign build screen, on the Content block, select add + or edit .
Some sections in the Content editor apply to all users, such as Message. Other content is restricted by platform, such as a GIF for iOS media or Android extended notification content. If you select a single platform when setting up the campaign, the Content editor displays only the options that apply to that platform.
We’ll start with how to add basic notification content that applies to all platforms. Then we’ll cover how to add custom buttons and platform-specific options. Finally, we’ll review how to add advanced options like custom properties and alert sounds.
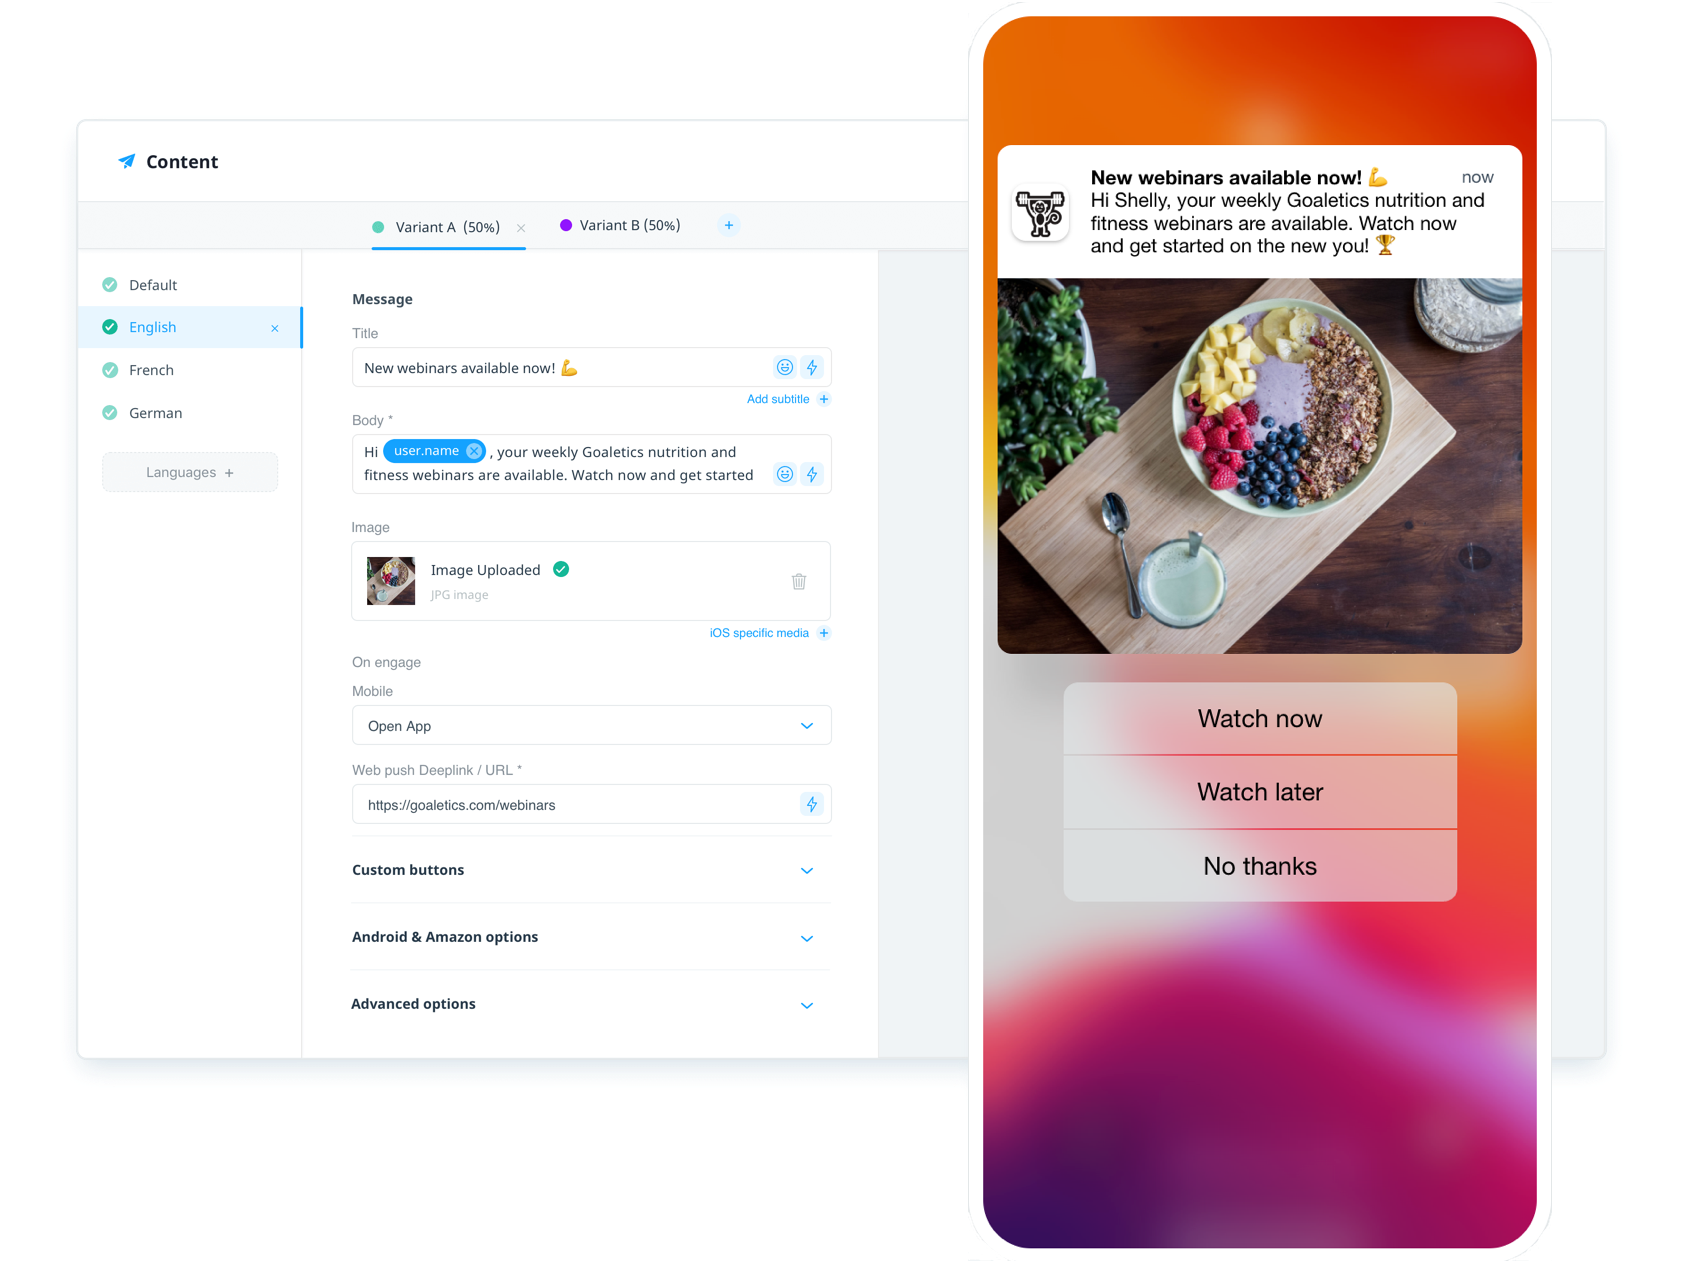
Create your basic message
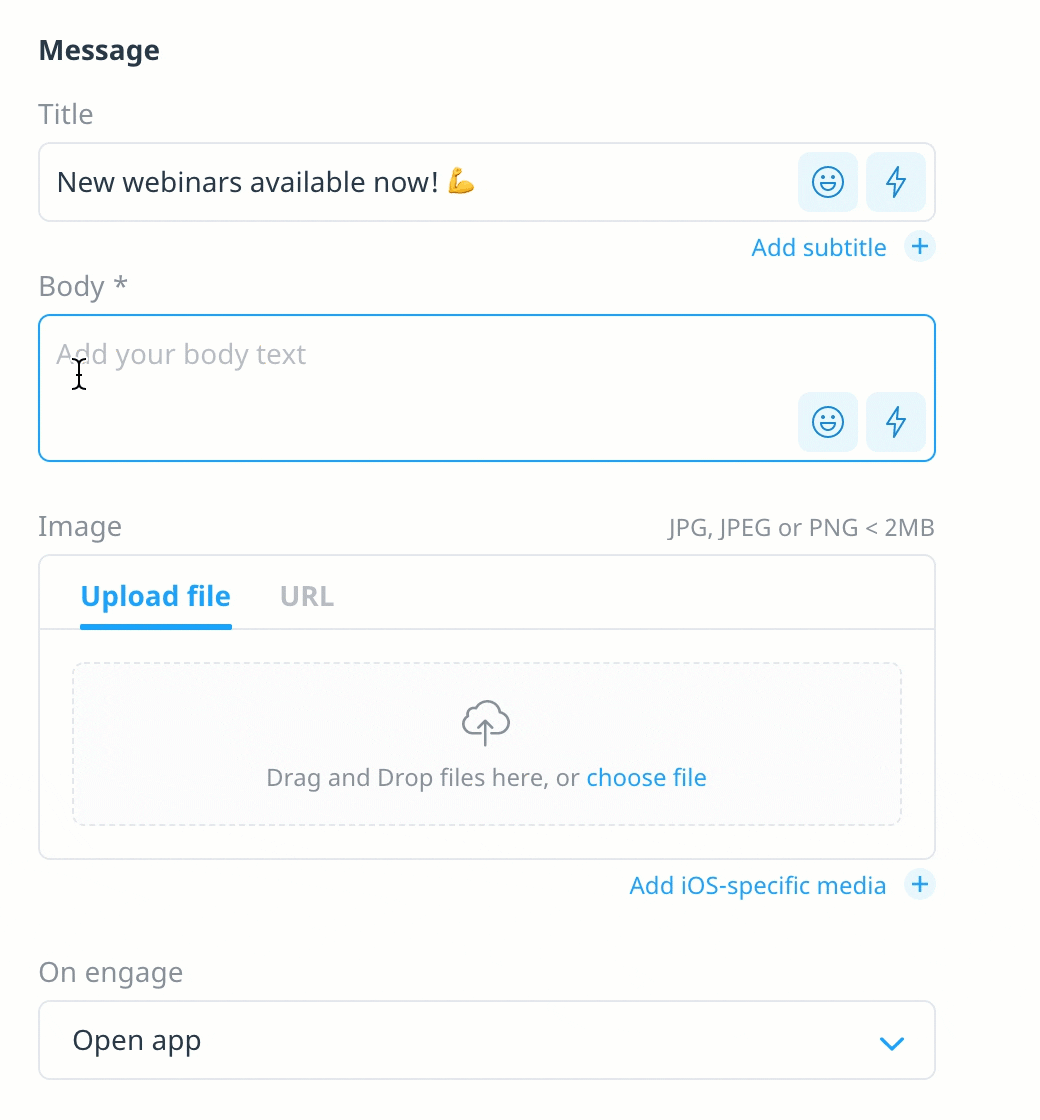
- On the Content screen, under Message, enter your notification Title.
- Optionally, to add a subtitle, select Add subtitle + and then enter the Subtitle.
- In the Body box, enter your notification content. Body is the only content that is mandatory for all platforms.
- If you want to include an image, under Image, upload your image file or select URL to enter the image link.
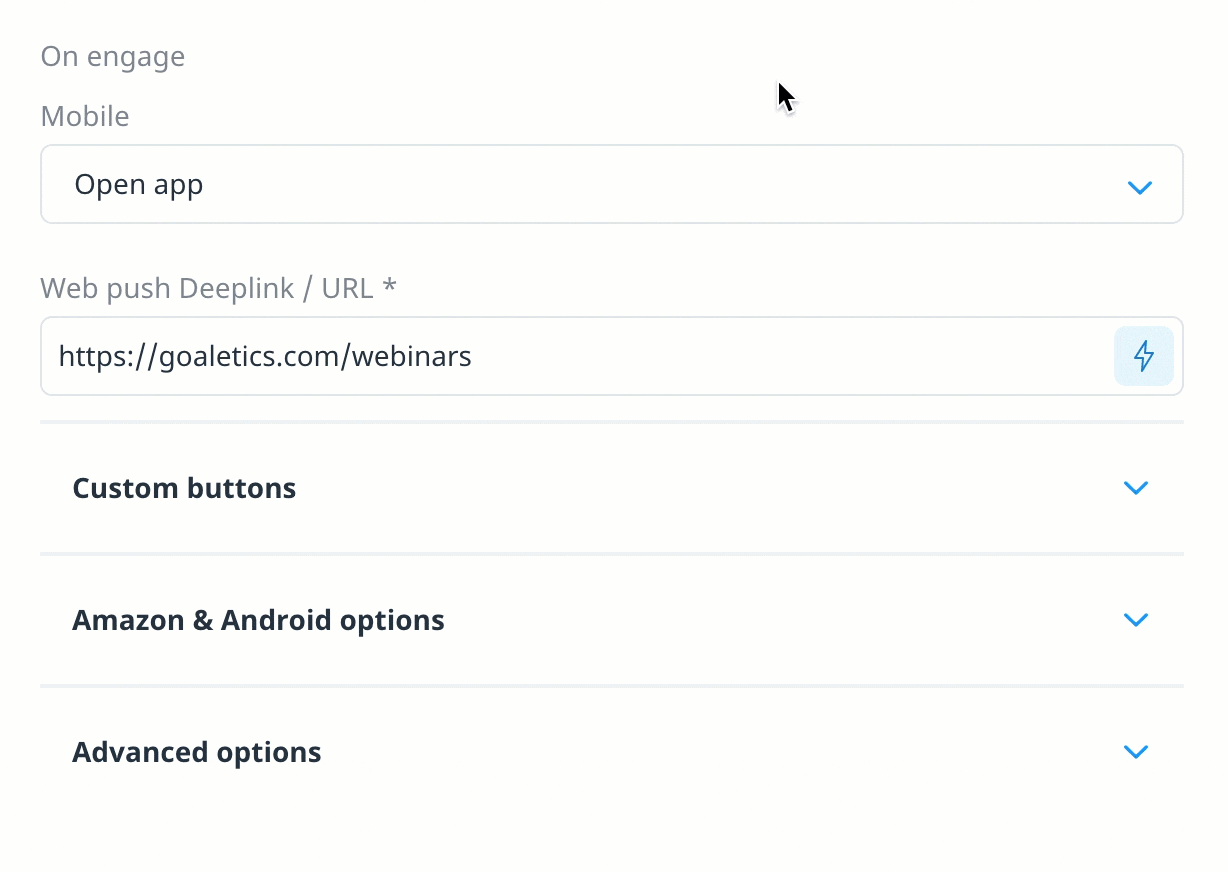
If you customize the URL with a custom property that references user-specific content (for example, a user’s profile photo or flight destination image), to specify a fallback image that displays if a user does not have a value for the referenced property, select Image URL fallback. Upload the fallback image or select URL to enter the fallback image link. - Under On engage, select the action you want to take if a customer engages with the notification on Mobile.
- Open app – opens the app in the foreground.
- Deeplink / URL – directs the user to a custom location. For example, you might use a deeplink to direct the user straight to your app store or a flight booking screen. For more information about using deeplinks with push notifications, see How do I implement deeplinks in push notifications?
- Open in-app message / Conversation – opens the app and triggers the selected in-app message or Conversation campaign. To link a push notification to an in-app message or Conversation campaign, you must first create the linked campaign, which then displays in the list of available campaigns. For more information, see Linking push notifications to in-app campaigns.
- If you included Web as a platform, under On engage, enter the Web push Deeplink / URL you want to direct the user to if they engage with the notification.
Add custom buttons
Add up to three custom buttons to give your users options for interacting with the notification in extended view. You can configure the button actions with deeplinks to direct the customer to a specific screen in your app, or even use the buttons to create a short survey.
- To expand the Custom buttons section, select the down arrow
- To add your first button, select Add custom buttons +.
- Under Button 1, enter your Button text and select an engagement option from the On engage list.
- If you select Deeplink / URL, enter the relevant deeplink for each platform.
- To add more buttons, select Custom button + and repeat steps 3 and 4 as needed.
- When you’re finished adding your buttons, select Confirm.
Platform-specific content
Your basic message content applies to notifications sent to all platforms, while buttons (2) are mobile-only. Depending on the platforms you initially select, additional content options are available, such as GIF and audio for iOS (1) or specifying the large icon (3) or different content for Android, Amazon, and Huawei notifications displayed in extended view (4,5,6).

iOS
To include iOS-specific media, under the Image uploader, select Add iOS-specific media +.
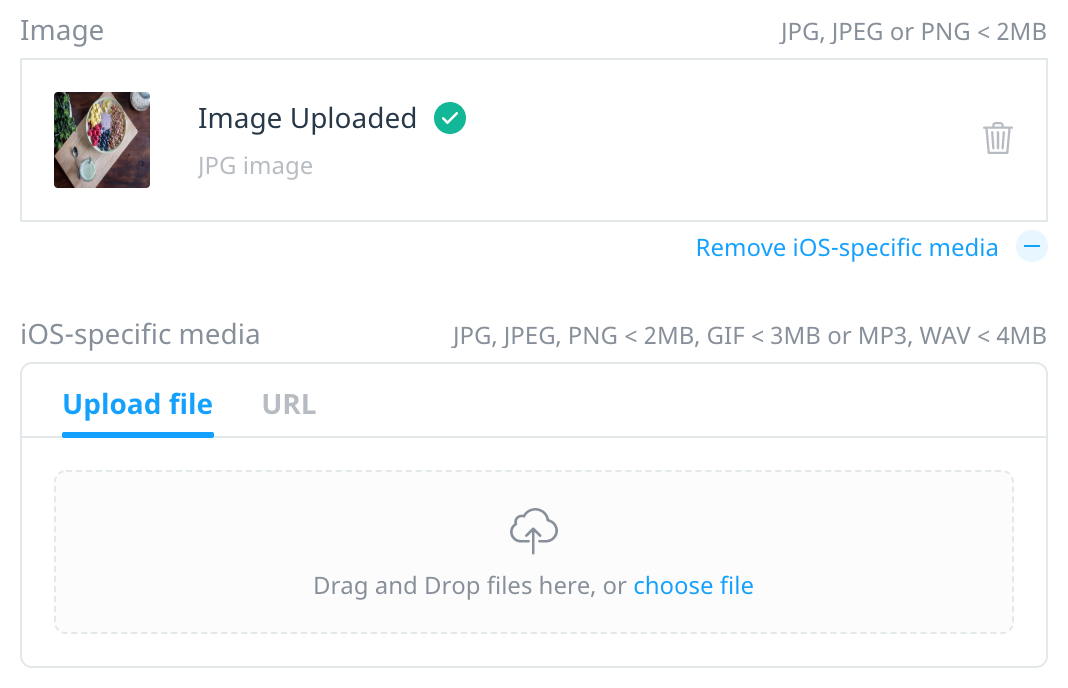
Upload your media file or select URL to enter the media link.
If you customize the URL with a custom property that references user-specific content, to specify fallback media that displays if a user does not have a value for the referenced property, select Media URL fallback. Upload the fallback media or select URL to enter the fallback media link.
Amazon, Android, and Huawei
Amazon, Android, and Huawei notifications include the option to set a large icon (3) or specify different title and body content that displays when a user views the notification in extended view (4,5,6).
If you include an image in your basic notification content, there is a limit to how much text you can include in the extended body. To include a longer message for Amazon, Android, and Huawei users, leave the main image empty and use the iOS-specific media option to include an image for iOS users only.
To expand the Amazon, Android & Huawei options section, select the down arrow and then upload or enter the desired content:
- Large icon – Upload the icon image or select URL to enter the icon image link.
- Extended title – Enter the title that displays in extended view.
- Extended body – Enter the notification content that displays in extended view.
- Extended icon – Upload the icon image or select URL to enter the icon image link.
- Visibility – Define how the notification appears on the device’s lock screen. (Sensitive notifications must be disabled. For more information, see Control notifications on Android.)
- Public (default) – The notification’s contents are fully visible on secure lock screens.
- Private – The notification is shown on the lock screen, but its content is hidden.
- Secret – The notification is not shown on the lock screen.
- Lock screen message – Enter the notification content that displays on the lock screen.
- Unlike the default message content, the lock screen message is displayed when Visibility is set to Private.
- The lock screen message also replaces message content in the collapsed drawer, regardless of the visibility setting.
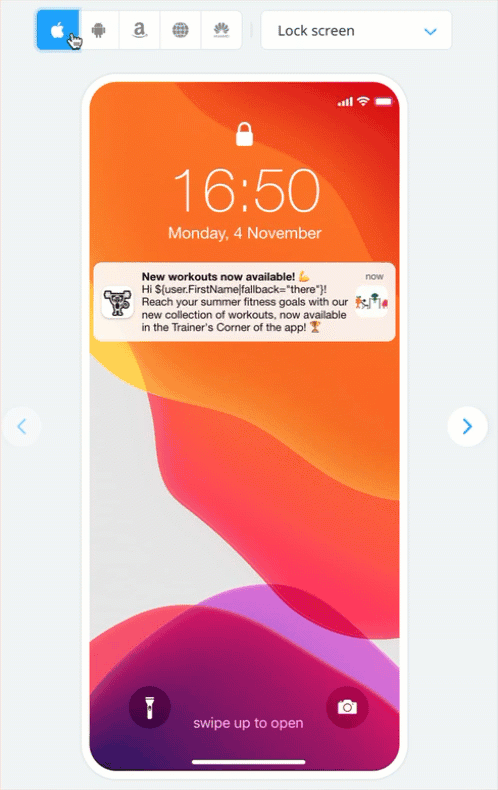
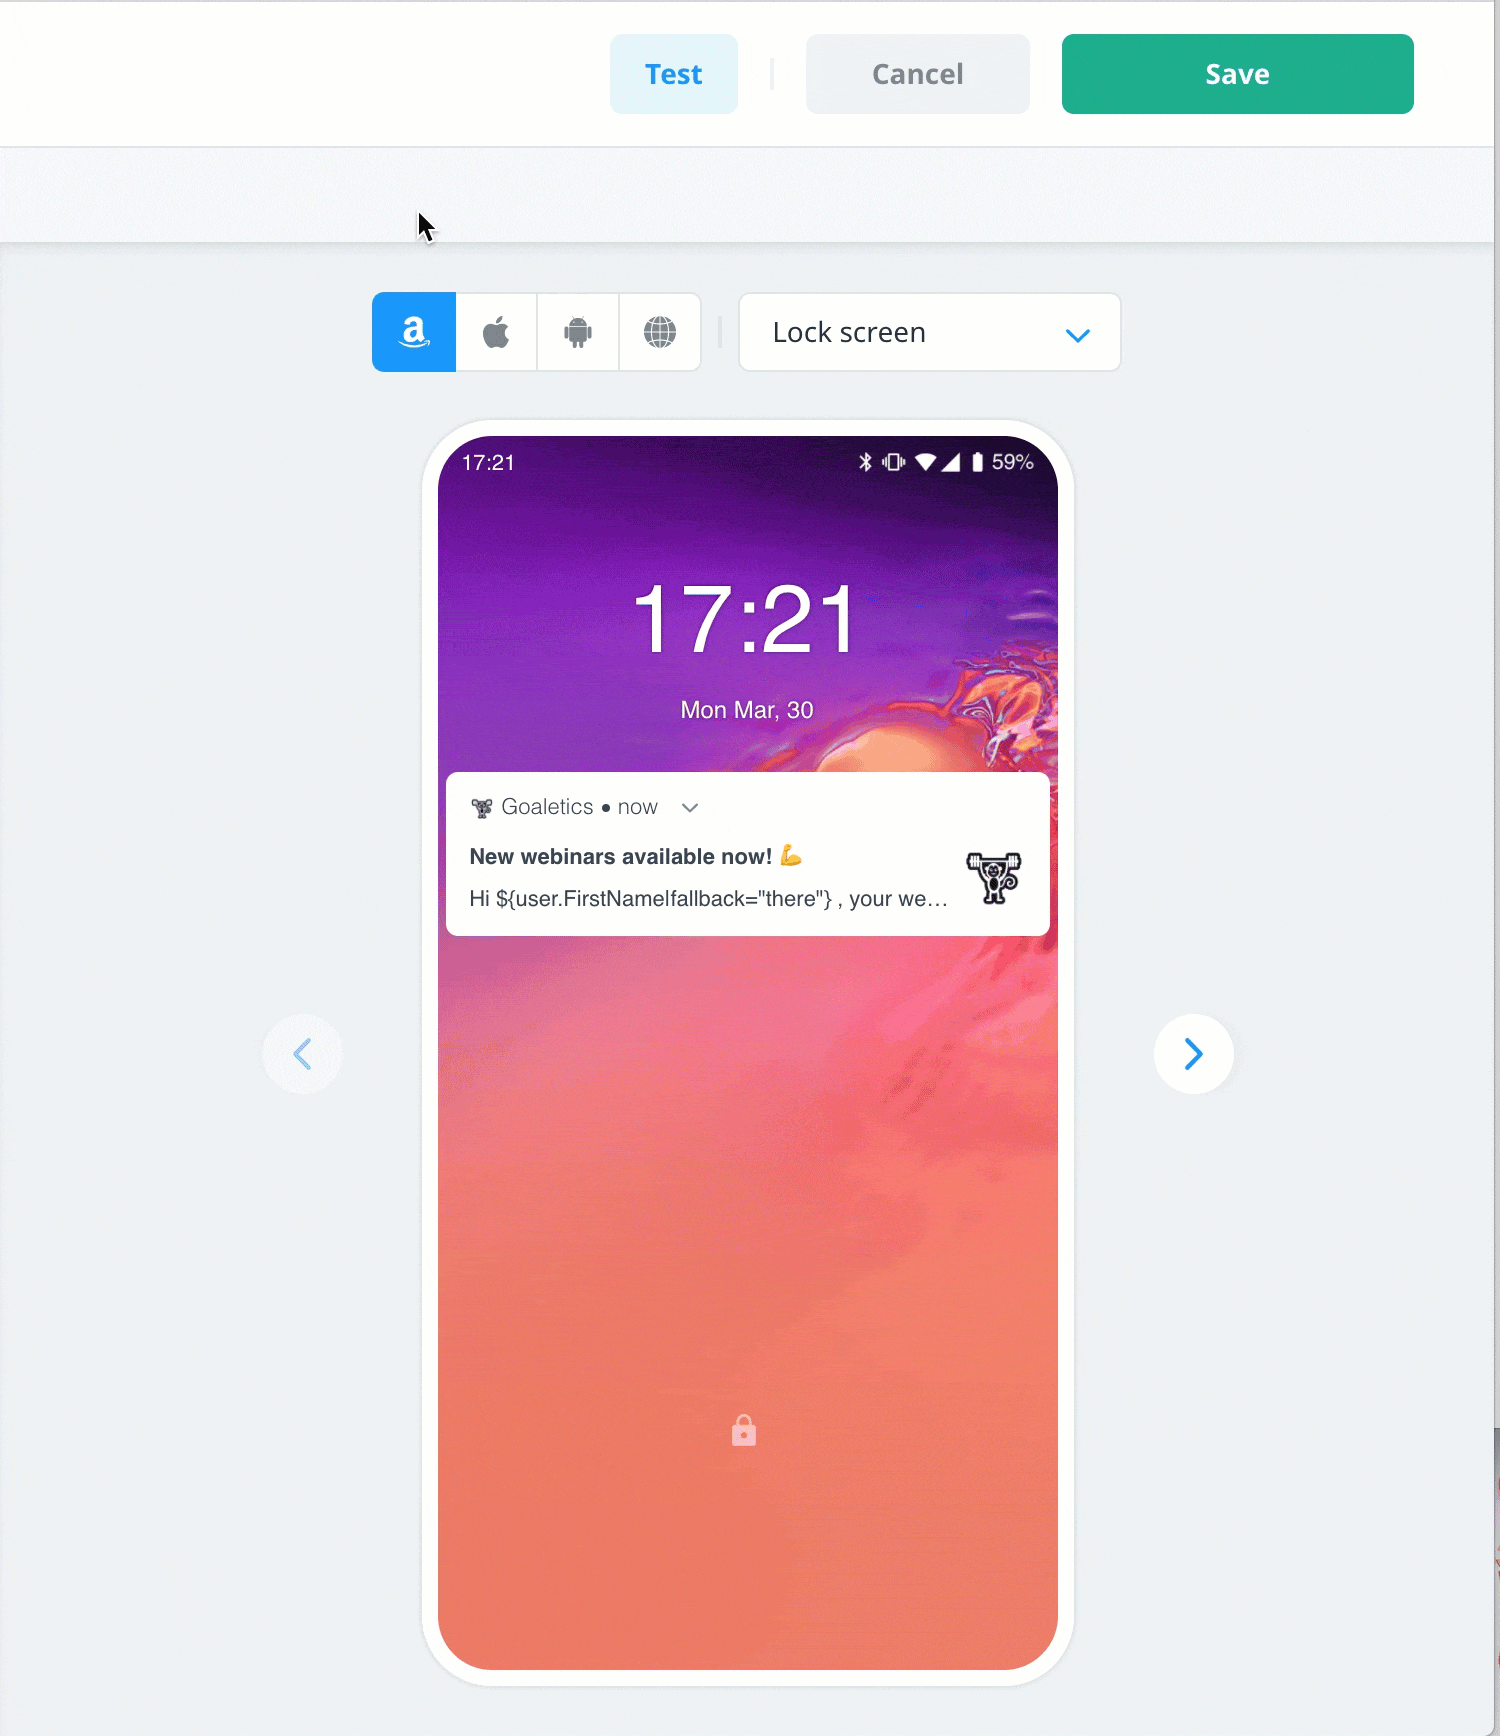
Preview your content
As you add your content, it displays in the device preview on the right side of the editor. To view how the content looks in Lock screen, Extended view, or Banner, select the relevant platform icon and option from the list.
Advanced options
Use the Advanced options section to include instructional parameters with your notification or to select an alert sound.
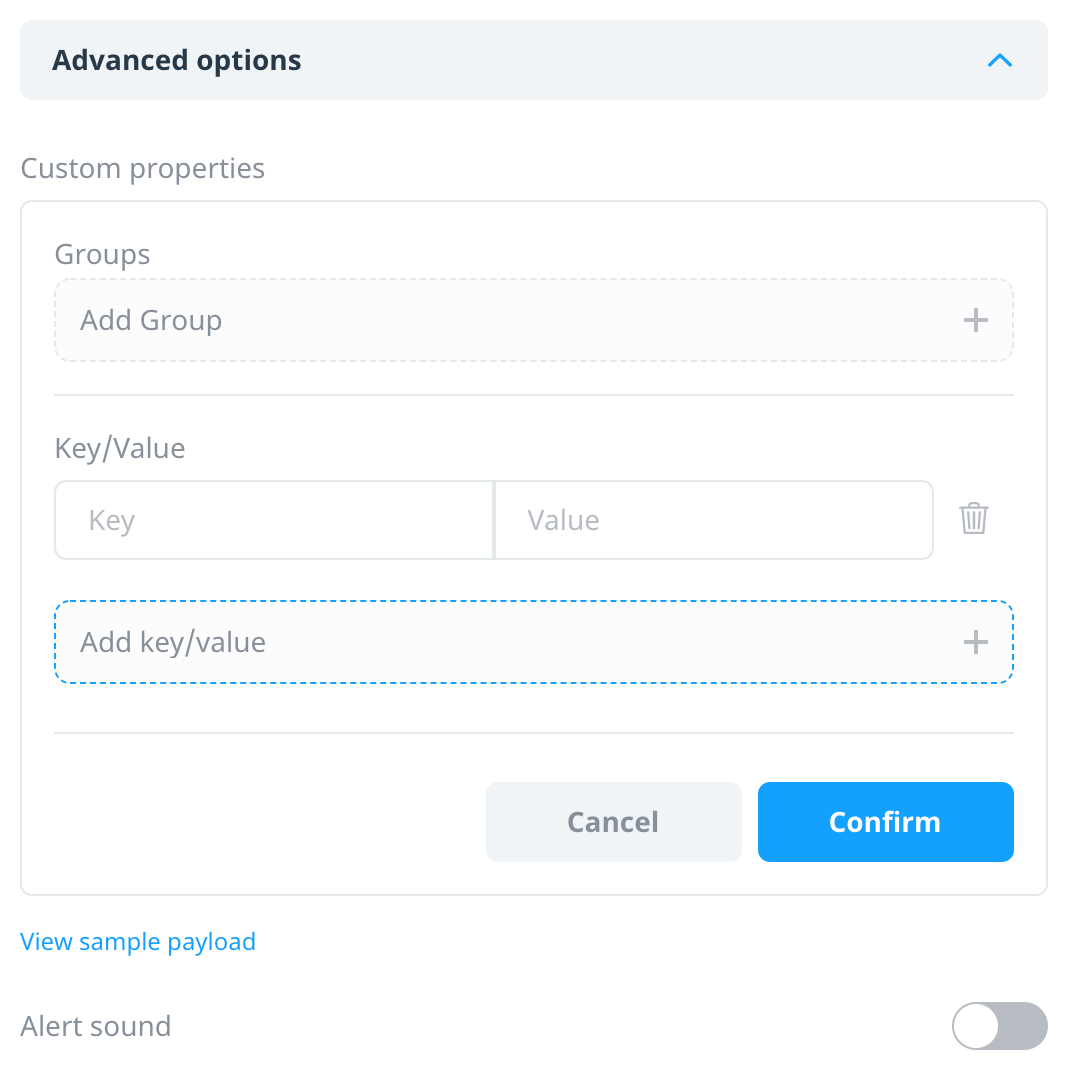
Custom properties
To send instructional parameters to your app when you send the push notification, define custom key/value groups or pairs. For example, you might want to direct the user straight to the store (instead of the default start screen) when they open your app from the push notification. Alternatively, you might want tracking parameters to be passed from the push notification for use by your internal or external tracking systems.
To add custom key/value pairs:
- Under Custom properties, select Add Group or enter individual Key/Value pairs, as required.
- Enter a key/value pair in the Key and Value fields. For example, go_to/store, trial/30days or discount/10percent.
- To add the group or individual payloads, select Confirm.
To view a sample of the payload that will be sent with the notification, select View sample payload.
Alert sounds
Some brands use a distinctive alert sound to notify users of an app update, for example, BBC News. To make a sound available with your notifications, you must first configure it at the app level. For more information, see Push campaign prerequisites.
To select a sound for your push notification, turn on the Alert sound toggle and then select the sound from the list.
Push settings
To configure the delivery and display settings for your campaign, select Push Settings on the Content page.
Cross platform settings
The following settings apply to all push platforms, excluding web.
- Collapse notification: Specify a numeric collapse ID for your push notification. If the device receives multiple notifications with the same Collapse ID, the system only shows the most recently delivered notification. This is only applicable to recurring, transactional, and triggered push notification campaigns, where only the most recent notification may be relevant.
- Time to live: Set the delivery attempt duration for devices that are offline when a push is sent.
iOS settings
The following settings apply to push notifications sent to iOS apps.
- Priority: Set the delivery priority of the notification to determine whether the notification prioritizes delivery or the iOS device’s battery.
- High priority (System default) – Delivers the notification immediately.
- Low priority: Delivers the notification based on the device’s power considerations.
- Relevance score: Indicate how notifications should be displayed when grouped by specifying a value between 0 and 1. Notifications with higher scores gets featured in the notification summary and appear at the top of grouped notifications.
- Interruption level: Set the importance and delivery timing of the push notification.
- Active (System default): Presents the notification immediately, lights up the screen, and can play a sound. Respects focus modes.
- Passive: Delivers the notification quietly without lighting up the screen.
- Time-sensitive: Bypasses focus modes. To use this option, your developer must add the Time Sensitive Notifications capability to your app in Xcode.
- Critical: Bypasses focus and do not disturb modes. Requires special entitlement from Apple.
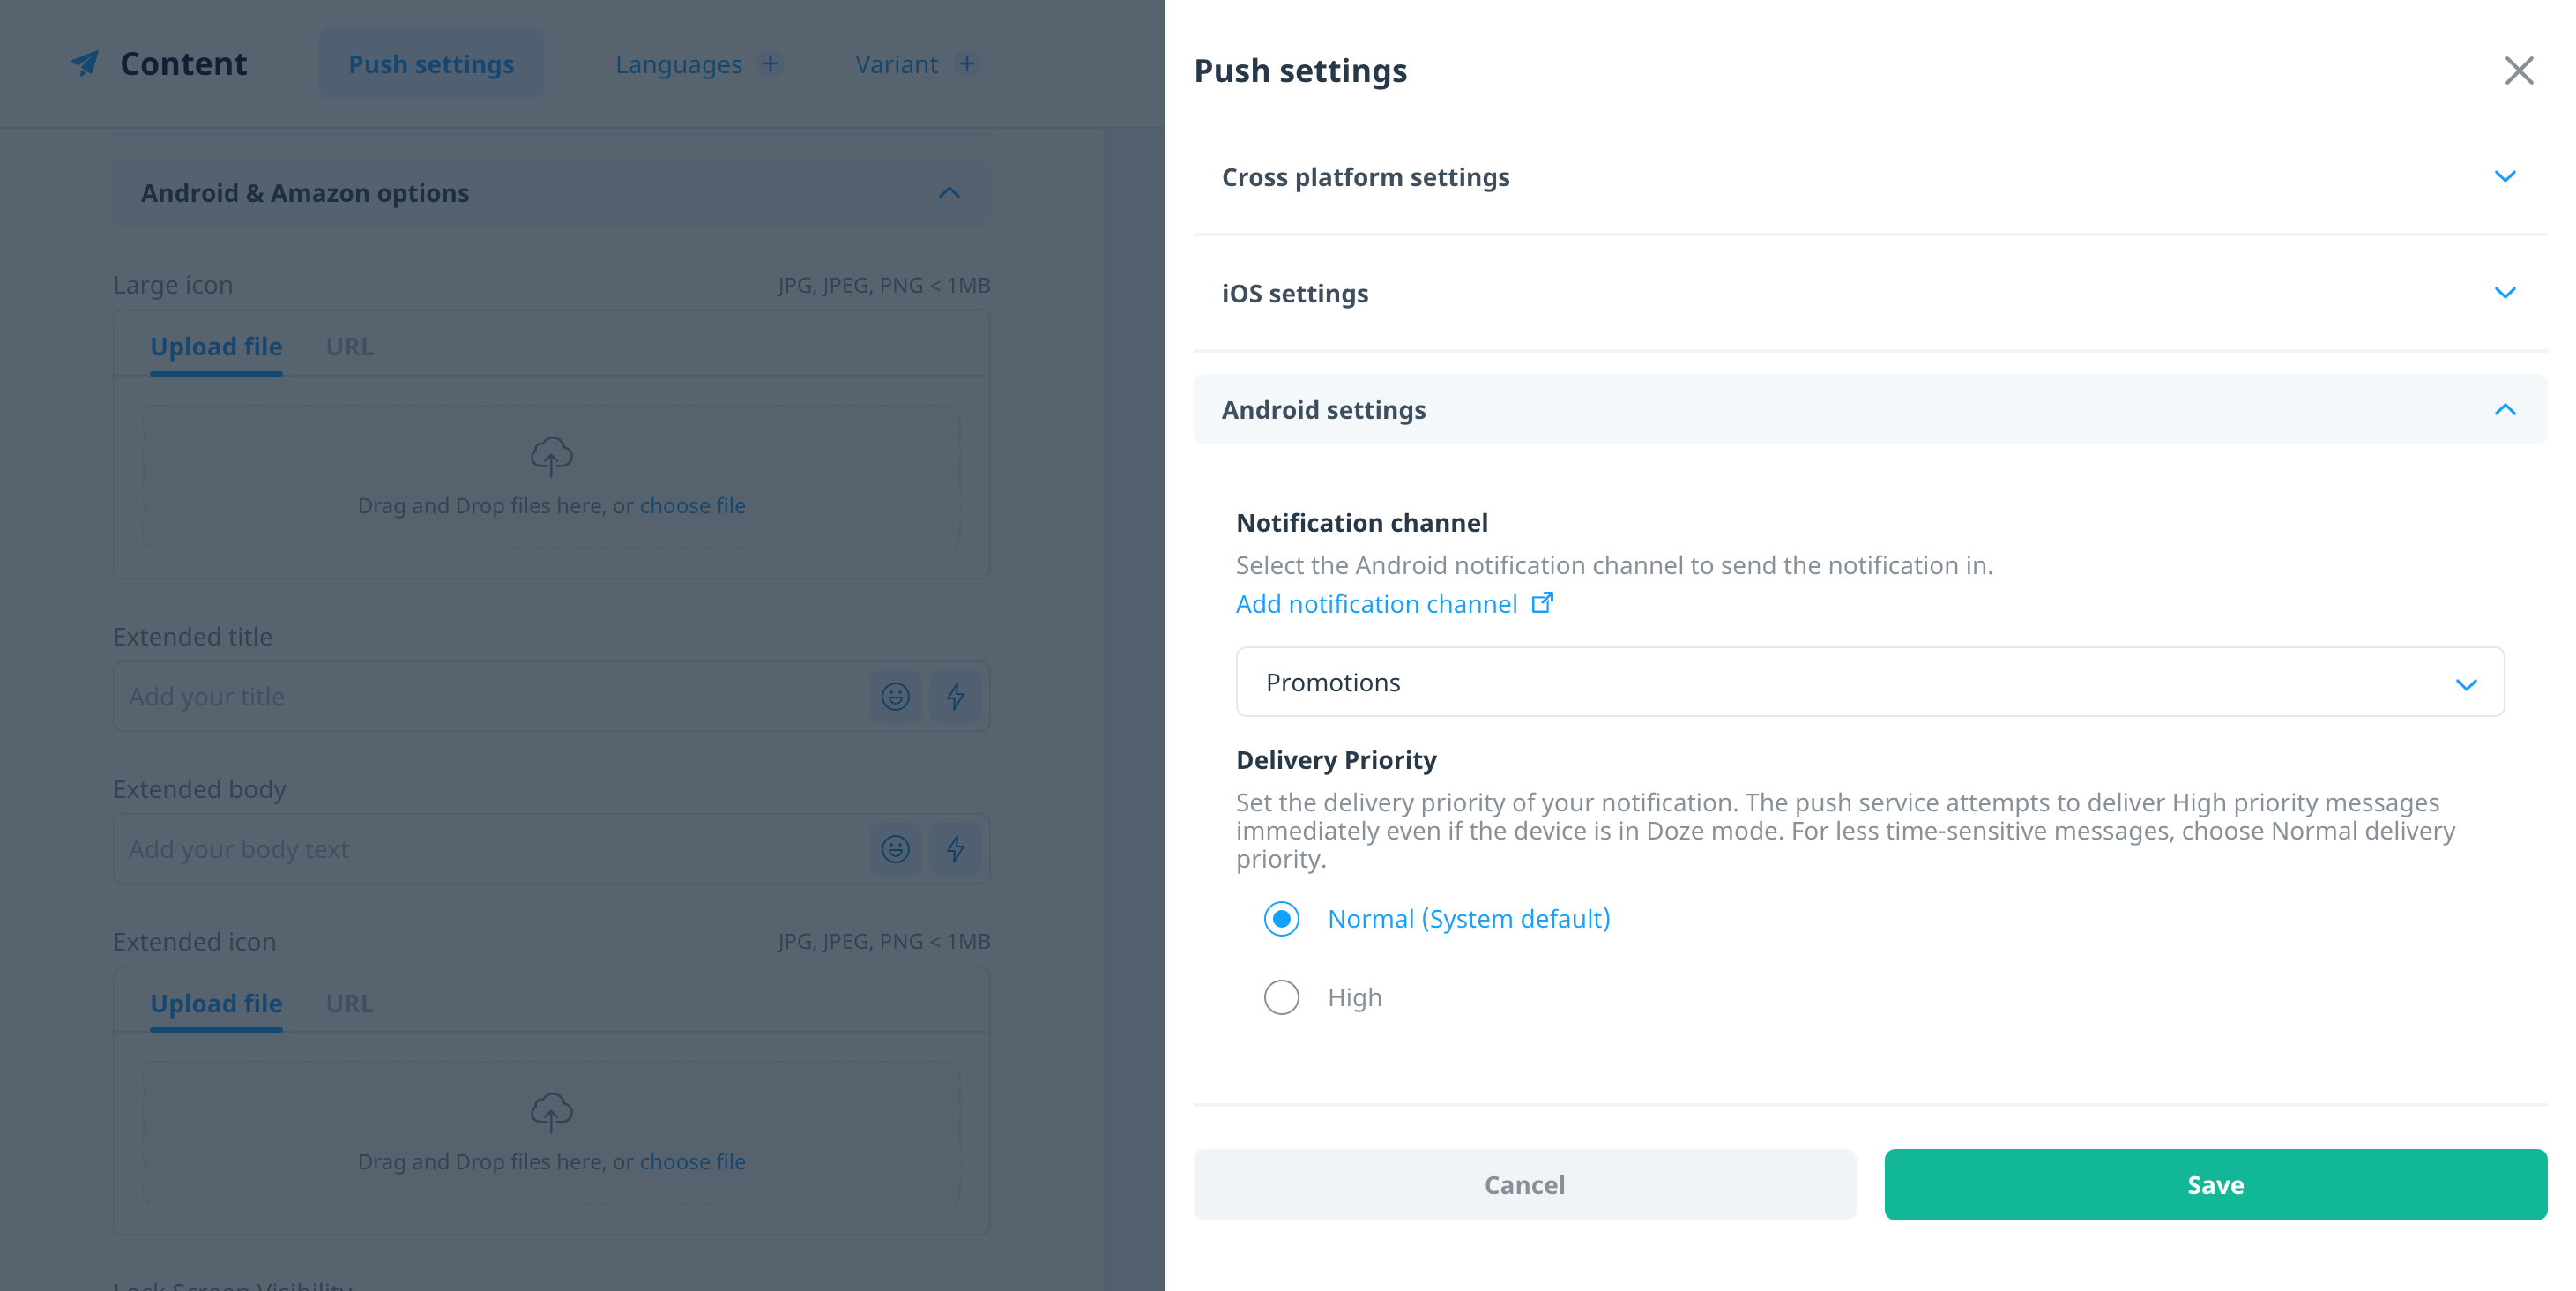
Android settings
The following settings apply to push notifications sent to Android apps, including apps downloaded from the Google Play, Huawei, and Amazon app stores.
- Notification channel: Set the channel to send your notification through, which indirectly sets the display priority. For more information, see Android notification channels.
- Delivery priority: Set the delivery priority of your notification.
- High priority – Delivers the notification immediately, even if the device is in Doze mode.
- Normal priority (System default) – Delivers the message immediately when the app is in the foreground. For backgrounded apps, delivery may be delayed.
Localize and A/B test your content
One of the most exciting features of our combined campaign flow is the ability to localize and A/B test your campaign content within a single, unified campaign. Use the Languages and Variant tabs to create localized versions of your content or create variations of your message to test for best conversion.

For more information on how to localize and A/B test your campaign content, see Localizing and A/B testing campaign content.
Test your message
To preview your message on a physical device, first ensure your device is set up on the QA Devices screen. If your campaign includes multiple languages and variants, select the content you want to test, and then in the header bar, select Test.
Select your device from the list and then select Send. If the Send button is disabled, check to make sure your message includes all required content.
Next steps
- Set custom goals to measure the success of your campaign. For more information, see Campaign goals.
- Define your campaign audience. For more information, see Targeting campaign audiences.
- Schedule and launch your campaign. For more information, see Scheduling your campaign.
- Review your campaign results. For more information, see Campaign reports.
- If you’ve used our old push notification campaign workflow, you might be wondering how to configure the target audience for daily recurring push campaigns. This option has moved to the Audience and Schedule blocks of the campaign builder. For a review of the changes between the old and new flows, see How do I configure target audiences for daily recurring push campaigns?