Creating resource A/B tests
There are six main steps to creating and managing a resource A/B test:
- Initiate the test and select the test type.
- Build the test.
- Define the test variants.
- QA test the A/B test (optional).
- Start and monitor the test.
- Finish the test.
Prerequisites
To initiate a resource A/B test, you must first create the resource(s) you want to use. Coordinate with your development team when manually creating resources. Although you can manually add a resource whenever you like, your development team must have configured the resource and its associated attributes in the code before you can use it as the basis for an A/B test. For more information about creating user resources, see Managing resources.
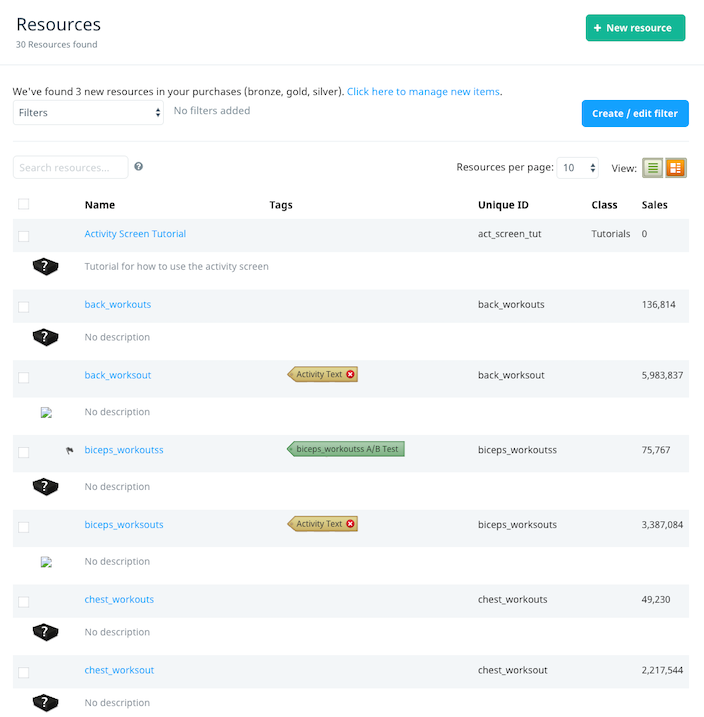
The Resources screen enables you to view, create, and manage resources manually. To access this screen, on the Optimization menu, select Resources.
Note that you cannot edit the resources for an A/B test if the test has started or if the test has finished and a variant has been selected as the winner. This is to prevent user segment data for those users becoming incorrect or misleading. You can, however, edit the resources of a test if the test has not started (that is, if it is in Staging status), if the test is finished and the control has been selected as the winner or if the test has finished and the changes applied.
Initiating the test
Step 1: There are two ways to access the resource A/B test workflow from the Optimization menu:
- To view the resources available for A/B testing, select Resources. Select the resource you want to A/B test, and then on the Resource Details screen, select Create A/B Test.
- To view your A/B tests, select Resource A/B Testing. Enter the resource name or select it from the list and then select New Resource A/B Test.
Step 2: On the Choose Test Type screen of the workflow, select the test type:
- Conversion Test – select this option if you want to compare variants based on the proportion of users who send a given event (the conversion event). In conversion tests, each user can contribute at most once to the success of that variant.
- Engagement Test – select this option if you want to compare variants based on the total number of times users have sent an event (the counting event). For examples of the application of engagement tests, see Intro to resource A/B testing.
Step 3: Select Build A/B Test to proceed.
Building the test
To build your test, on the Build A/B Test screen of the workflow, complete the following:
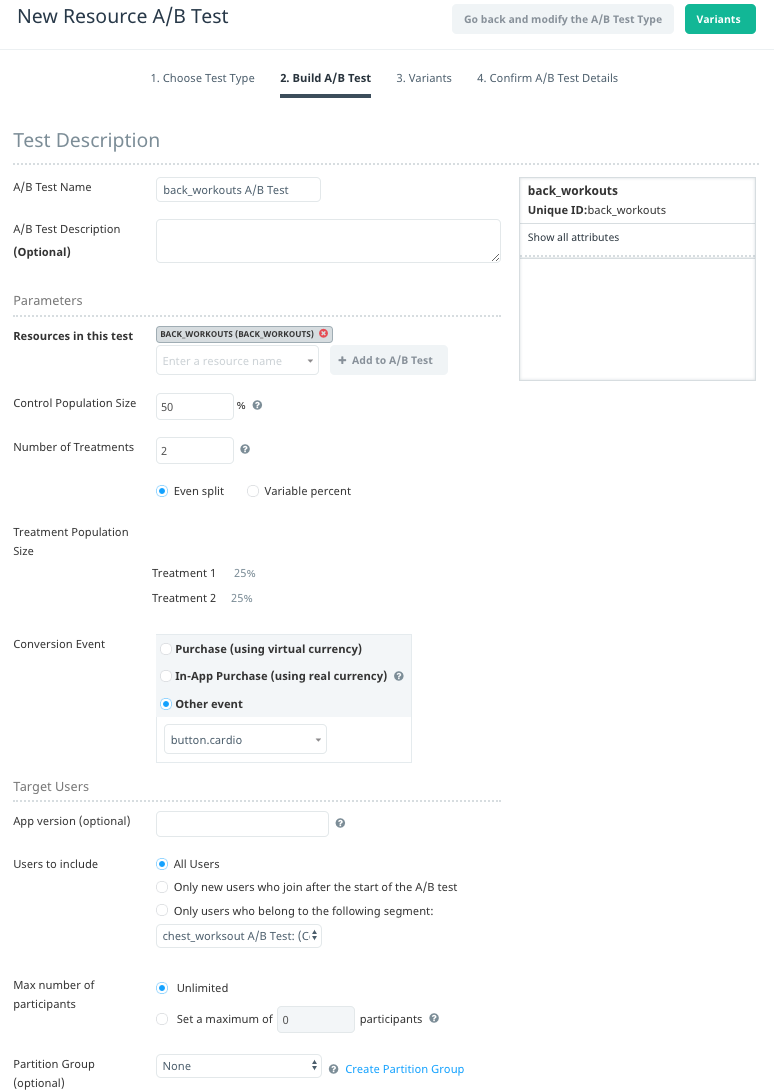
Step 1: In the A/B Test Name and A/B Test Description fields, enter a unique name and description for the A/B test. It is useful to enter as detailed a description as possible, including your test hypothesis and criteria for success.
Step 2: (Optional) If required, you can include additional resources in the A/B test. Select the additional resource(s) from the Resources in this test list and then select Add to A/B Test.
Step 3: In the Control Population Size field, enter the percentage of users that are served the control (that is, the unedited resource). This value is 50 by default. If you want only 20% of users to be served the control, for example, enter 20.
Step 4: In the Number of Treatments field, enter the number of variations of your resource that you want to create. We recommend limiting the number of variants in each A/B test to 10.
If you enter a value greater than 1, two radio buttons are displayed below that enable you to specify the Treatment Population Size. The options are:
- Even split – by default, the treatment population is split equally between the variants.
- Variable percent – enables you to specify the percentage of the treatment population that are exposed to each variant. If you select this option, a slider bar is displayed. Use the controls to adjust the treatments sizes as needed. If you adjust the size of the first treatment, the difference is added to or removed from the next treatment, and so on.
Step 5: Select the Conversion Event or Event to count (depending on whether you are creating a conversion or engagement test). In both cases, the event can be the purchase (using virtual or real currency) of any item, an item in the test or a selection of items that you define. Alternatively, you can specify any custom event being sent to Swrve.
Step 6: If you are creating an engagement test, in the Event rate is defined by section, specify how the event rate is defined. That is, specify the measure of user activity by which Swrve divides the number of times the event is sent (this ensures that metrics are constant over time). Otherwise, proceed to the next step.
The available definitions are:
- Number of sessions – select this option if it only matters how many times per session a user sends the counting event.
- Time spent by user in the app since test start – select this option if it matters how often a user sends the counting event during the A/B test.
- Another event – select this option if the counting event happens based on a specific activity (event) within the app.
Step 7: (Optional) In the Target Users section, target your A/B test at specific users; for example, you can target the test at specific user segments or at new users who join after the start of the test. You can also set a cap on the number of participants in a test or assign the test to user partitions in order to run A/B tests in parallel with no overlap of users between tests. For more information about these actions, see Targeting users in A/B tests.
Step 8: Select Variants to proceed to the Variants screen. The control displays by default.
Defining test variants
To define each of your test variants (the number of which you specified in the Number of Treatments field on the Build A/B Test screen of the workflow) complete the following actions on the Variants screen.
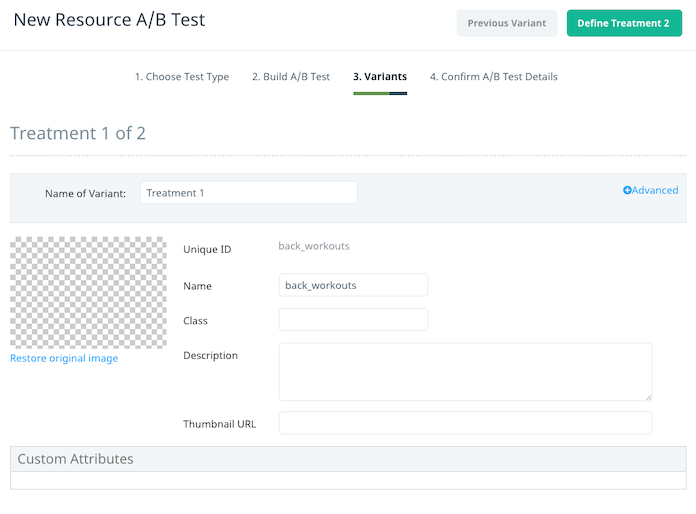
Step 1: Select Define Treatment n, where n is the variant number.
Step 2: (Optional) Select Advanced and in the Worth of successful outcome field, assign a weighting to define how much a successful outcome is worth to you. You could, for example, use the price of an item to weight the outcome in a price sensitivity test; if you are testing the price of an item at $1, $2 and $3, then a successful purchase of the item is worth x1, x2 and x3 respectively. A variant’s score (displayed in the A/B Test Progress table on the Resource A/B Test Details screen after you have started the test) is the normalized total of the counting event multiplied by the assigned Worth of successful outcome.
Step 3: In the Custom Attributes section, in the value field, enter the modified custom attribute for your variant. For example, if you defined an upgrade button resource with a text attribute that is set to Click Here, you might want to set the text attribute of the variant to Click to Upgrade!
Step 4: Repeat the above steps for each variant.
Step 5: Select Show A/B Test Summary to proceed to the Confirm A/B Test Details screen.
Step 6: Select Create A/B Test to create the A/B test.
Before you start your test, you can still edit the test and its variants by selecting Edit A/B Test. After you start the test, you can no longer modify it; you can only finish, abort, or delete it.
QA testing the A/B test
If required, QA test your A/B test before starting (deploying) it. For information about QA testing your A/B test, see QA testing A/B tests.
Starting and monitoring the test
To start (deploy) your test:
Step 1: On the Resource A/B Test Details screen, select a Start date and End date. Leave the default campaign start and end values as ASAP and Ongoing to activate your campaign immediately or keep it going indefinitely.
Step 2: Select Start Test. (If you are returning to a test that you created previously, but have not started, first select the test on the Resource A/B Testing screen.) You can only start an A/B test which has already been created and is in Staging status.
The following occurs when you have started your test:
- Swrve immediately sorts all known users who qualify for the test (based on the restriction criteria you have already set) into groups:
- Group 1: users who receive the control.
- Group 2, 3,…n: users who will receive one of the n variants of the resource.
- Swrve automatically creates a segment for each of the above user groups so that you can track their behavior over time. Swrve also automatically creates an annotation to delineate the start of the A/B test in Trend reports. Swrve’s automatic segments provide insights into the behavior of users who are being tested. Segment-based viewing of, for example, revenue KPIs, retention KPIs and funnels can provide critical insights into your test. They can help you to select the winning variant and they can continue to provide information even after you finish your A/B test, therefore enabling you to monitor the long-term behavior of tested users. For more information about Swrve’s Trend report, see Trend Reports. For general information about Swrve analytics, see Intro to analytics.
- When a specific user returns to the app to start a new session, the app must first call the Swrve A/B Test API to determine if that user has been selected and, if so, what version of each A/B test resource to provide to them. If applicable, the user is then served the A/B test resource. As users can be active participants in multiple (non-overlapping) A/B tests at the same time, they may be served a list of multiple resources from various active A/B tests when they return for a new session.
Step 3: Monitor the test over time to help identify the winning variant. The A/B Test Progress section on the Resource A/B Test Details screen provides a snapshot of test progress.
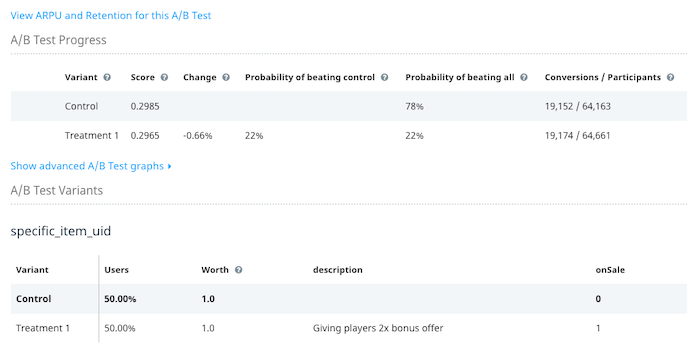
To view ARPU and Day-7 retention data on a KPI Metrics Trend Report for the control and all variants, select View ARPU and Retention for this A/B Test. If there are at least 100 participants in each A/B test variant, the following additional Bayesian testing graphs and metrics display:
- Show advanced A/B Test graphs – select to view the following advanced Bayesian testing graphs:
- Probability of beating all over time – this shows the trend relating to the variant winning the test.
- Score over time – for a conversion test, this shows the trend relating to the proportion of test participants in each variant that have triggered the conversion event. For an engagement test, the score over time relates to the number of counting events sent by users in that variant.
- The Probability of Beating control and Probability of beating all metrics are populated in the A/B Test Progress section.
Finishing the test
When you are satisfied with the results of an A/B test and you want to either revert to the original version of the resource you are testing (the control) or deploy the winning variant of the resource, on the Resource A/B Test Details screen, select Finish Test.
Selecting the control as the winner
If you select the control as the winner, the A/B test stops serving the variants to all users. The A/B test does not serve any differences to users, as the control is identical to the default version of the resource which is already available in the app.
Selecting the control when finishing a test has the same effect as deleting the A/B test, except that the history of the A/B test is saved on the Resource A/B Testing screen. Deleting an archived A/B test has the effect of deleting the history of the test.
Selecting a variant as the winner
If you select a variant as the winner, the A/B test begins serving the chosen variant to all users whose app version matches the app version restrictions of the test. Swrve serves that variant until you select Apply Changes on the Resource A/B Test Details screen. This action updates the resources to match the resources in the winning variant.
These changes are deployed to your app differently depending on how your development team instrumented resource A/B testing for your app:
- If your development team instrumented resource A/B testing using the Get User Resources Diff API call, your users do not see any changes until your app client code or server data is updated. That is, the new resource values are not sent to your app. In this instance, Swrve recommends that you keep your A/B tests in the Finished state until your development team updates your app. Selecting Apply Changes is then just a final clean-up step to reflect the new resource values in your app.
- If your development team instrumented resource A/B testing using the Get User Resources API call, your users see the changes the next time they start an app session. That is, once you select Apply Changes, the changes are final and are served to all users.
Once you have selected a variant as a winner, you can still track the A/B test variants through the segments that Swrve has automatically created for your A/B test. Keep the A/B test in Finished or Archived status if you want to be able to see all your variants in the Segment list in the Trend Reports, Events, and User Cohorts reports. This enables you to monitor the behavior of users who received your A/B test variants, even after the test has finished.
For more information about these reports, see the following articles:
You can also target in-app messages at the user segments that Swrve has automatically created for your test variants. Alternatively, you can serve another A/B test to a variant of your A/B test.
Next steps
- View A/B testing best practices. For more information, see A/B testing best practices.
- Find information about aborting, deleting and archiving A/B tests. For more information, see Aborting and deleting A/B tests.
- Find information about Trend reports, the Events report and the User Cohorts report. For more information, see Intro to analytics.