Salesforce Journey Builder
Supported actions
Swrve delivers a powerful out-of-the-box API-to-API integration with Marketing Cloud.
Use Swrve’s Salesforce connector to include Swrve-supported mobile engagement actions in your Journey Builder journeys, such as:
- Trigger in-app message and embedded campaigns.
- Send rich media push notifications with custom properties and custom deeplinks.
- Send events from Marketing Cloud to Swrve.
- Update user properties of mobile users in Swrve.
- Trigger any of the business logic preconfigured in Swrve integration.
From your mobile app, use the Swrve connector to instantly:
- Initiate a Marketing Cloud interaction for a user based on their real-time actions in the mobile app.
- Update Marketing Cloud contact information with data coming from the Swrve-powered mobile app.
- Update location information when a user triggers a geofence.
Prerequisites
- To use Marketing Cloud with your Swrve-powered app, your CSM must configure your Salesforce integration in Swrve. For information, see Salesforce Marketing Cloud.
- If you’re using an external user ID to track users as part of Swrve’s User Identity feature, you need to generate an Identity secret key on the Integration Settings screen of your Swrve dashboard. For more information about managing your API keys, see Integrate your app.
Install Swrve in Journey Builder
To get started with Swrve for Marketing Cloud, see the Swrve app page on the Salesforce AppExchange and follow the instructions to install the app.
After you install the app, enter your credentials on the login screen to connect to Swrve and get the mobile app access credentials.
Create a special API-only user in your organization, solely for integration purposes. That way, even if an actual user leaves your organization, you’ll always have a user with the correct permissions available.
Swrve configuration
To complete your integration, your CSM must set up data rules that control how information flows between Swrve and Marketing Cloud. While you can select the field values from pre-populated lists, we recommend contacting your CSM at support@swrve.com for a detailed walk-through.
To configure the Marketing Cloud Adaptor and create the required rules, you need to provide the following credentials for the associated actions:
- FTP location, file path, user name and password – Required for bulk data upload of Swrve data into Marketing Cloud.
- Client API ID and Secret key – Required for real-time updates from Swrve to Marketing Cloud and Swrve event-triggered journeys.
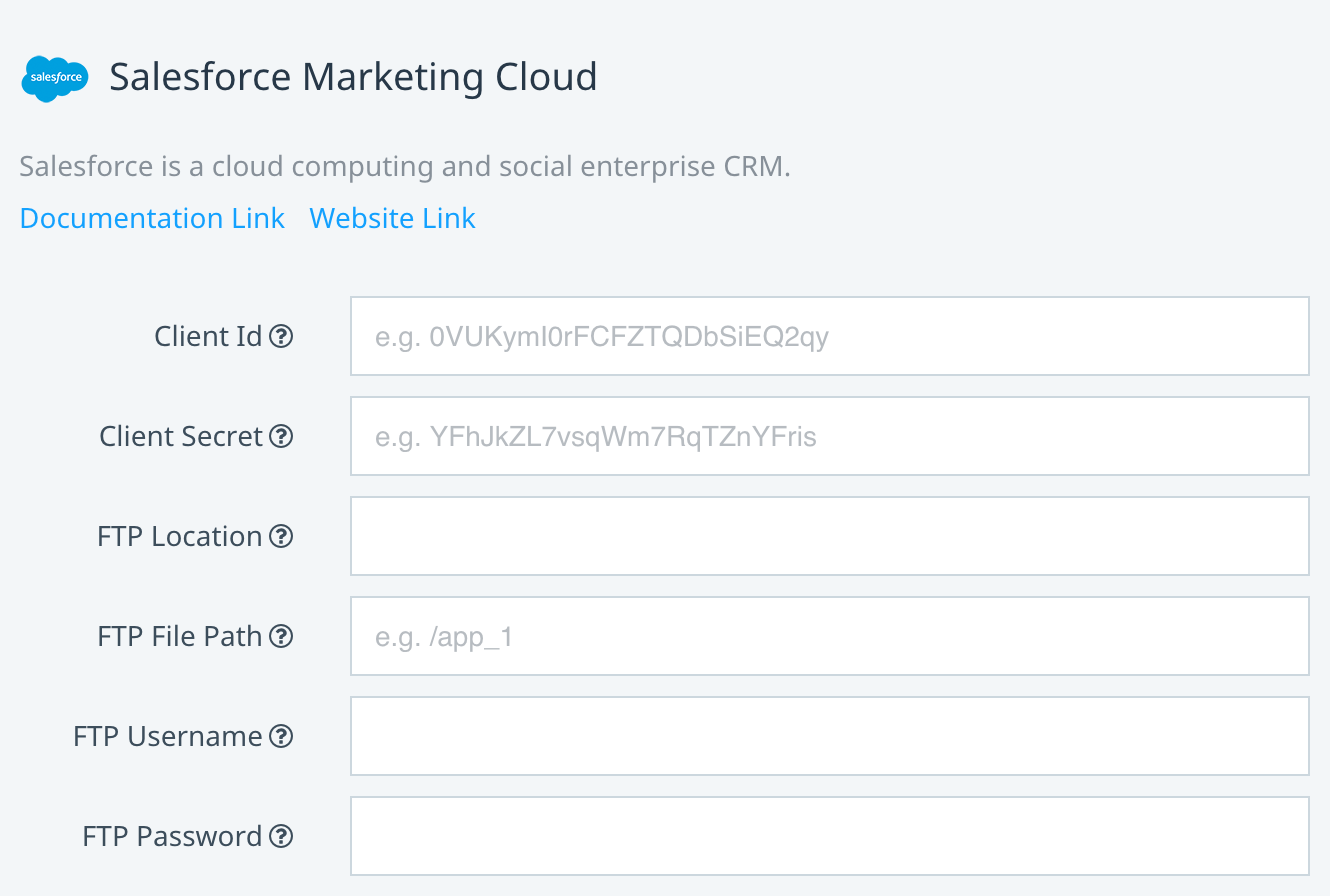
For information on how to get your Client API ID and Secret key, see the Marketing Cloud getting started guide.
Create interactions in Journey Builder
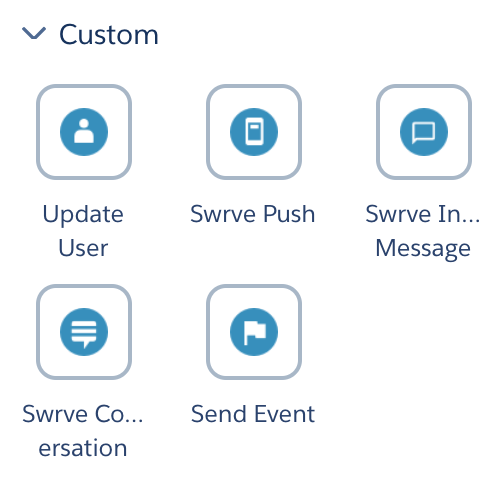
After you install the Swrve for Marketing Cloud app, all of the supported mobile engagement actions are available in the Journey Builder canvas, on the Activities panel, under the Custom section. There are four independent actions available to use in the journey (Note: Swrve Conversations are deprecated as of December 2024):
- Update Swrve User Profile
- Swrve Push Notification
- Swrve In-App Message*
- Send Swrve Event
*Includes our new embedded campaign experiences.
There are also three corresponding real-time actions that Swrve can take to change how a user lifecycle evolves. These are controlled by data rules in Swrve and can be as simple or powerful as your business requires.
- Update Marketing Cloud contact.
- Update Marketing Cloud Data Extension; for example, with geofence data.
- Initiate a specific journey for a user, based on a trigger in Swrve.
Send push notification
Swrve push notifications sent from Journey Builder are highly customizable. They can contain any of the information you have available in Marketing Cloud about a contact and you can inject that information into the notification in the same way you would inject custom properties into an email. You can also include rich media options such as images, GIFs, video, and audio files in your notification content. For more information on the rich media options available with Swrve push notifications, see About rich push notifications.
It is also possible to fully customize any of the deeplinks or payloads associated with your push notification. This is often used to send a user to a custom location within the app or personalize the app behavior as soon as the user opens the push notification.
There are two options for including a Swrve push notification in your journey: using an existing Swrve push via API campaign or creating a new campaign directly in Journey Builder. However, some campaign functionality that Swrve supports is not available in Journey Builder. To use features such as content localization, linking the push notification to an in-app or embedded campaign, or QA testing the content on a device before you launch the campaign, we recommend creating the push via API campaign in Swrve first.
To add a Swrve push notification to your journey:
Step 1: In the journey side bar, under Custom actions, select and move Swrve Push to the desired point in the journey.
Step 2: To display the configuration options, select the Swrve Push action.
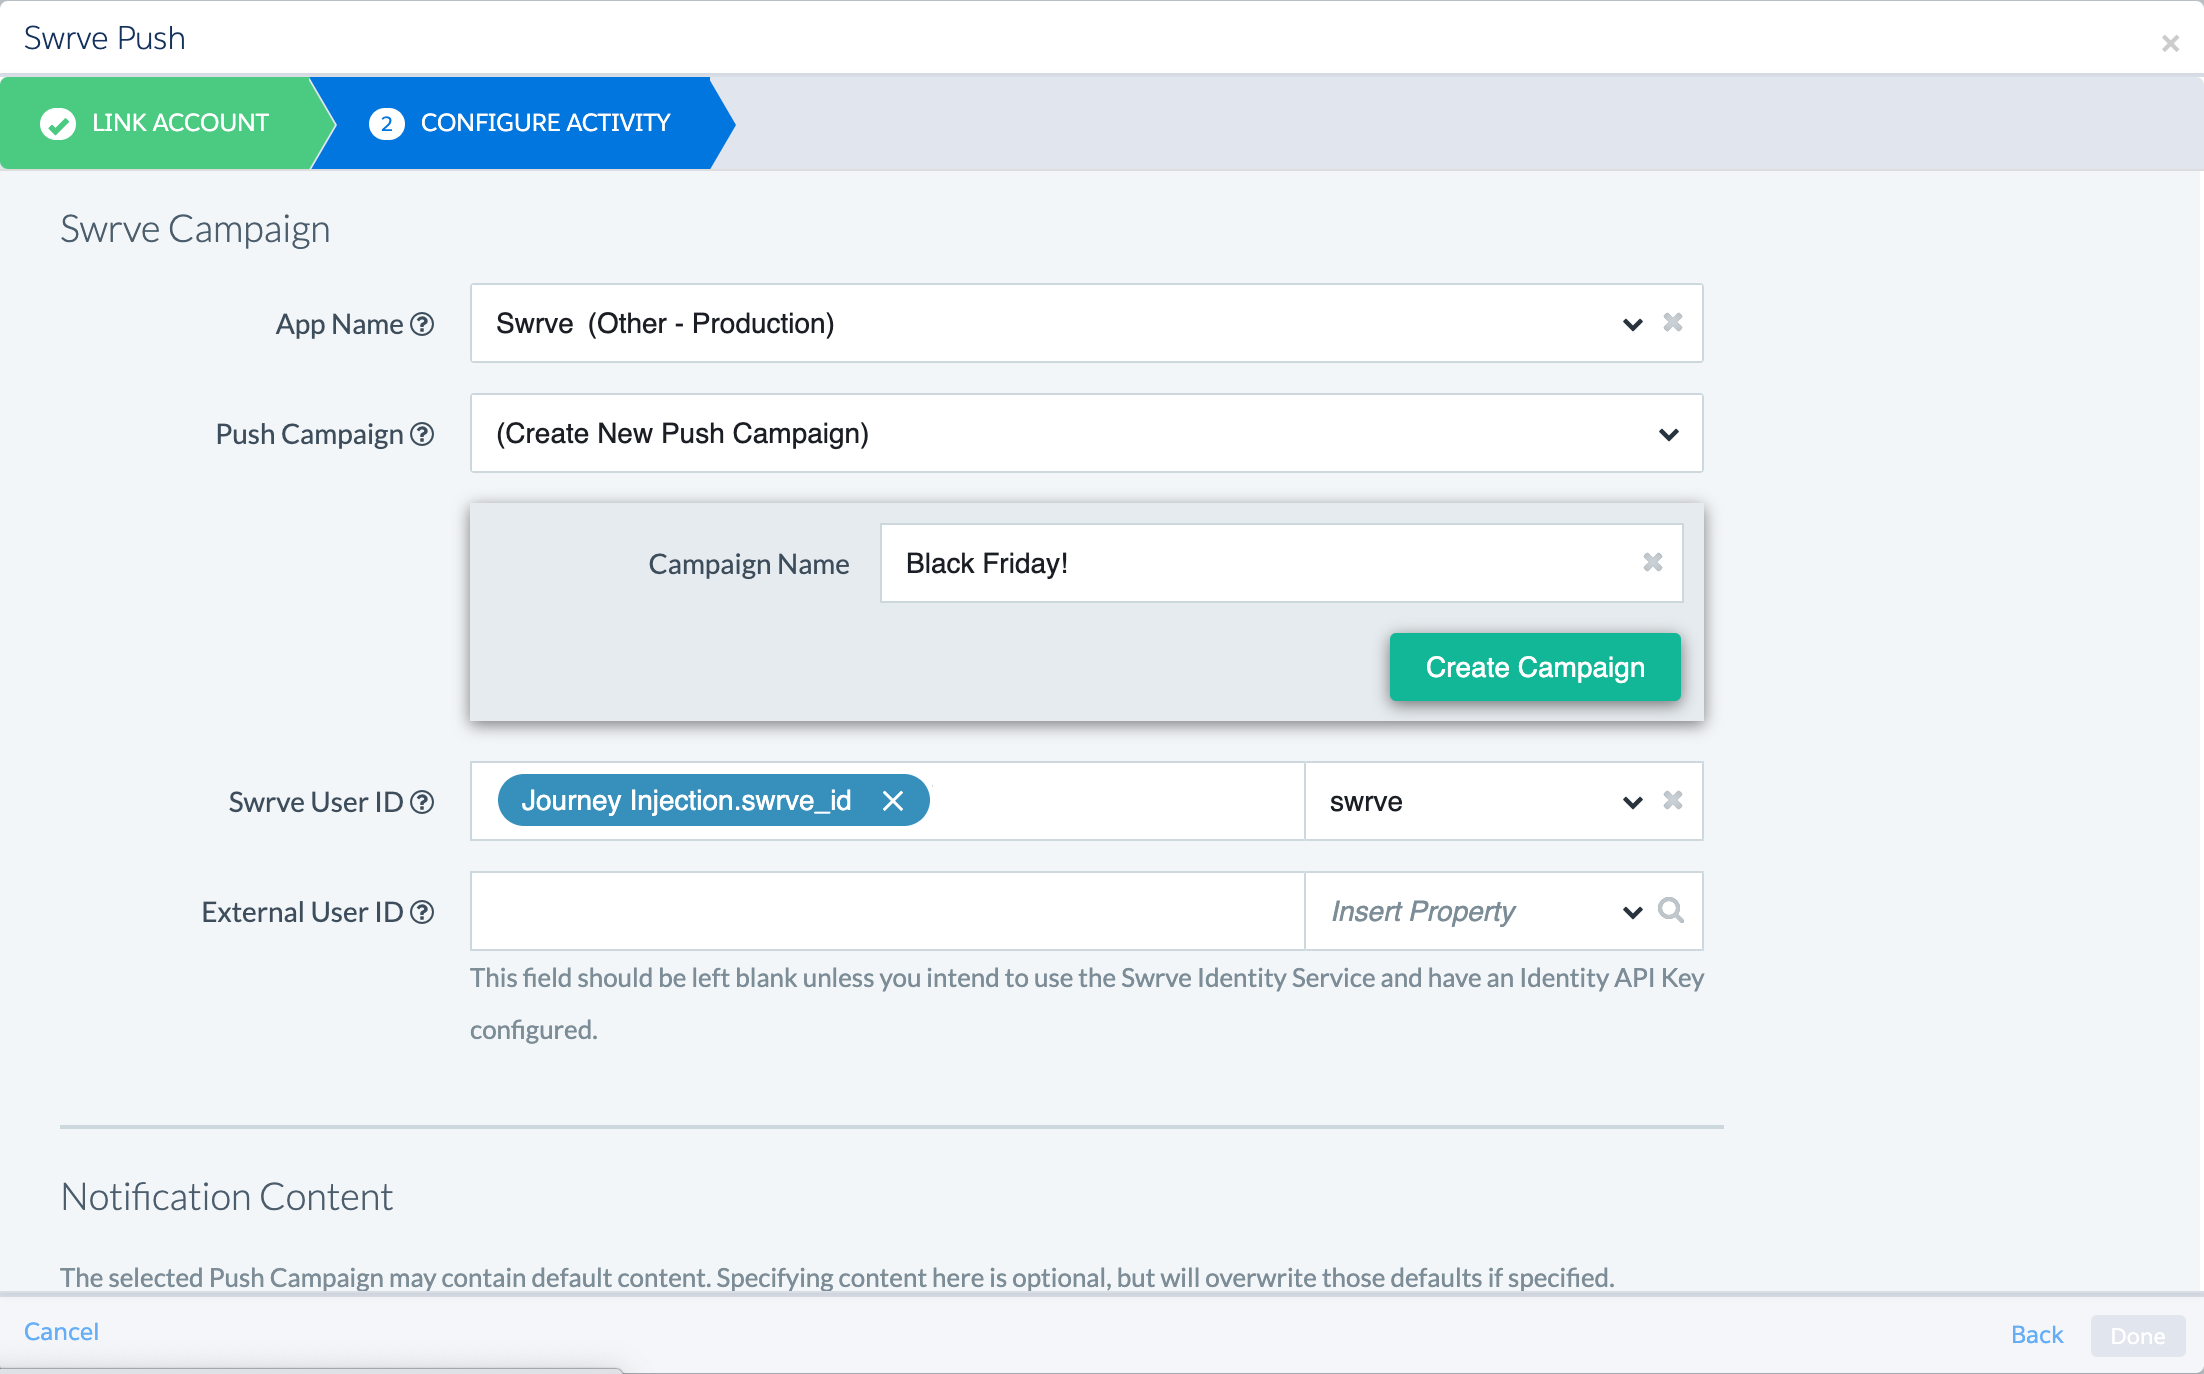
Step 3: In the Configure Activity dialog, complete the following sections as required:
Swrve Campaign
- App Name – Displays a list of your Swrve apps that are linked with your Salesforce account. Select the app you want to use for the campaign.
- Push Campaign – To take advantage of all of Swrve’s built-in tracking and analytics, the Swrve Push activity uses our Push API and corresponds to a push via API campaign in Swrve. There are two options for selecting the push campaign:
- Create New Push Campaign (New!) – To create a new push via API campaign from the push activity, select (Create New Push Campaign), enter a Campaign Name, and then select Create Campaign.
- Select existing campaign – To use an existing campaign, first create and activate the push via API campaign in Swrve, then select the campaign from the list. For more information, see Push via API.
- Swrve User ID – The key you use to link Swrve and Marketing Cloud. This is the ID Swrve uses to uniquely identify a mobile app user. In some cases it may be the Marketing Cloud master user table primary key, while in other cases it will be a separate key. In all cases there is a 1:1 mapping from Swrve User ID to app user.
- External User ID – If you’re using Swrve’s User Identity feature to track your users across multiple devices, platforms and channels, this is the app-specific ID you’re using to identify your users. Note: You must include either the Swrve User ID or an external user ID. If you include both, the external user ID is used.
Notification Content
If you selected an existing Swrve push via API campaign and it contains default content, any content or rich media you add here will overwrite those defaults. Campaigns you create directly from Journey Builder do not include default content.
- Body Text – The push notification content. This can be text that you enter directly or that is completely extracted from the Salesforce user attributes or one of the app’s data extensions, or a mixture of the two. To insert data from your contact record, select the property name from the Insert Property list.
- Title – The notification title. To include a custom property in the title, select Insert Property and then select the desired property from the available list.
- Subtitle – For iOS10+ devices, text that is displayed as the subtitle in push notifications. For Android devices, text that is displayed after the title. To include a custom property in the subtitle, select Insert Property and then select the desired property from the available list.
- Alert Sound – To set a sound for your push notification, select the Alert Sound list and select the desired sound. For information about configuring custom sounds so that they are available in the Alert Sound list, see Intro to push notifications.
- iOS Category – If your push notification is targeted at Apple users and you’ve implemented actionable categories, use the iOS Category field to make the notification appear as an interactive push notification on devices running iOS 8 or later. Select a custom action category (for example, Yes/No, Ignore/Respond) from the list. For information about iOS categories, see the iOS integration guide.
- Engagement Action Deeplink/URL – If you want to direct the user to a particular custom location when they engage with the notification, enter the deeplink or URL address.
- Silent Payload JSON – Use silent notifications to update your app content in the background, and, if applicable, add a badge icon to notify the user about the app update. Enter the JSON object that is sent to the app using a silent push notification (background app update). Unlike custom parameters, you can provide any valid JSON object here, with any level of nesting. This replaces the Advanced – Custom Payload parameters that you might send with a standard notification.
- Badge Number – Sets the iOS device’s badge icon to a specific number. This overwrites any previous value set. Use 0 to clear the current badge count.
- Time to Live – This parameter specifies how long (in seconds) the notification should be kept before being discarded (if the device is offline). Minimum value is 0, maximum value is 2419200 (4 weeks).
- Collapse Key – This parameter (passed as an integer) allows you to replace or update earlier notifications with the same identifier (provided they haven’t been read) with new message content.
- Advanced – Custom Payload – If you want instructional parameters to be sent to your app when you send the push notification, define custom key/value groups or pairs. For example, you might want to direct the user straight to the store (instead of the default start screen) when they open your app from the push notification. Alternatively, you might want tracking parameters to be passed from the push notification for use by your internal or external tracking systems. Note: The custom parameter is not supported in silent push notifications (background app updates). Use Silent Payload JSON instead.
To add custom key/value pairs:- Select Advanced – Custom Payload.
- In the Custom key/value pairs section, select Add key with sub pairs or Add key/value pair, as required.
- Enter a key/value pair in the Key and Value fields. For example, go_to/store, trial/30days or discount/10percent. The Payload Preview displays the actual code sent with your push notification.
The Add key with sub pairs option enables you to nest multiple key/values under the group name in the JSON payload. Consult with your development team about the appropriate key/value pairs to use to trigger the outcome you require.
Advanced – Rich Media – If your app supports it, you have the option to include rich media in your push notification content that is displayed on supported devices. For more information on Swrve rich push notifications, see About rich push notifications. To include rich media options, select the Advanced – Rich Media link and complete the following fields:
- Media Type – The type of media you want to include in your notification content. The available options are:
- Image – Displays the URL as an image in the locked, banner, or extended view of the push notification.
- Audio – (iOS only) Include an audio file in your notification that a user can play directly in the extended view of the push notification.
- Video – Links to a hosted video and provides options for watching the video in a related player (for example, YouTube, Vimeo) from the extended view of a push notification.
- GIF – (iOS only) Displays a GIF in the extended view of the push notification.
- Media URL – The URL of the file you want to use for your rich media content. The URL must be a valid and HTTPS URL and include a file extension. If required, you can customize the media that’s include in the notification (for example, reference a customer’s profile picture or the destination of a flight they searched for). To include a custom property in the URL, select Insert Property and then select the desired property from the available list.
- Video Thumbnail URL – For notifications that include a video, the URL of the thumbnail image that will be displayed on the notification in locked or banner view. To include a custom property in the URL, select Insert Property and then select the desired property from the available list.
- Buttons – Lets you include up to three buttons to give your users custom options for interacting with the notification in extended view. Select the Add Button link and complete the following for each button:
- Button Text – The text for the button label.
- Action Type – The button action. The options are Open App, URL / Deeplink (directs the user to a custom location) or Dismiss.
- URL / Deeplink – If you select URL / Deeplink, enter the deeplink or URL address for the button action.
Step 4: After you’ve selected the Swrve Campaign details and added your Notification Content, to return to the journey, select Done.
Tracking uninstalls
iOS and Android do not provide trackable feedback for app uninstalls. However, a good indication a user has uninstalled your app is when push notifications that were previously sent to them successfully now fail. This may not be true in every instance, for example, your user might be traveling overseas or their phone battery has died, but in general it’s a good indicator.
Every time you send a push notification via Marketing Cloud, Swrve tracks the response and if the push fails, records a Swrve.possible_uninstall event for that user. You can then choose to treat this user as an uninstall or wait until a number of pushes fail before you switch to email or other channels as your best way to update the user.
Real-time data transfer from Marketing Cloud to Swrve
In many cases you’ll want to send information from Marketing Cloud to Swrve. This information is per user and is transferred instantly as users hit the corresponding activity in a journey.
Swrve divides information into two logical groups:
- Events you want to count and track over time. For example, visited_website.
- Facts about a user that hold a set value at any given moment in time. For example, qualifies_for_free_shipping = true.
The following sections address both of these scenarios.
Send Event
The Swrve app enables Salesforce to send custom events to the Swrve system. You can then use those events in Swrve to trigger other mobile campaigns such as in-app messages or other Swrve actions when the custom events are received.
To send a Swrve event as part of your journey, move the Send Event action to the desired point in the journey and then select it to display the configuration options.
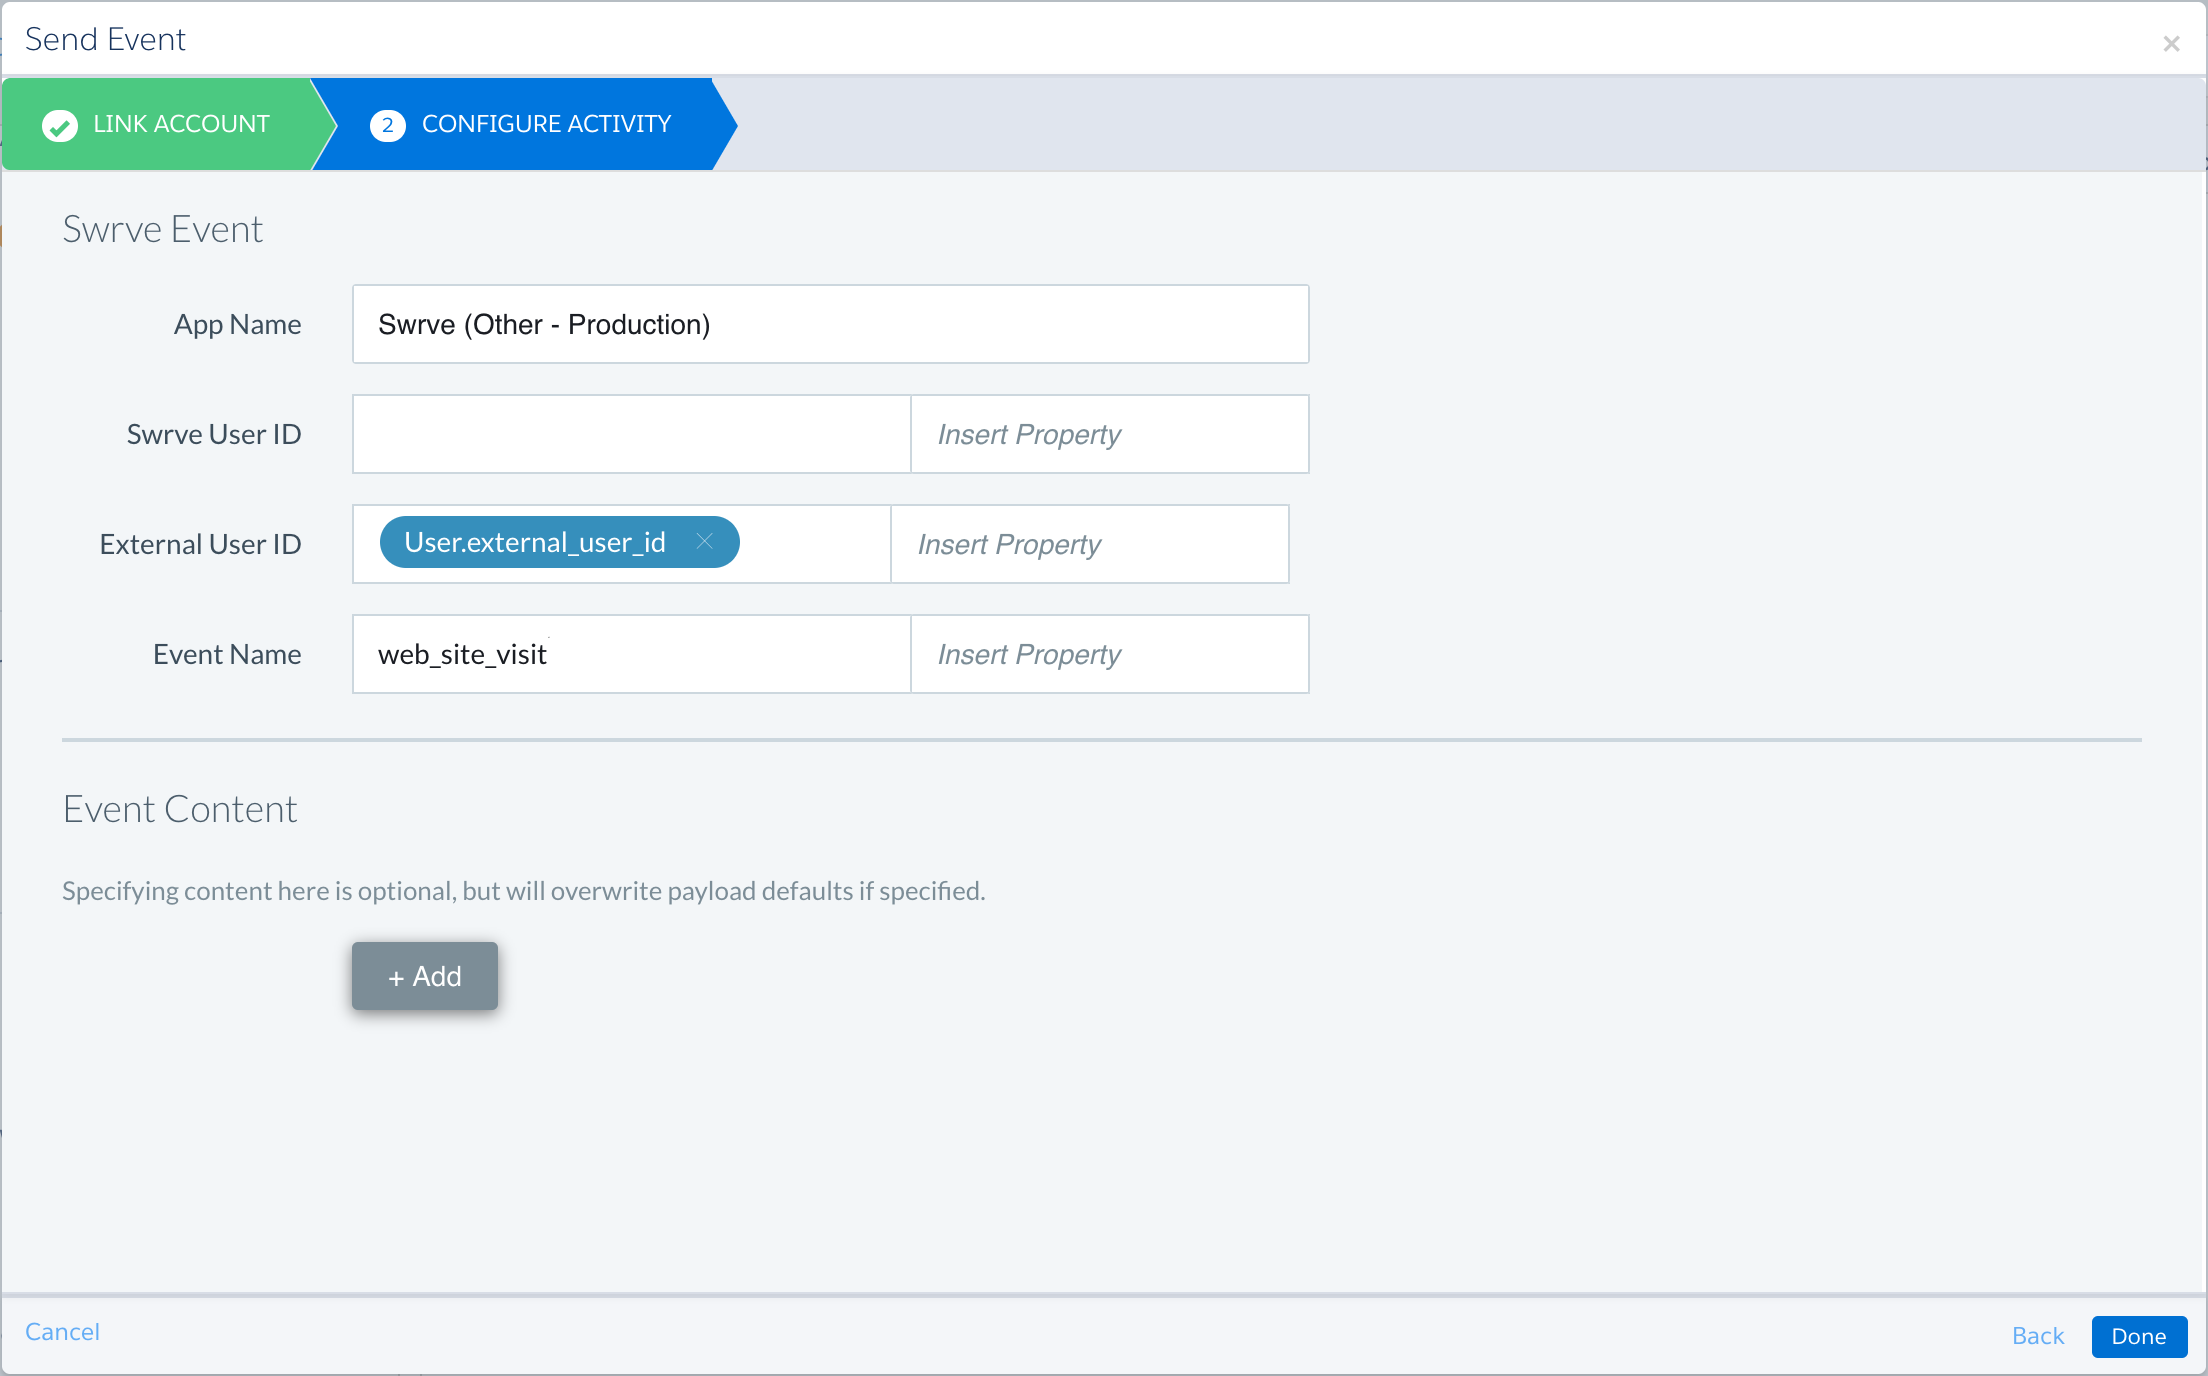
To configure the Send Event action, complete the following fields:
- App Name – Displays a list of your Swrve apps, including sandbox and production versions. Select the app you want to use for the campaign.
- Swrve User ID – The key you use to link Swrve and Marketing Cloud. This is the ID Swrve uses to uniquely identify a mobile app user. In some cases it may be the Marketing Cloud master user table primary key, while in other cases it will be a separate key. In all cases there is a 1:1 mapping from Swrve User ID to app user.
- External User ID – If you’re using Swrve’s User Identity feature to track your users across multiple devices, platforms and channels, this is the app-specific ID you’re using to identify your users. Note: You must include either the Swrve User ID or an external user ID. If you include both, the external user ID is used.
- Event Name – The name of the action or behavior Swrve records for this user. Event names must be unique, alphanumeric, contain only special characters underscore (_) and periods (.) and no spaces. Swrve counts the number of times it see this information for each user and notes the time the event arrives. For example, you might have an event called visited_website that is triggered every time a user visits the website. In your mobile dashboard you can use this information to change the app behavior based on information coming from all of your systems. If the mobile app knows that this user has really recently used your website and done so X number of times, it can behave differently than it would for a user who has not visited the website in six months.
- Event Content – When sending events, at times you may want to include additional information to help target behavior. That extra information is often described with a label (or key) and a value. In the above example, you might be interested in the section of the website a user visited and store that information in Marketing Cloud in a field called web_page. In that case, select Add to add a new key-value pair. The values of the key-value pair can be dynamically inserted from any Marketing Cloud contact attributes or Marketing Cloud data extensions.

Update User
Use the Update User action to send data you have in Marketing Cloud about non-mobile user activities to Swrve. After the Swrve user profile is updated with this information, Swrve can immediately change how it engages with the user based on this new context.
To send a user update as part of your journey, move the Update User action to the desired point in the journey and then select it to display the configuration options.
To configure the Update User action, complete the following fields:
- App Name – Displays a list of your Swrve apps, including sandbox and production versions. Select the app you want to use for the campaign.
- Swrve User ID – The key you use to link Swrve and Marketing Cloud. This is the ID Swrve uses to uniquely identify a mobile app user. In some cases it may be the Marketing Cloud master user table primary key, while in other cases it will be a separate key. In all cases there is a 1:1 mapping from Swrve User ID to app user.
- External User ID – If you’re using Swrve’s User Identity feature to track your users across multiple devices, platforms and channels, this is the app-specific ID you’re using to identify your users. Note: You must include either the Swrve User ID or an external user ID. If you include both, the external user ID is used.
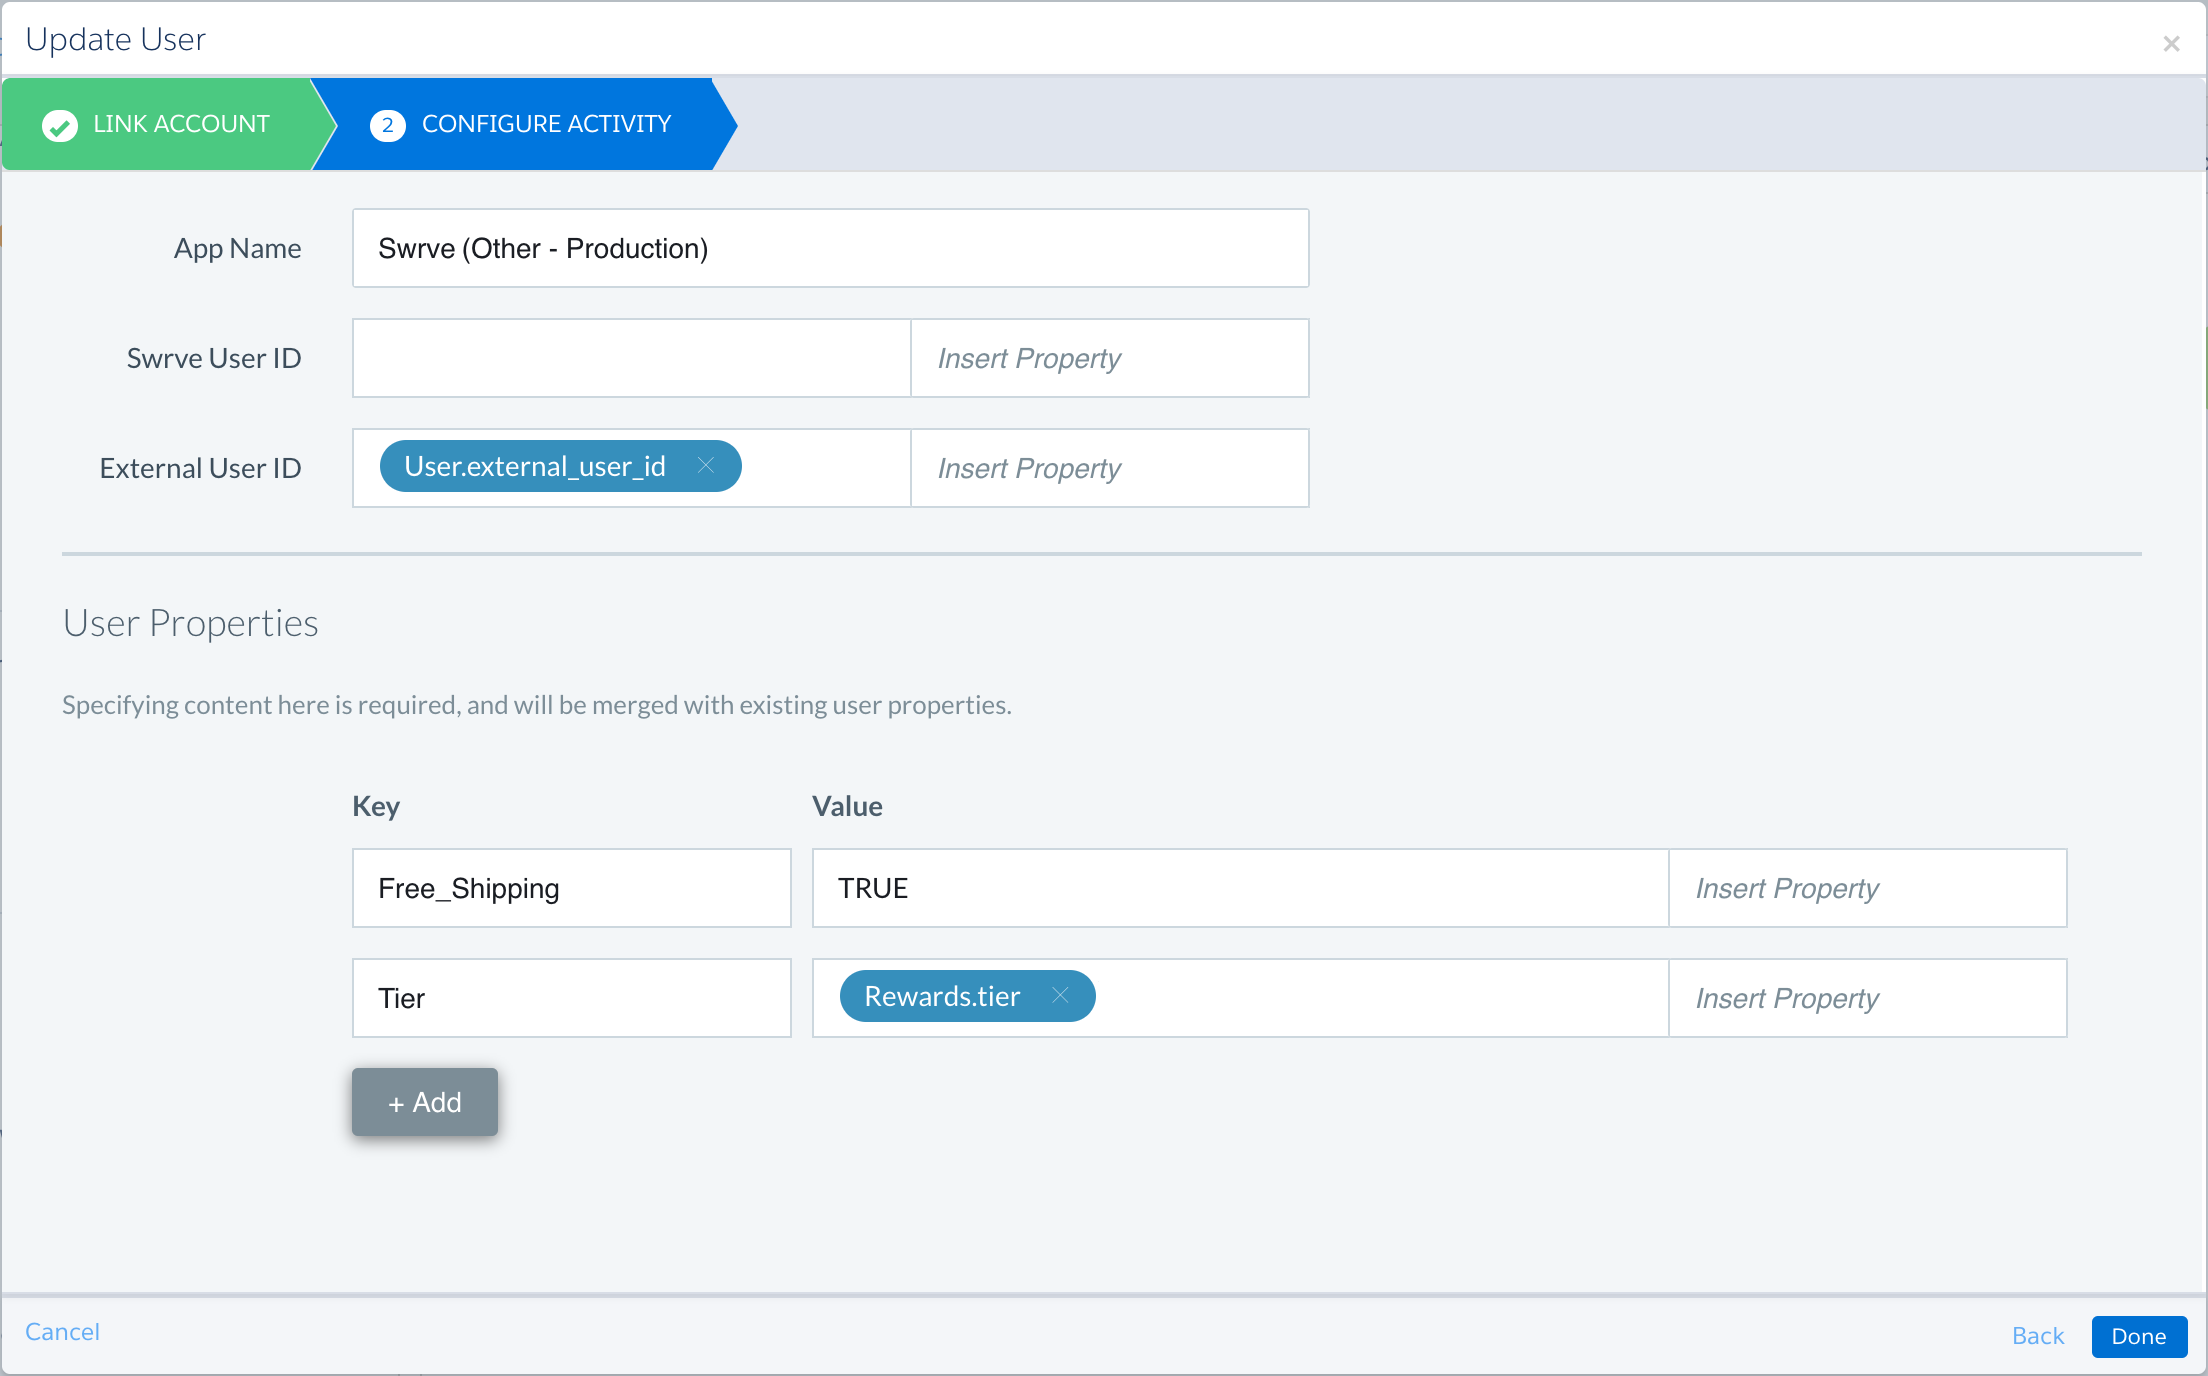
- User Properties – User properties are described with a label (or key) and a value. You must include at least one. The above example illustrates how to update the user’s profile to show they now qualify for Free_Shipping and the tier of rewards they are at. First, select Add, enter a Key called Free_Shipping and set the value to TRUE. The information about tier is stored in this instance of Marketing Cloud in a field called Rewards.tier. To update the rewards tier, add a new key-value pair called Tier and use the Insert Property list to find the corresponding value in your data extensions.
To check the existing custom properties for your app, download the Custom User Properties CSV file from the User DB Downloads screen, or in the audience builder, on the Property tab, check the list of available properties in the filter list. For more information, see Intro to user databases or Segment and audience filters.
In-app message and embedded campaigns
Use the In-App Message action to add and remove users from in-app messages and embedded campaign target audiences as part of a journey.
To make an in-app message or embedded campaign available in your journey, you must first create the campaign in Swrve. We recommend following a standard naming convention for your Journey Builder campaigns so they’re easy to find in the campaign list. For more information on the main steps involved, see one of the following:
To make the campaign available in Journey Builder, on the Define Target Audience step of the campaign workflow, select External Audience, and then select Marketing Cloud.
For in-app messages, you now also have the option to create the Swrve in-app campaign directly in Journey Builder.
To add a Swrve in-app message or embedded campaign to your journey, move the related action to the desired point in the journey and then select it to display the configuration options. If you’re including an in-app message or embedded campaign in your journey, you must add two separate actions—one that adds the user to the audience for the associated Swrve campaign and one that removes them.
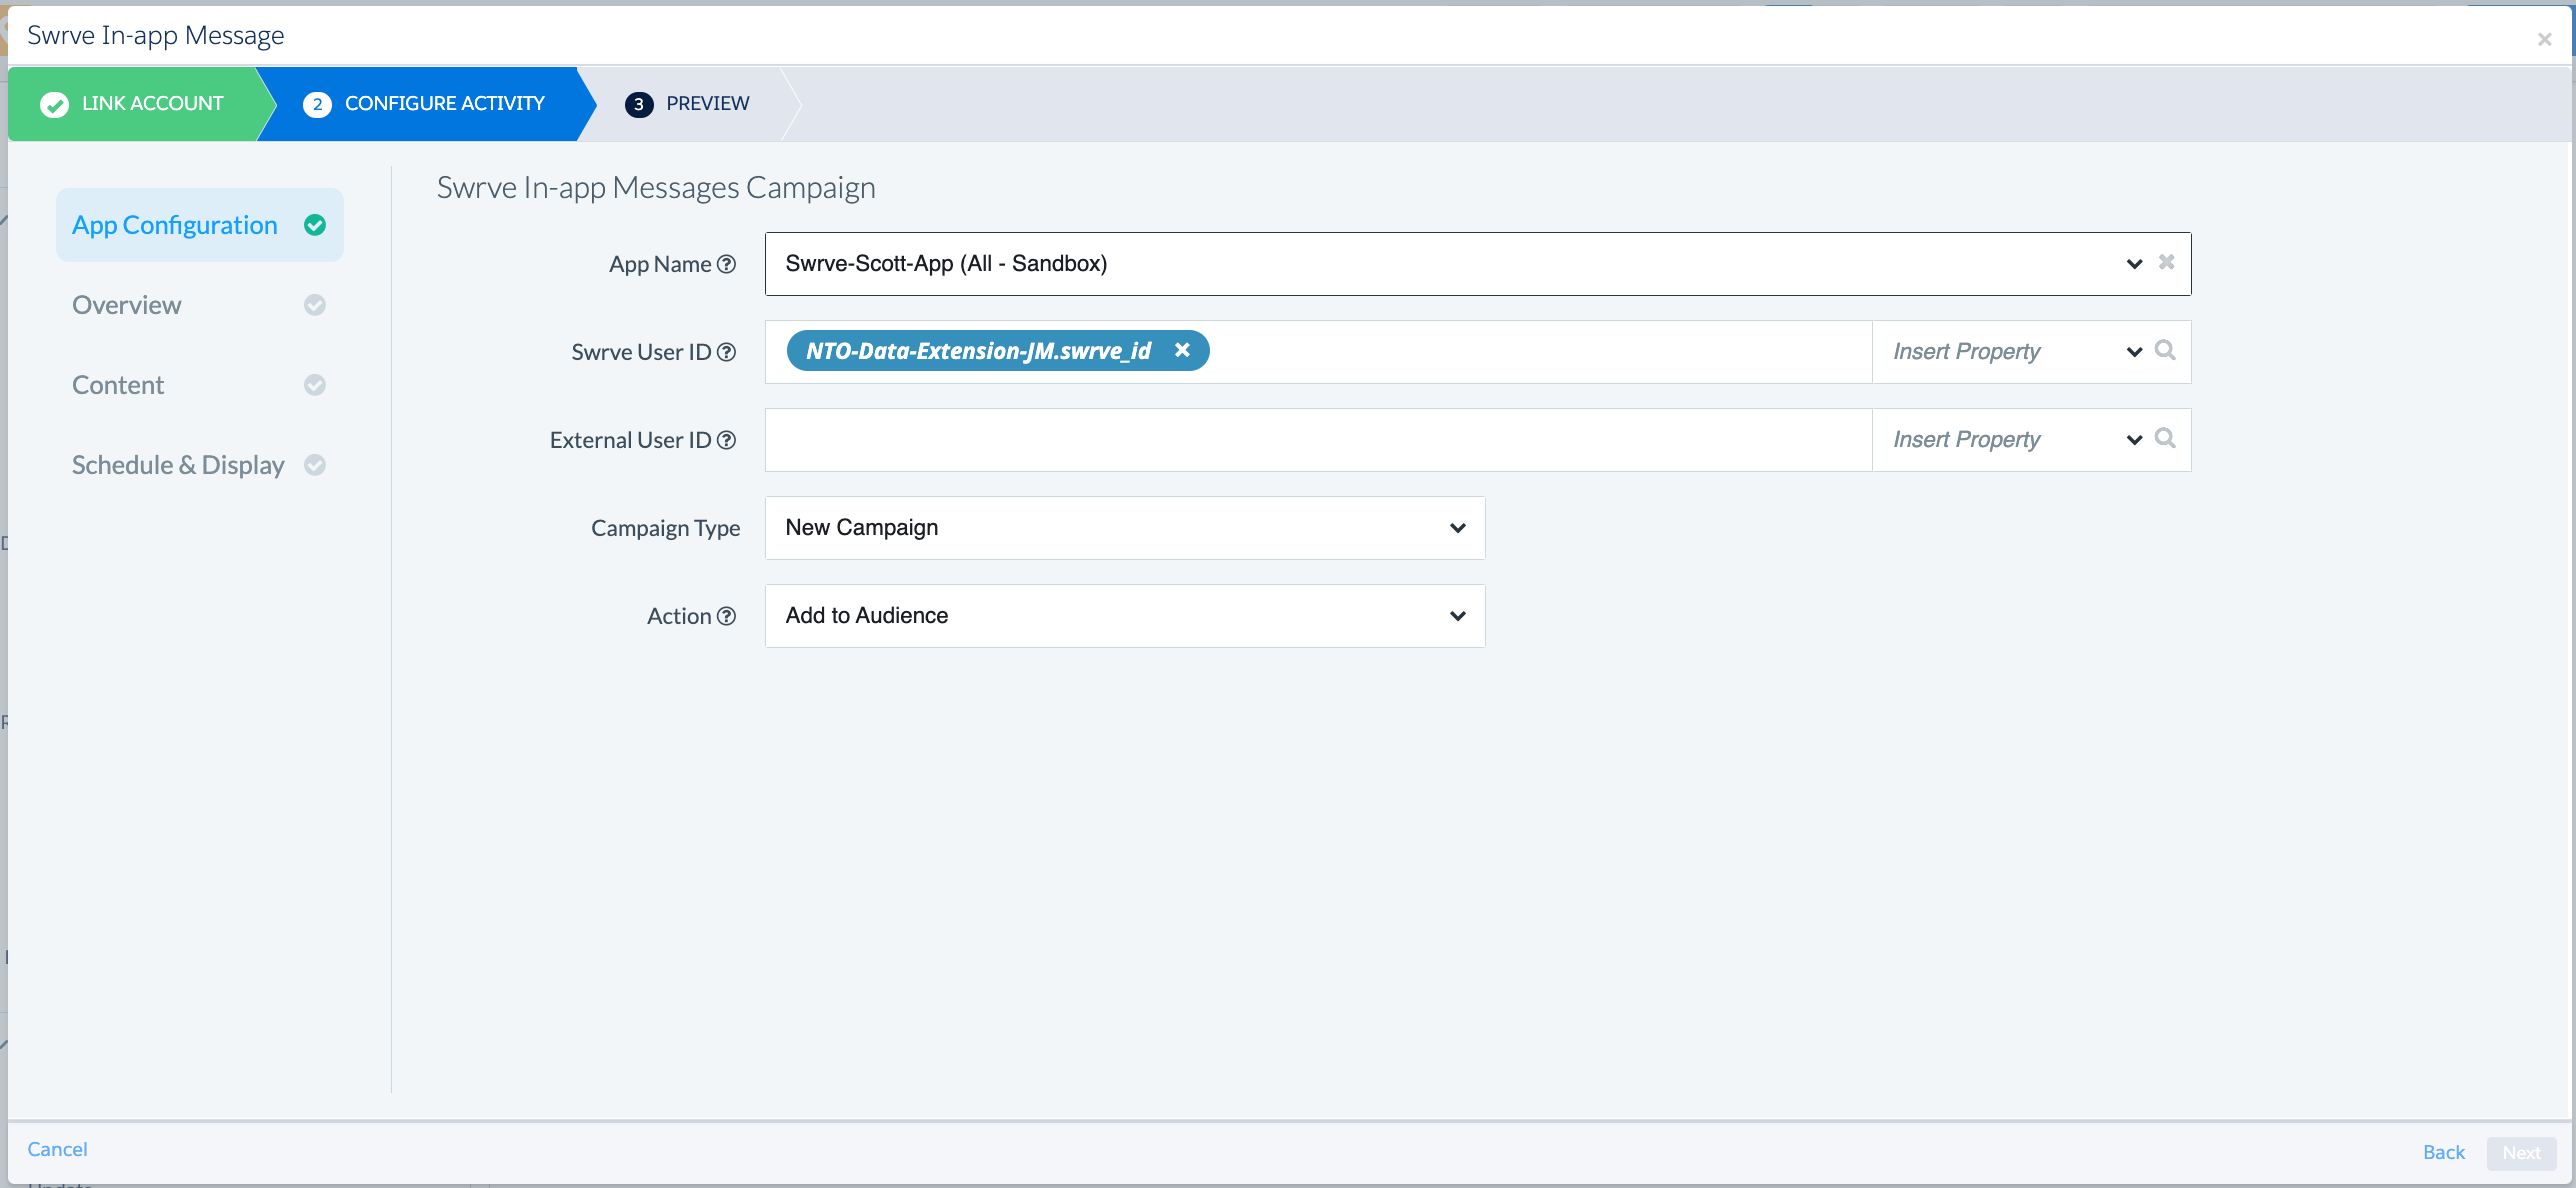
To configure the in-app message action, complete the following fields:
-
- App Name – Displays a list of your Swrve apps, including sandbox and production versions. Select the app you want to use for the campaign.
- Swrve User ID – The key you use to link Swrve and Marketing Cloud. This is the ID Swrve uses to uniquely identify a mobile app user. In some cases it may be the Marketing Cloud master user table primary key, while in other cases it will be a separate key. In all cases there is a 1:1 mapping from Swrve User ID to app user.
- External User ID – If you’re using Swrve’s User Identity feature to track your users across multiple devices, platforms and channels, this is the app-specific ID you’re using to identify your users. Note: You must include either the Swrve User ID or an external user ID. If you include both, the external user ID is used.
- Campaign Type (In-App Message Campaigns only) – There are two options for selecting in-app message push campaign:
- Create new in-app message campaign – To create a new campaign from the in-app message activity, select New campaign.
- Select existing campaign — To use an existing campaign, select Existing Campaign.
- In-App Messages Campaign – Select the campaign you created in Swrve. Ensure the campaign you select has been set to use Marketing Cloud as the external audience source.
- Action – Select the relevant action to add or remove the user from the campaign audience.
Create in-app message campaign in Journey Builder
As mentioned above, you now have the option to create an in-app message campaign directly in Journey Builder. However, the Journey Builder activity only supports basic message content, such as images and text buttons. If you want to localize or A/B test the campaign content, or use new features like multiple text boxes or pages, you must still create the campaign in Swrve.
Creating in-app message campaigns from within Journey Builder is currently available as part of our Early Access program. If you would like to have this feature enabled for your app, contact your CSM at support@swrve.com.If you selected New campaign as your Campaign type, complete the following steps.
Overview
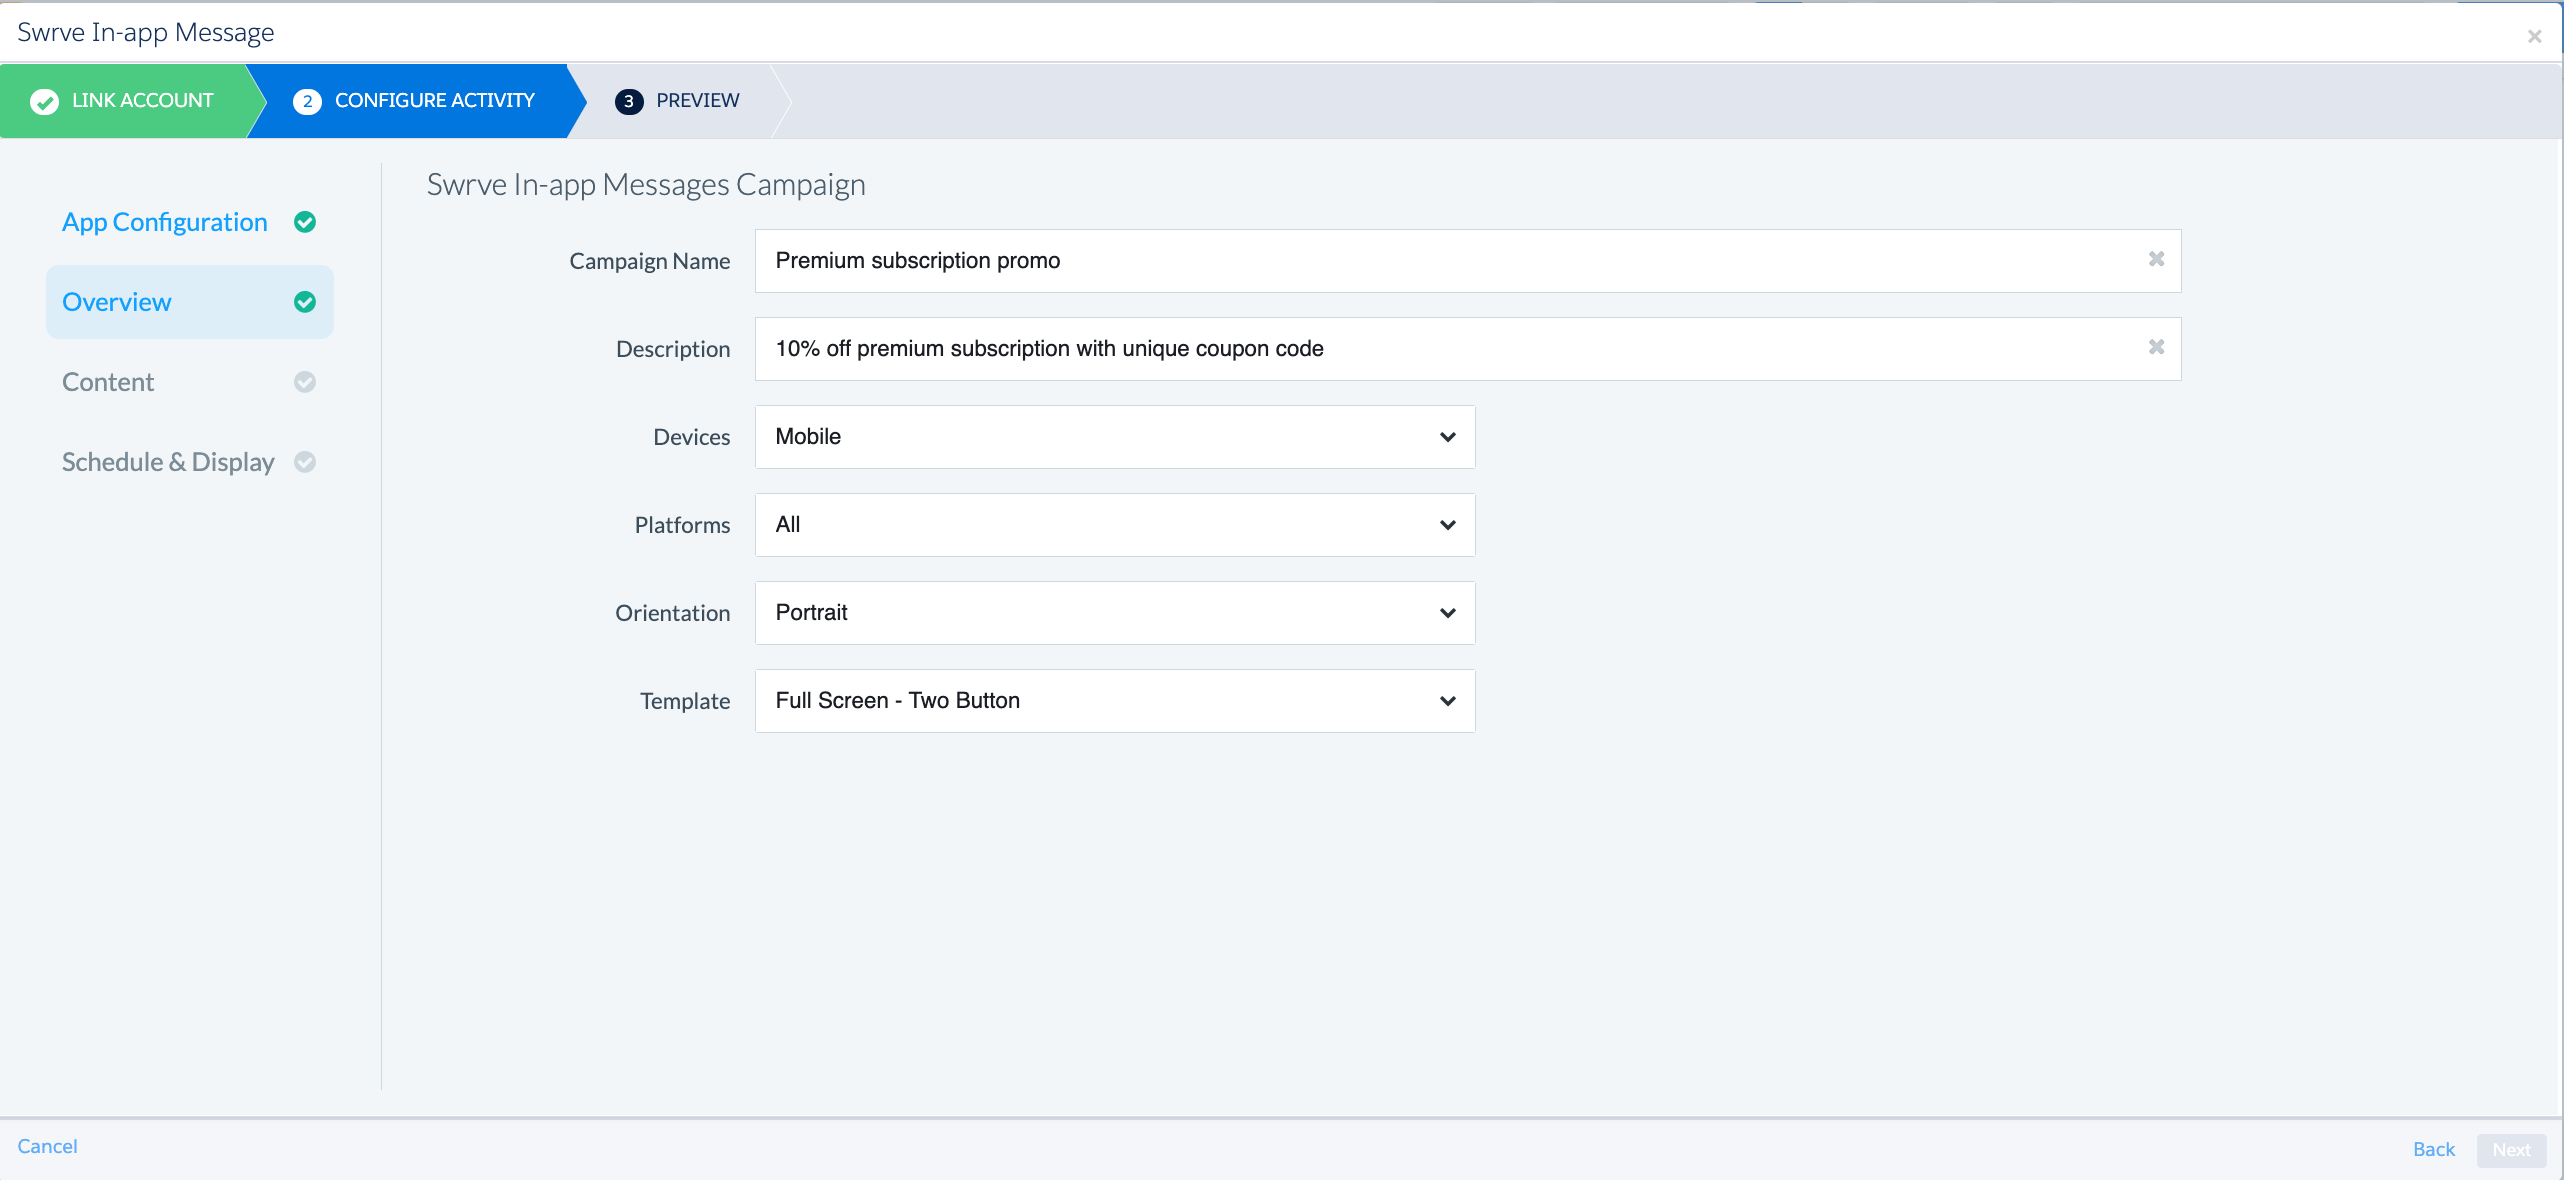
Select Overview from the Configure activity menu and complete the following fields:
- Campaign name: The campaign name. Must be unique and not use the same name as any existing in-app message campaigns in your app.
- Description: Optional description of the campaign.
- Devices: Select the types of devices you want the campaign to display on.
- Platforms: Select the specific platform you want the campaign to target.
- Orientation: Select the message orientation(s) that you want to apply to the campaign.
- Template: Select the template you want to use for the campaign content.
Content
Select Content from the Configure activity menu.
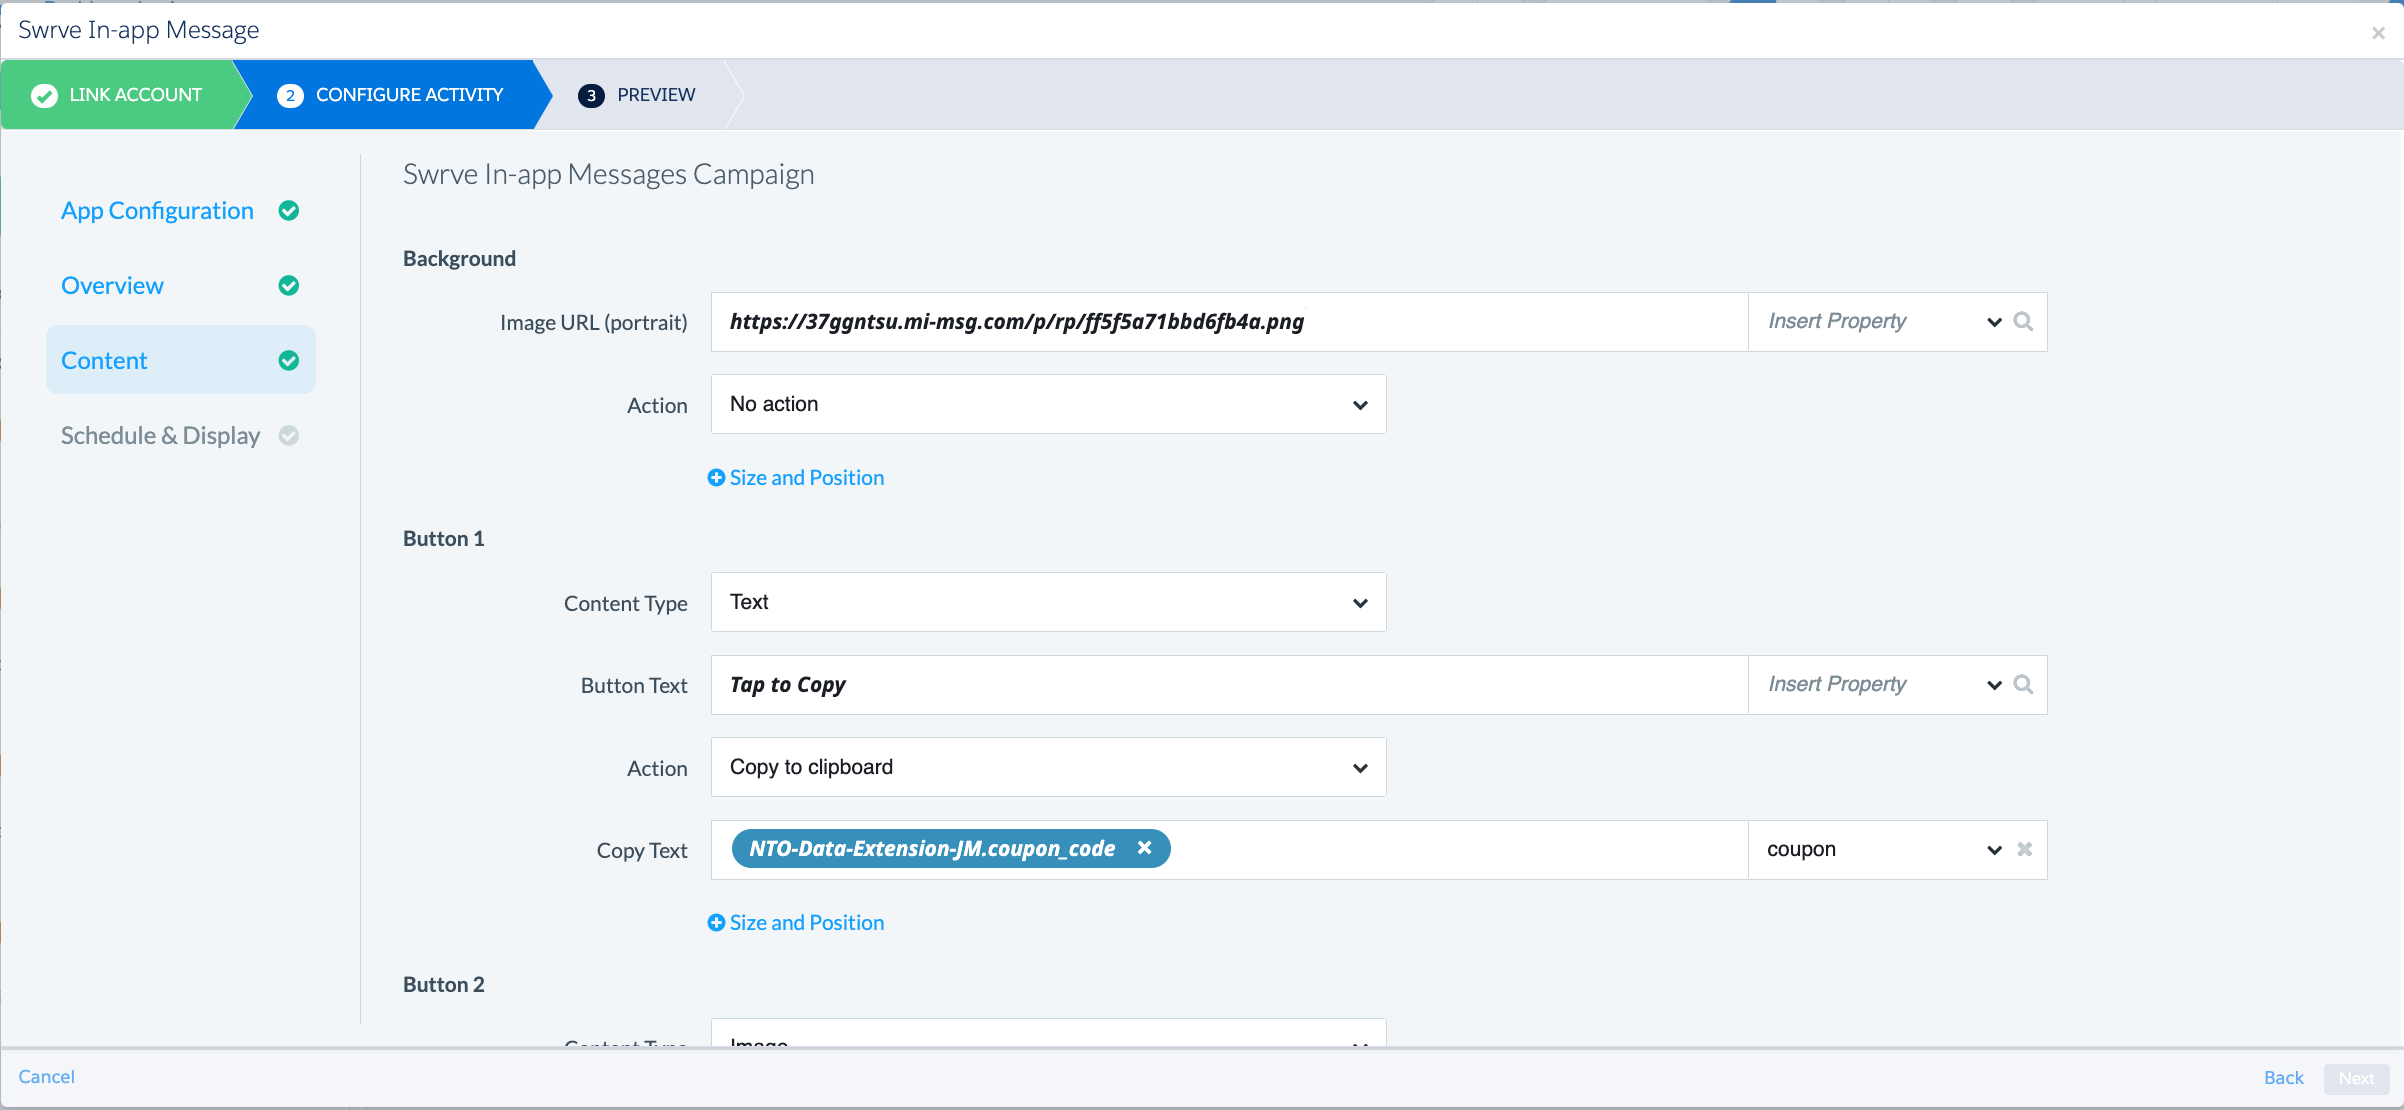
The fields displayed on the Content page depend on the template you selected on the Overview page. Your in-app message campaign is made up of a background image and one or more buttons. While your campaign must always include a background image, you can choose the number of buttons and the content type of each of your buttons.
Background
- Image URL (format name): The background image URL. To insert data from your contact record, select the property name from the Insert Property list.
Buttons
Depending on the template you selected, include additional content with your message.- Content Type: Select image or text.
- Image URL (format name): The button image URL. To include a custom property in the image URL, select Insert Property and then select the desired property from the available list.
- Button Text: The button text. To include a custom property in the button text, select Insert Property and then select the desired property from the available list.
Both the Background and Button(s) have the following fields:
- Action: To include an engagement action for the background image, select an action. No action is selected by default. If you did not select an action for your background image, then you must specify an action for at least one of your buttons.
- Deeplink: If you selected Deeplink as the action, enter the deeplink or URL address you want to direct the user to when they click the background image. To include a custom property in the deeplink, select Insert Property and then select the desired property from the available list.
- Copy Text: If you selected Copy to clipboard as the action, enter the text you want copied to the user’s device when they click the background image. To include a custom property in the copy text, select Insert Property and then select the desired property from the available list.
- Size (optional): Modify the container height and width values for your image to fit inside.
- Position (optional): Modify the image position by entering the number of pixels by which you want to move the image in the Position boxes. For example, if you enter 5 in the X box and 10 in the Y box, the image moves 5 pixels to the right and 10 pixels down from the center.
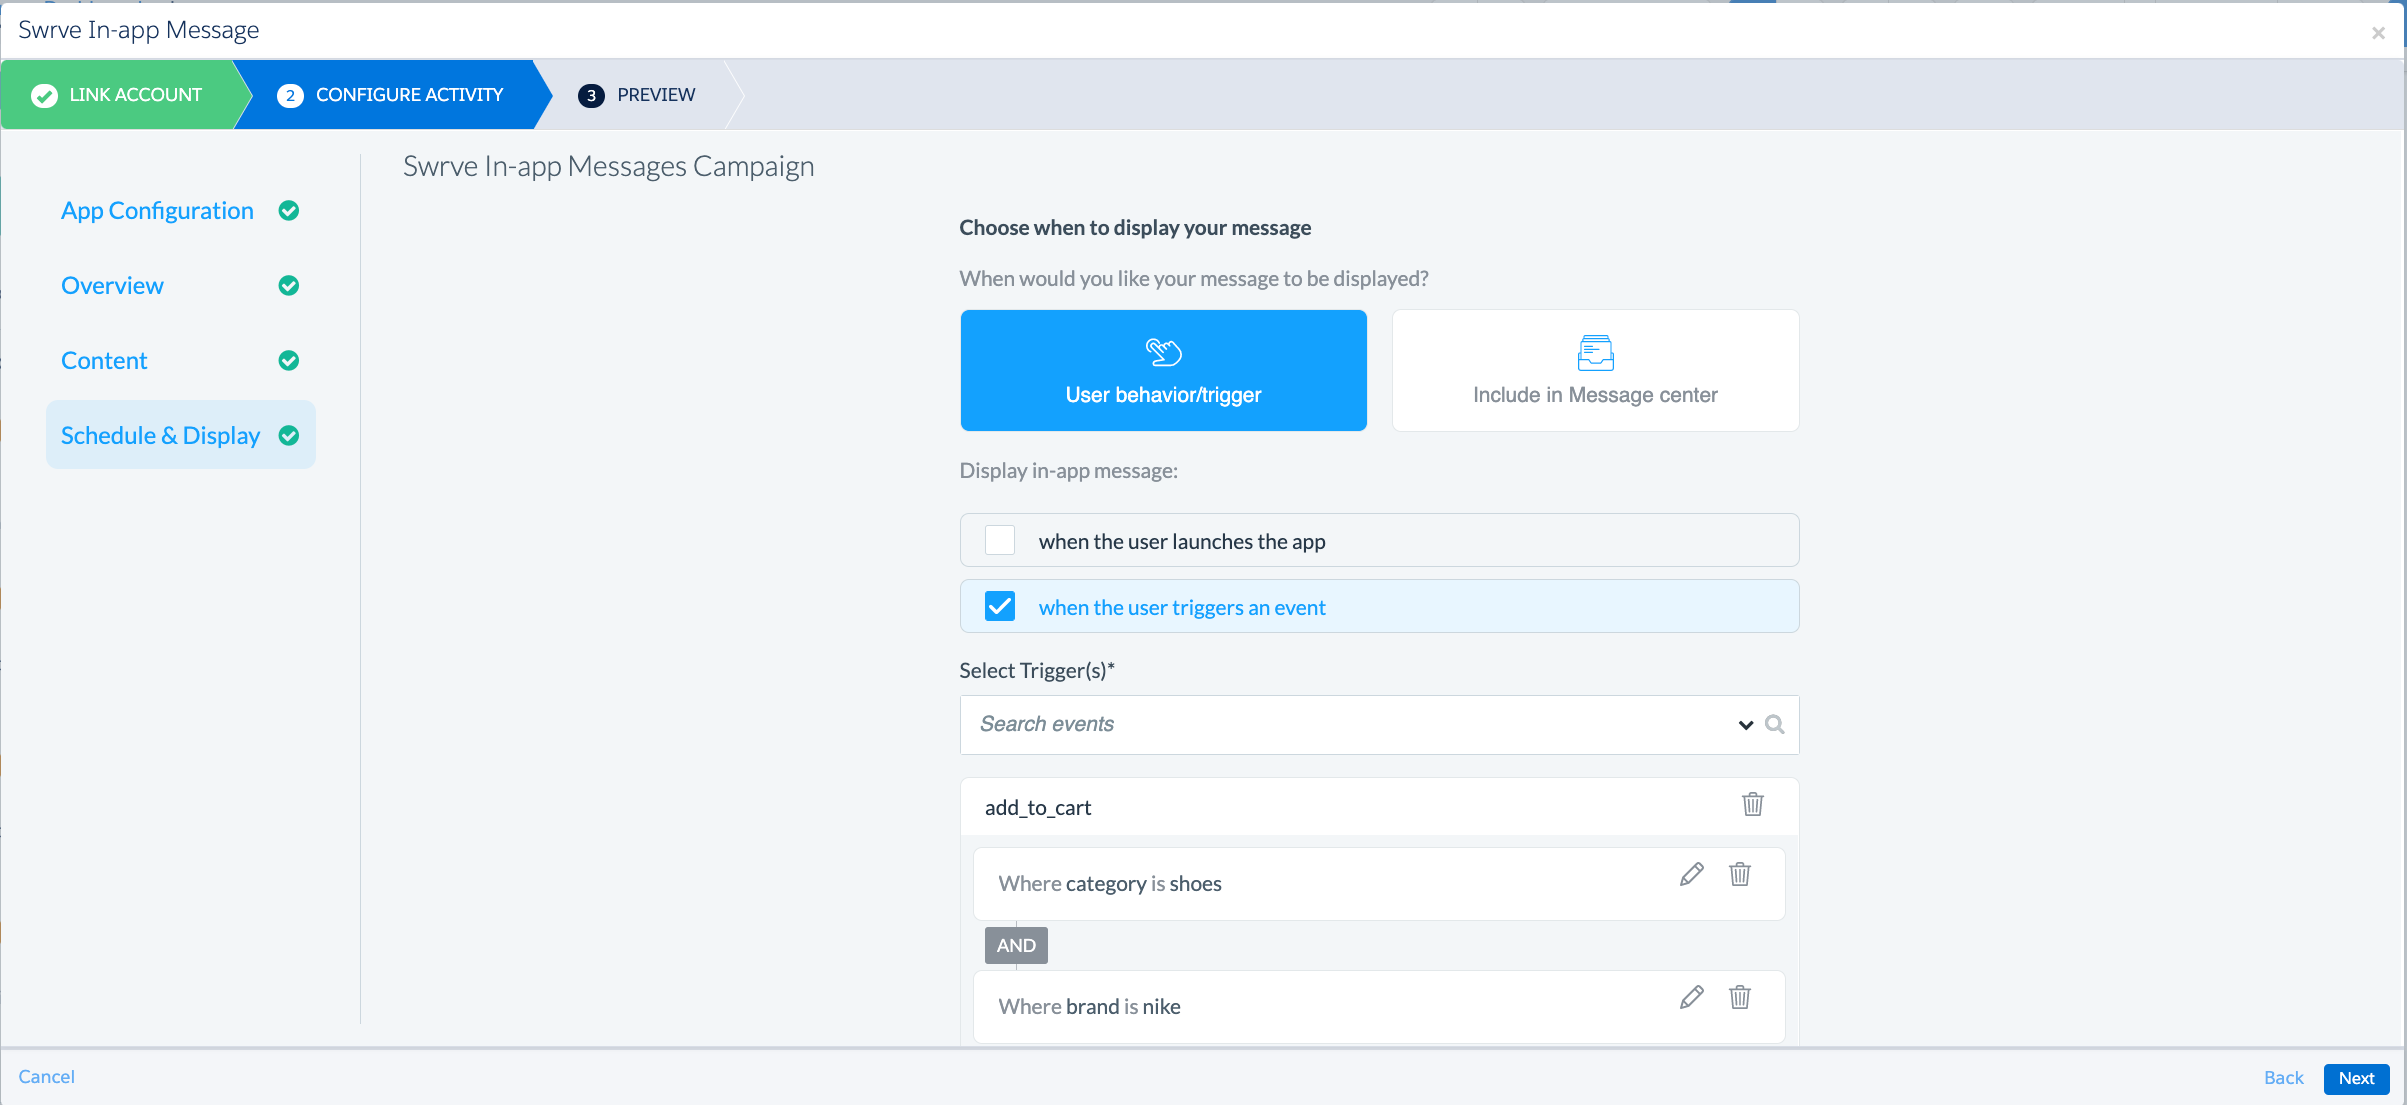
Schedule & display
Select Schedule & Display from the Configure Activity menu.
This section allows you to define where in the app you want to display your in-app message. For more information, see Campaign display triggers.
- Once you’ve finished configuring your campaign’s display triggers, click Next.
Preview
To preview the content on a specific device or orientation, select an option from the device list and select the orientation icon. To include or hide the image safe zone in your preview (that is, the portion of the image that always displays after automatic resizing, regardless of the platform device), select the Safe Zones toggle.
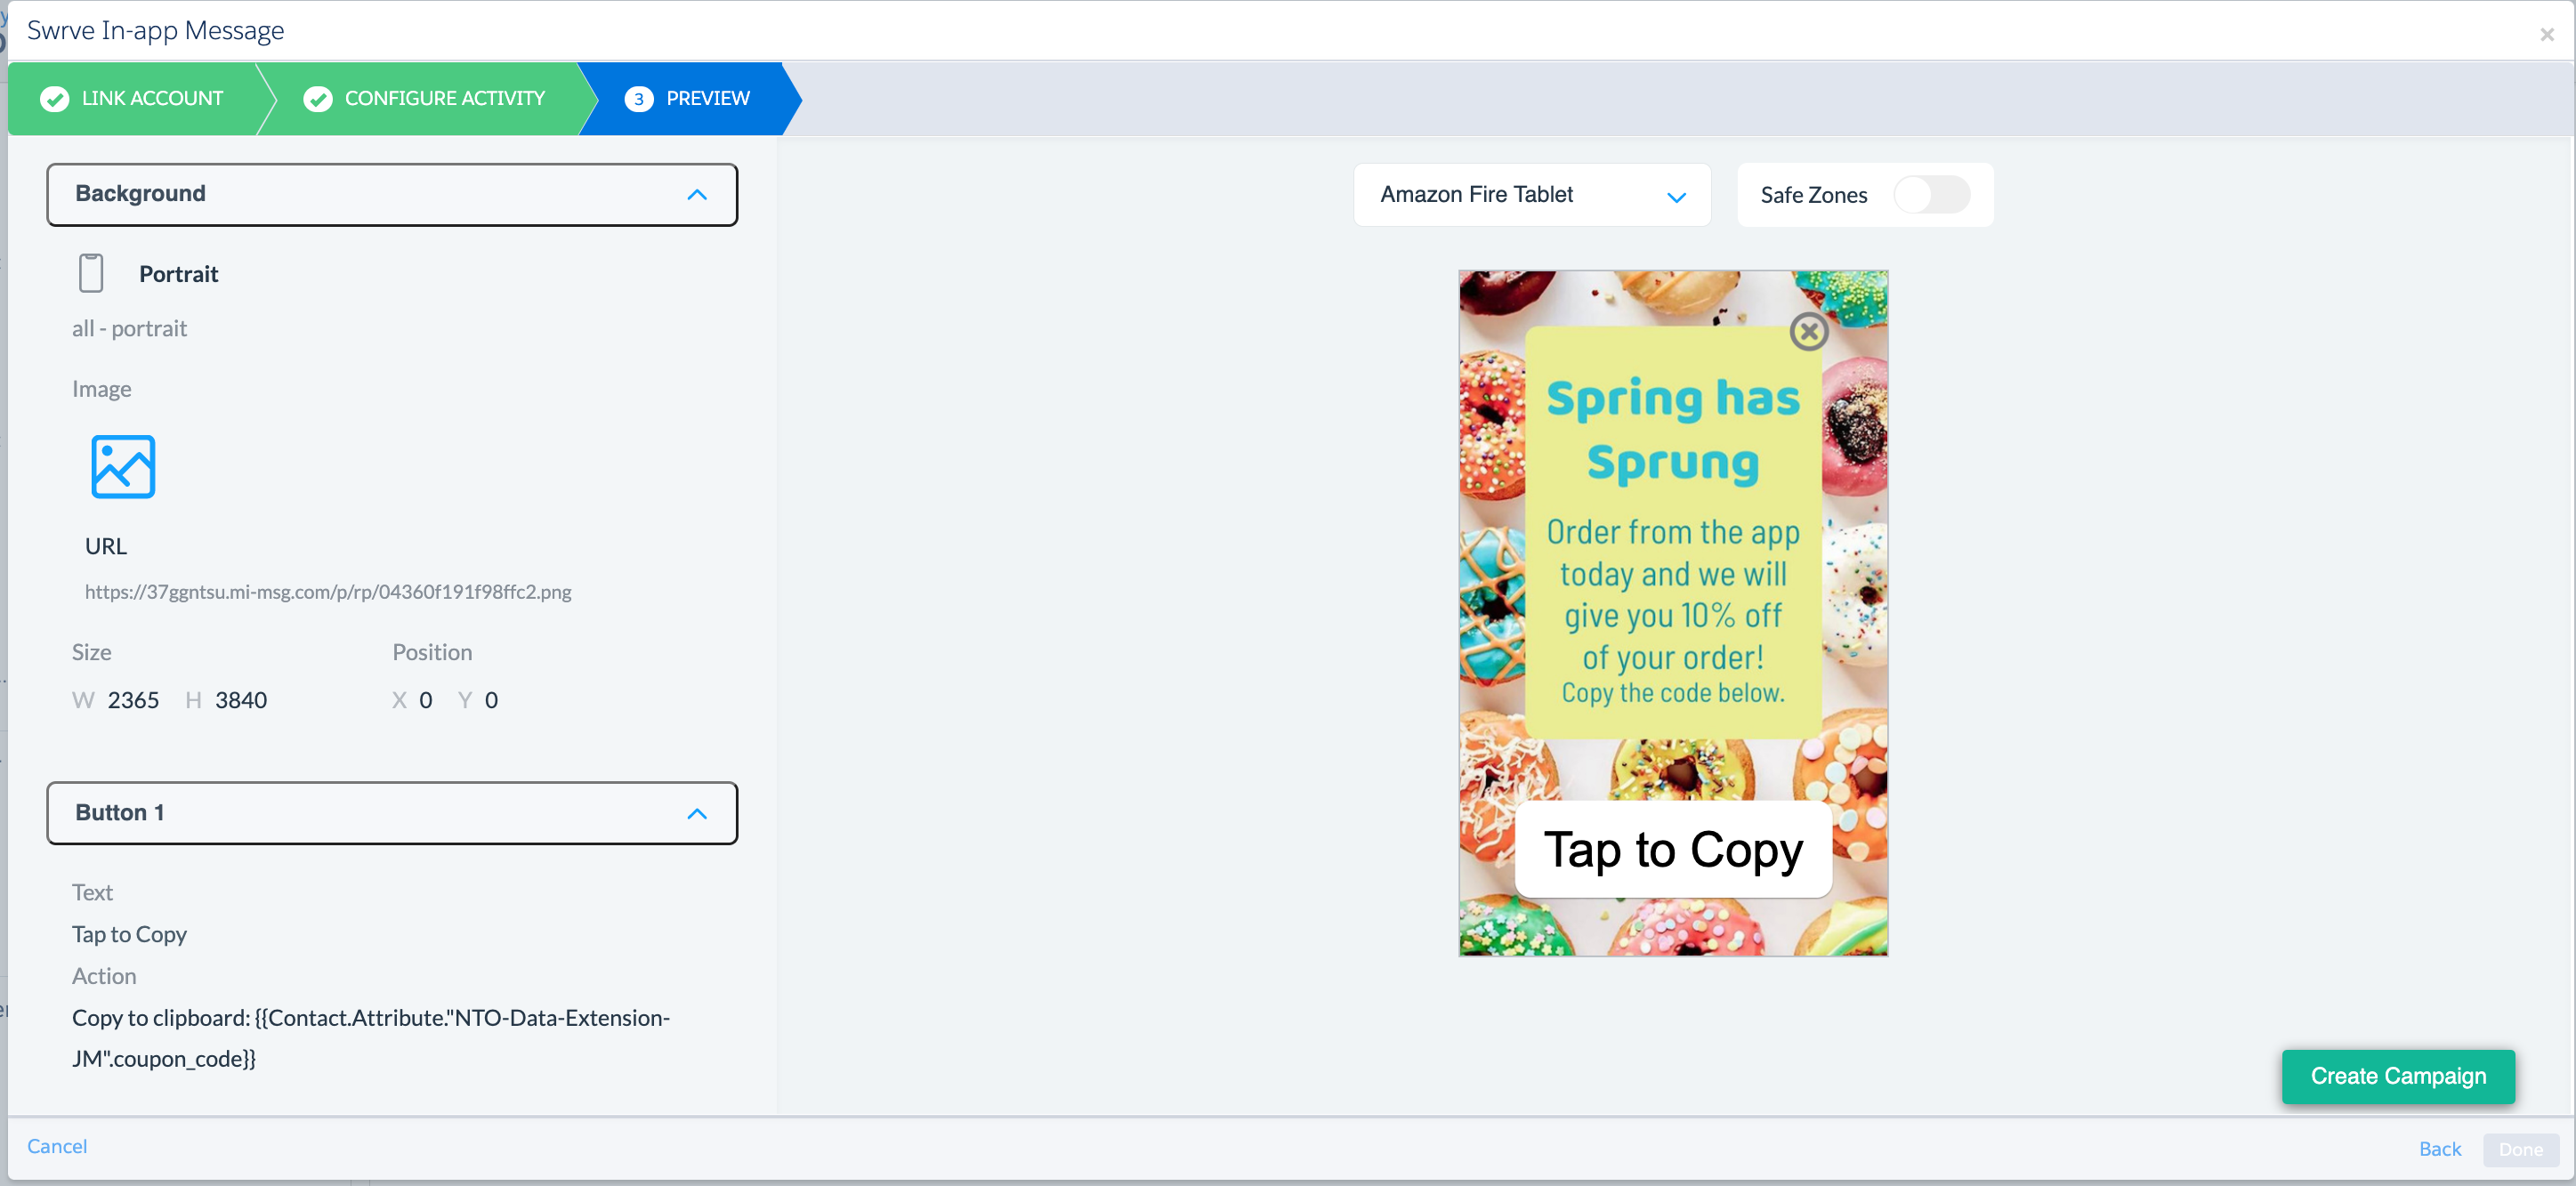 To review your campaign’s content and actions, expand the background and button elements. When you have finished reviewing your campaign, click Create Campaign.
When you have received confirmation that Swrve has successfully created the campaign, click Done to continue building your journey.
You may not edit your Swrve campaign in Journey Builder after it is created. To make changes to your campaign after creating, you must first login to your Swrve account and pause the campaign. Once you’ve made your changes, re-activate the campaign.
Use cases
- Track your users non-mobile behavior in Marketing Cloud and then trigger push notifications based on a user’s non-mobile actions/activities or an external real-time event. For example, send a push notification about an upcoming event of special interest to a specific user.
- Use non-mobile behavioral data to target and run engagement campaigns in Swrve. For example, use web purchase data received from Marketing Cloud to segment users for an in-app messaging campaign in Swrve.
- Synchronize Swrve and Marketing Cloud user records so you can run coherent mobile and non-mobile campaigns from Swrve and Marketing Cloud respectively.
- Send a personalized web notification to a website or browser from Salesforce, based on a user’s interests.

