Managing resources
Test how users respond to variants in resources such as changes to prices, settings or GUI items with Swrve’s resource A/B testing functionality. For more information about resource A/B testing, see Intro to resource A/B testing.
Resources are the core of A/B testing. A resource may be:
- A difficulty setting.
- An in-app purchase item.
- UI changes.
- Any setting or design change.
This article describes how to create and manage user resources in Swrve.
Resource management
The Resources screen enables you to view, create and manage resources manually. To access this screen, on the Optimization menu, select Resources.
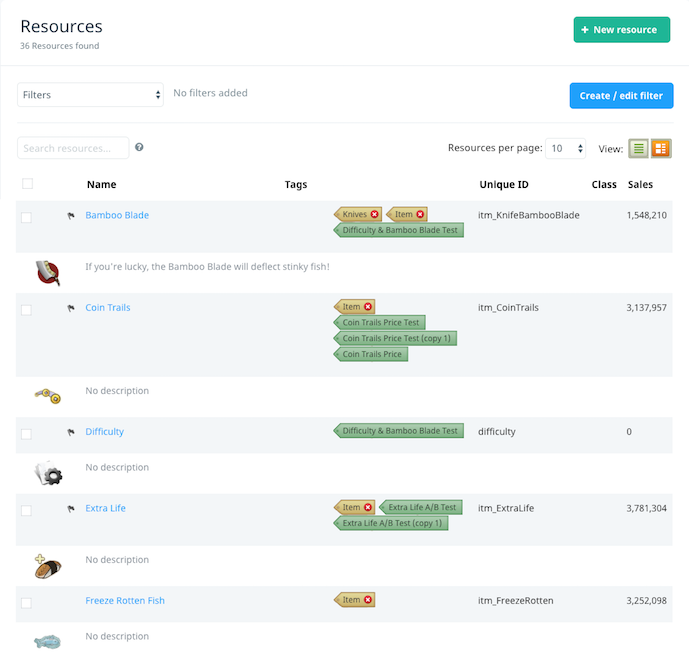
Note that you can’t edit a resource that is in an A/B test if the test has started or if the test has finished and a variant has been selected as the winner. This is to prevent user segment data for those users becoming incorrect or misleading. You can, however, edit the resources of a test if the test has not started (that is, if it is in Staging status), if the test is finished and the control has been selected as the winner or if the test has finished and the changes applied.
Creating a user resource
You must coordinate with your development team when manually creating resources using the Resources screen. Although you can manually add a resource whenever you like, your development team must have configured the resource and its associated attributes in the code before you can use it as the basis for an A/B test. For technical information about resource A/B testing, see the platform-specific Integration guide.
To manually create a new resource:
Step 1: On the Resources screen, select New resource.
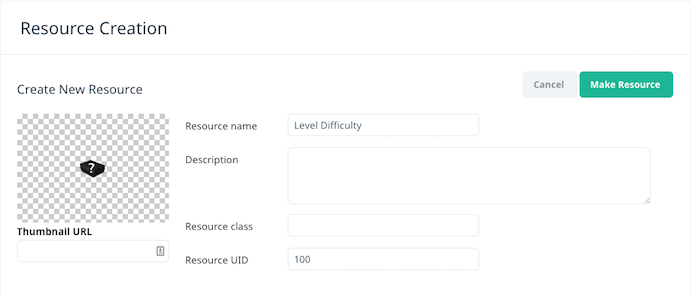
Step 2: On the Resource Creation screen, complete the following:
- In the Resource name field, enter the name for resource.
- In the Description field, enter a description for the resource.
- Optionally, in the Resource class field, enter a resource class.
- In the Resource UID field, enter a unique identifier for the resource.
- Optionally, to add an icon for the resource, in the Thumbnail URL field, specify a URL that points to an image. In this instance, the Resources screen automatically displays the thumbnail.
- Select Make Resource to save the new resource and proceed to the Resource Details screen.
Step 3: To assign the required attributes to your resource:
- On the Resource Details screen, select Edit resource.
- In the Add New Attribute section, enter a key/value pair in the Key and Value fields and then select Add Attribute. For example, if you create a resource which is an app button, you might assign an attribute to determine the button text. In this example, you might assign a key of Text and a value of select Here.
- Repeat the above step until you have assigned all the attributes you require.
- To save the new attributes, select Save Changes.
If required, you can immediately start an A/B test on your new resource by selecting Create A/B Test on the Resource Details screen. If, for example, you defined an upgrade button resource with a text attribute value of Click Here, you might start an A/B test to determine the impact of changing the value to Click to Upgrade! For more information, see Creating resource A/B tests.
If a user is in an A/B test where this resource is altered, it is downloaded via the A/B test resources GET request from the client app. For more information, see the Swrve A/B test API guide. The details entered on the Resource Creation screen are brought down to the client app if the user is a part of an active A/B test with this resource.
Next steps
- Create a resource A/B test. For more information, see Creating resource A/B tests.