Swrve Activities for Salesforce Service Cloud
This article includes instructions and examples for setting up your Salesforce Service Cloud integration to enable activities and processes with Swrve.
Supported actions
Use Swrve’s Service Cloud integration to perform the following actions:
- Trigger in-app message campaigns created in Swrve using Service Cloud Activity Configurations.
- Send rich push notifications with custom properties and custom deeplinks.
- Send events from Service Cloud to Swrve.
- Update user properties of mobile users in Swrve.
- Trigger any of the business logic you’ve preconfigured in Swrve.
Prerequisites
- To use Service Cloud with your Swrve-powered app, your CSM must configure your Salesforce integration in Swrve. For information, see Salesforce Service Cloud.
- Swrve campaigns require the Swrve user ID that identifies a user in your app. To make the Swrve user ID available, you must create a custom field in Service Cloud that stores the ID, and then reference it from the relevant Object and Field. For more information, see Including Salesforce or custom objects in Swrve activities below.
Use cases
Stop all mobile engagement
Stop all mobile engagement from Swrve, with exceptions for service level or important notifications when a case or ticket exists for a user. These are actioned directly through Service Cloud for in-app messaging campaigns. You need an additional rule to trigger the Swrve Push opt-out action for push notifications.
Send a status update to user via Swrve
Send users a status update via Swrve using the Service Cloud User Update activity when a case or ticket is updated (whether update is to status, reassignment, escalation, or closing).
Install Swrve in Service Cloud
To use Swrve’s Service Cloud integration, first install Swrve Mobile Engagement for Salesforce Service Cloud from Salesforce AppExchange. Once installed, you might need to manually add the Swrve app and Activity Configurations to your navigation bar.
Installing the Swrve app
- In Salesforce AppExchange, search for Swrve Mobile Engagement for Salesforce and select Get It Now. Follow the required steps to authenticate your Salesforce credentials.
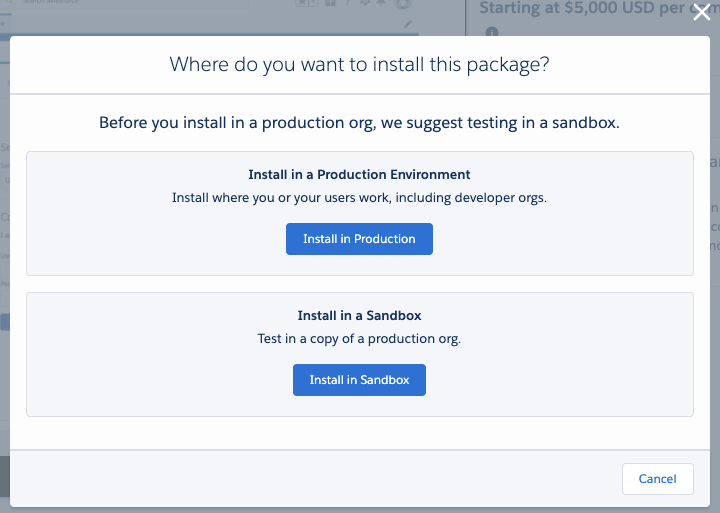
- Select the environment in which you want to install the package: Production or Sandbox.
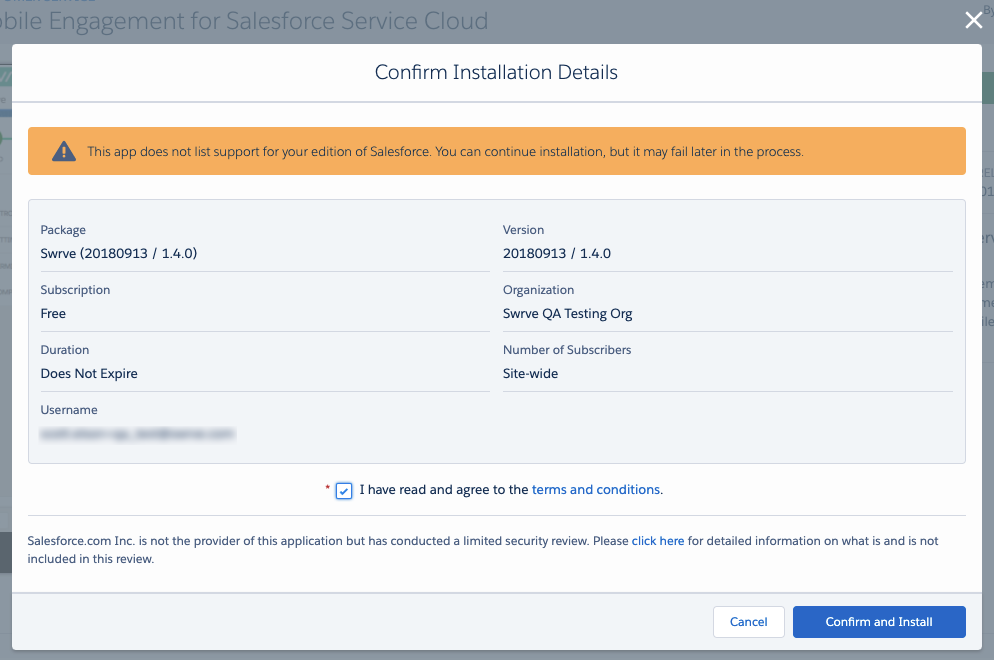
- To accept the terms and conditions, select Confirm and Install. Note the warning message is a known issue with Salesforce.
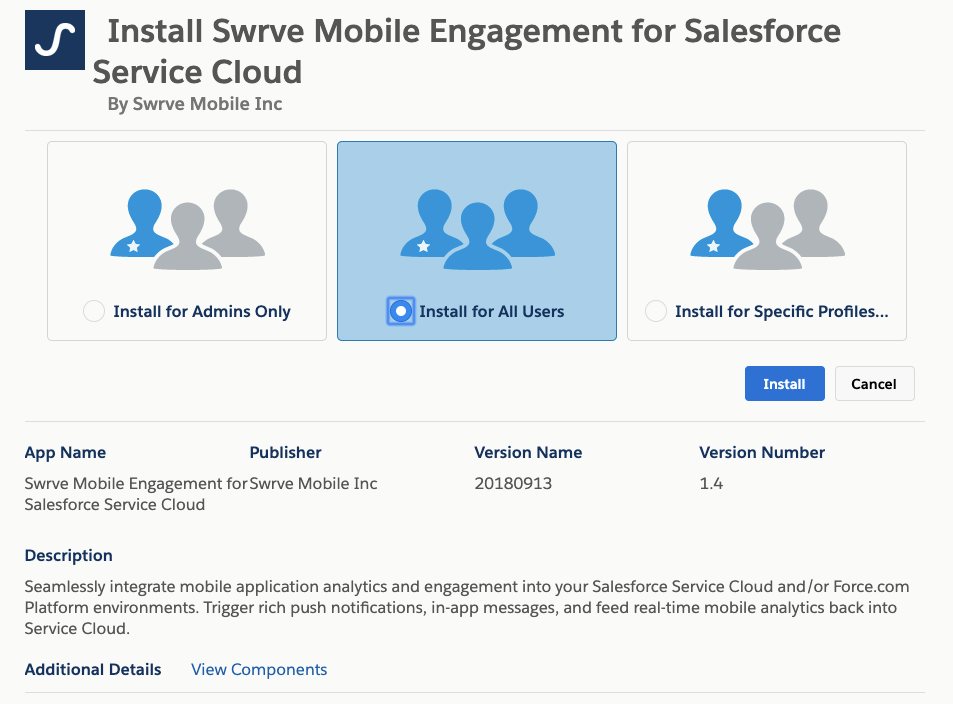
- On the install screen, select the required users permissions and then select Install.
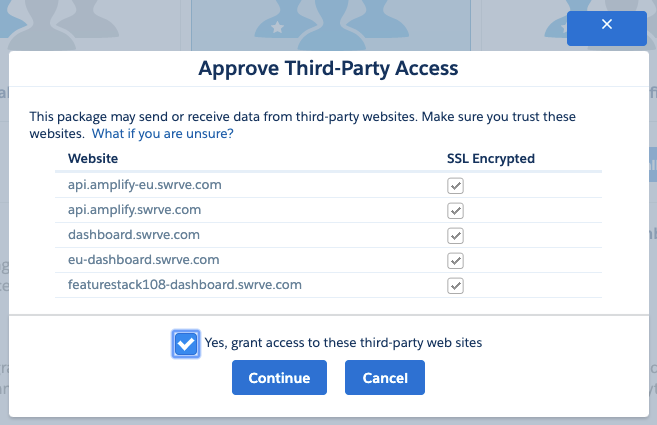
- Depending on where Swrve stores your data (US or EU data centre), approve the appropriate Third-Party Access. Note the listing of featurestack108—this is required for debugging and development.
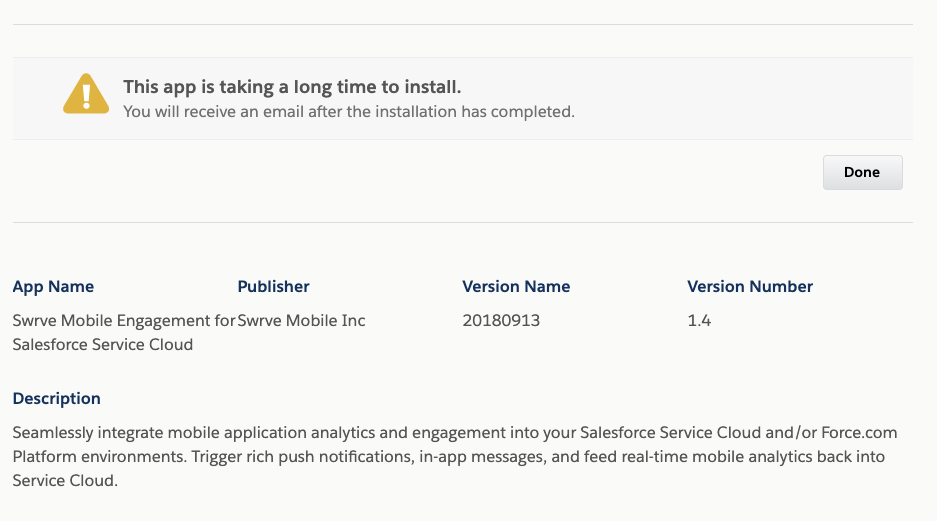
If the app takes too long to install, a warning message displays and Salesforce will send an email once installation is complete.
Once installed, the App is listed in your App Manager.
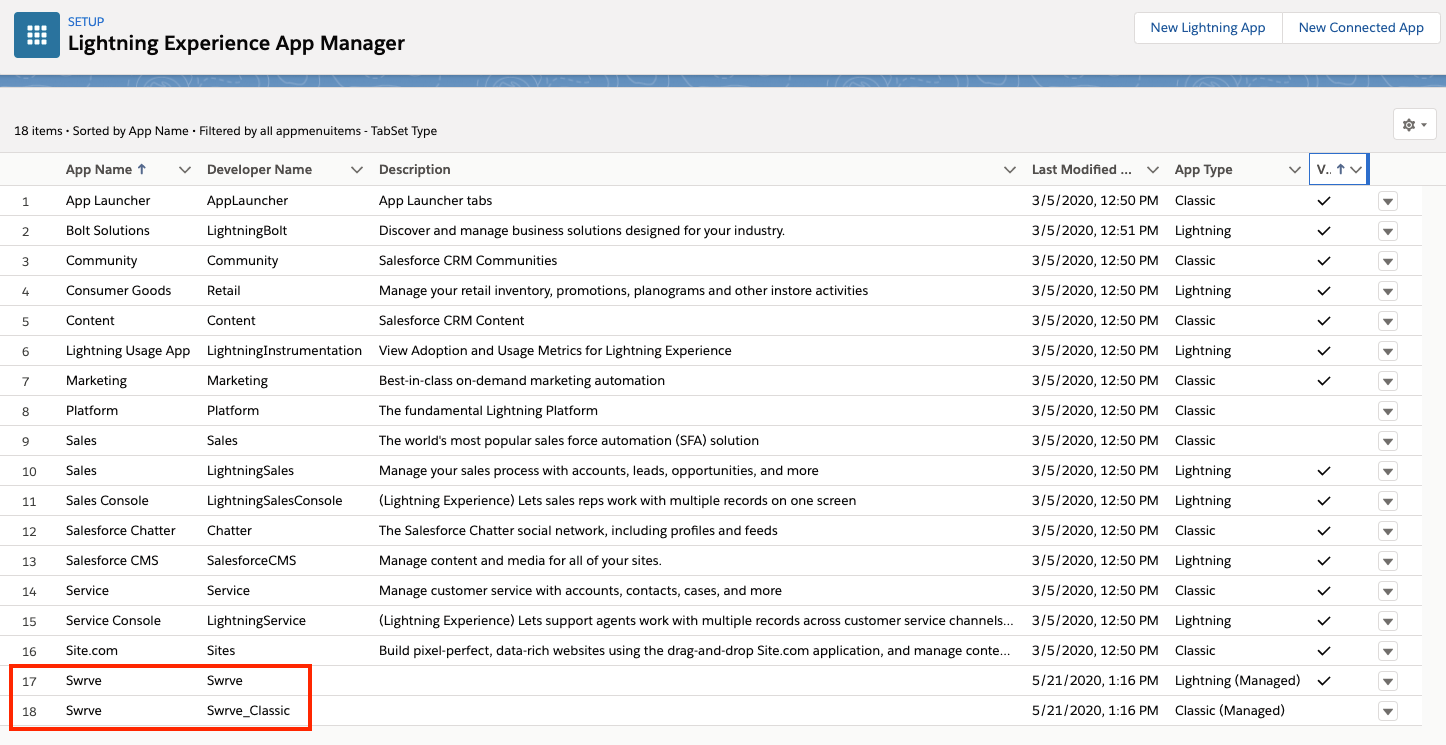
By default, the navigation bar is locked from removing items and you need to manually add the Activity Configurations and Swrve navigation tabs. Removing items is not required but makes the process easier.
Customizing app manager
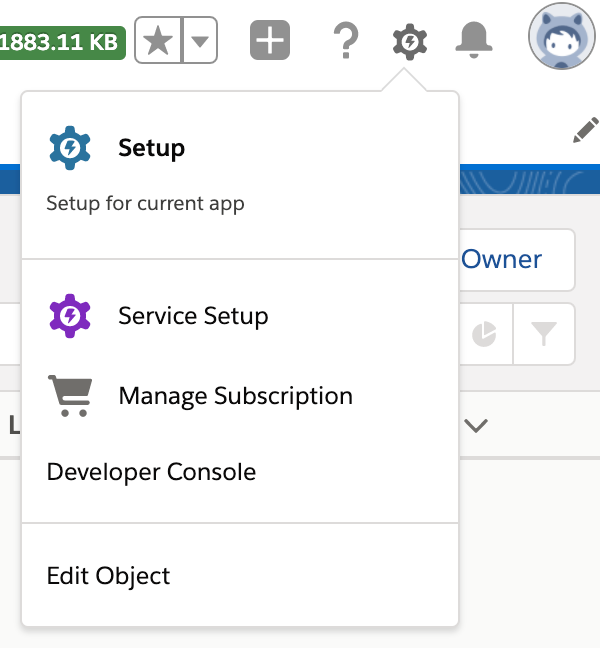
- In the menu bar, select the Setup icon, and then select Setup.
- Under Platform tools, select Apps and then select App Manager.
- In the Lightning Experience App Manager, locate the Sales – Lightning Sales row and select Edit.

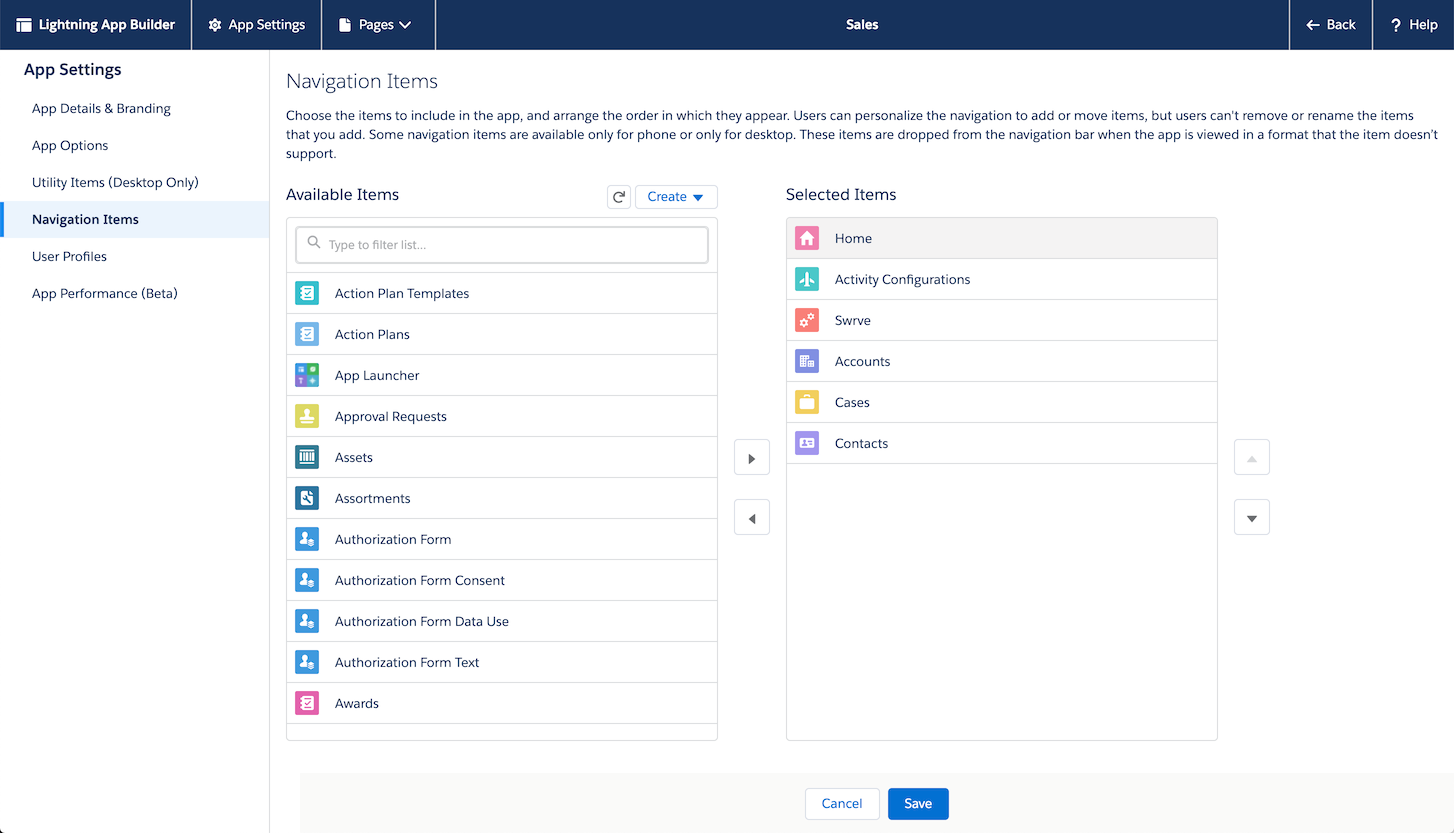
- Under App Settings, select Navigation Items.
- In the list of Available Items, locate and move Activity Configurations and Swrve to Selected Items. Remove any items you’re not using and then select Save.
Personalizing your navigation bar
- After adding or removing the items from the App, return to the Salesforce Home page and in the navigation bar, select edit .
- Use the options in the Edit Sales App Navigation Items window to add, remove, or reorder the items as desired.

Linking your Swrve account
To use Swrve Service Cloud integration, you must link an account to the Swrve tab.
-
- If you’ve customized your navigation bar, select the Swrve tab. Or open the App Launcher and under All Items, select Swrve.
-
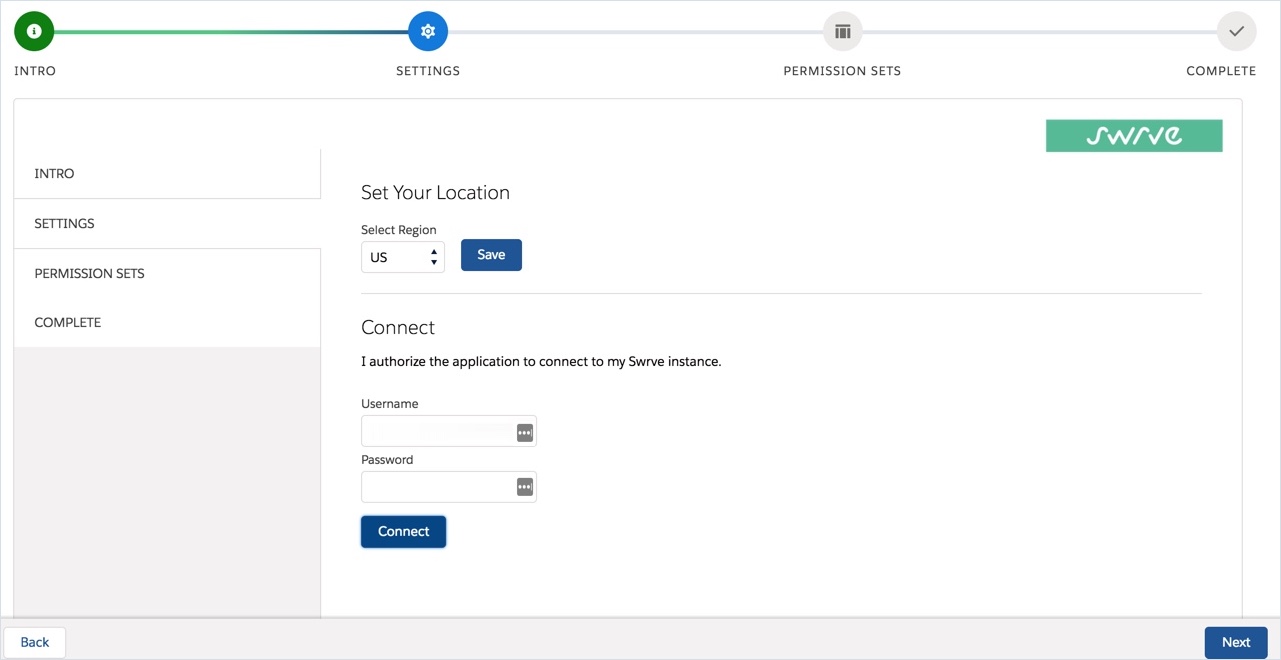
- On the Settings tab, select your region (US or Europe, depending on where Swrve stores your data) and enter your Swrve username and password. To connect to your Swrve account, select Connect. A message displays confirming your account is linked. To proceed, select Next.
- On the Settings tab, select your region (US or Europe, depending on where Swrve stores your data) and enter your Swrve username and password. To connect to your Swrve account, select Connect. A message displays confirming your account is linked. To proceed, select Next.
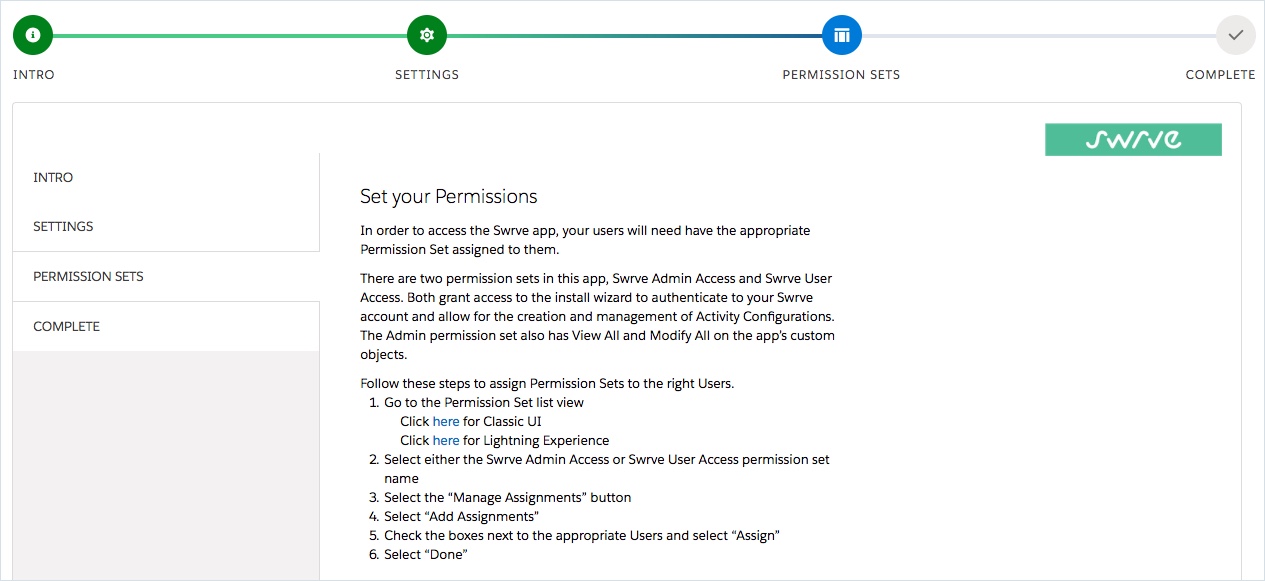
- On the Permissions Sets tab, set up the permission sets for your users to access the Swrve app. Select a view option to edit the Permission Set for your users: Classic UI or Lightning Experience. Then follow the steps outlined on the tab to select and assign permissions to the appropriate users.
Once you’ve added your permission sets, the account is linked and a confirmation message displays on the Complete tab.
Including Salesforce or custom objects in Swrve activities
Optionally, you might want to automatically include certain fields in your message. For example, you might want every message to contain a message ID, title, subtitle, and body. You have the option to add those fields to an existing Salesforce Object or to create your own custom object named “Message” that you can then use in a Swrve activity. There are two steps to adding custom objects to a Swrve activity:
- If required, create the custom object. For more information, see the Salesforce help articles Create a Custom Object and Fields for Creating Custom Objects.
- Add the object to your activity configuration. For more information, see the Salesforce help article Add or Edit Custom Meta Records Declaratively.
Once complete, you can use the object as the Activity Configuration’s Target Object.
Activity configurations
After you install the Swrve app in Service Cloud, all of the supported mobile engagement actions are available in your Activity Configurations. There are four types of Swrve activities available:
- Push notifications
- In-app messages
- Sending an event
- Sending a user update
When you select the values for an activity, make sure that you include them in the user Object. For example, if you select Object Contact ID and then email field {!Contact.email}, it follows that the contact must have an email address.
Creating a new activity
The initial steps for configuring a new activity are the same for all Swrve activity types.
- On the Activity Configurations tab, select New.
- On the New Swrve Activity screen, under Activity Configuration, enter the activity Name. To save the activity as a draft, leave Is Active unchecked.
- In the Activity Type list, select the desired activity. After you select the Activity Type, the Swrve Campaign section displays with the relevant fields.
- In the Target Object list, select a target object, whether it’s a default Service Cloud object or one of your custom objects. For more information about custom objects, see Including Salesforce or custom objects in Swrve activities above.

Complete the Swrve Campaign section as required for the campaign type (see the following sections for more detail). Once you’re ready to use the activity in your processes, make the campaign active. There are two options for editing the status: from the Is Active column on Activity Configurations tab, or by selecting the activity and editing it in the Activity Configuration screen.
Push notifications
Swrve push notifications sent from Process Builder are highly customizable. They can contain any of the information available in the Objects you have added to your activity configuration. For example, you can inject any relevant information from the custom meta data into any push notification field that supports dynamic content. You can also include rich media options such as images, GIFs, video, and audio files in your notification content. For more information on the rich media options available with Swrve push notifications, see About rich push notifications.
It is also possible to fully customize any of the deeplinks or payloads associated with your push notification, using a combination of static and dynamic values. This can be used to send a user to a custom location within the app or to a specific webpage.
To create a Swrve push notification activity in Service Cloud:
- Create a new activity as described above and for the Activity Type, select Swrve Push.
- In the Swrve Campaign section, enter or select the following details as required:
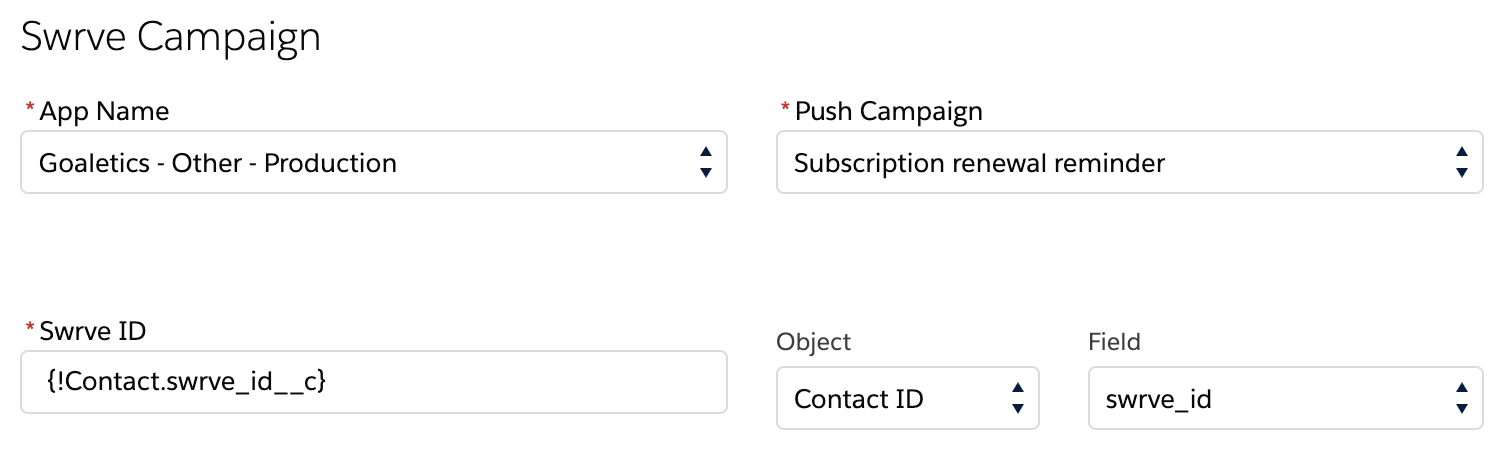
- App Name – Displays a list of your Swrve apps that are linked with your Salesforce account and that have active push notification campaigns (including sandbox and production apps). Select the app you want to use for the activity.
- Push Campaign – Service Cloud push uses the Swrve Push API to take advantage of all of Swrve’s built-in tracking and analytics. We recommend creating a Push API campaign for each individual push you want to include in your activities. Any push API campaigns you’ve created in Swrve are displayed in this list. For more information, see Push via API.
- Swrve ID – The Swrve user ID. Select the Object and Field values that you’ve configured to hold the Swrve user ID.
- In the Notification Content section, enter your push notification content. If the selected Swrve Push API campaign contains default content, any content or rich media you add here will overwrite those defaults if specified. Most boxes include the option to enter text directly or use a custom object to include dynamic content, or a mixture of the two. To insert data from an object, select the property name from the Object and Field lists.
- Body Text – The push notification content.
- Title – (Requires Swrve SDK 4.11+) The notification title.
- Subtitle – (Requires Swrve SDK 4.11+) For iOS10+ devices, text that is displayed as the subtitle in push notifications. For Android devices, text that is displayed after the title.
- Alert Sound – To set a sound for your push notification, select the desired sound from the list. For information about configuring custom sounds so that they are available in the Alert Sound list, see Push campaign prerequisites.
- Notification Category – If your push notification is targeted at Apple users, the Notification Category field enables you to make the notification appear as an interactive push notification on devices running iOS 8 or later. Select a custom action category (for example, Yes/No, Ignore/Respond) from the list. For information about configuring custom action categories for this list, see Push campaign prerequisites.
- Engagement Action Deeplink/URL – (Requires SDK version 4.3+) If you want to direct the user to a particular custom location when they engage with the notification, enter the deeplink or URL address.
- To include a custom payload with your notification, select Advanced—Custom Payload and enter the content in the Custom key/value pairs box in JSON format.
- To include rich media options or custom buttons in your push notification content that is displayed on supported devices, select Advanced – Rich Media and complete the following options as required:
- Media Type – The type of media you want to include in your notification content. The available options are:
- Image – Displays the URL as an image in the locked, banner, or extended view of the push notification.
- Audio – (iOS only) Include an audio file in your notification that a user can play directly in the extended view of the push notification.
- Video – Links to a hosted video and provides options for watching the video in a related player (for example, YouTube, Vimeo) from the extended view of a push notification.
- GIF – (iOS only) Displays a GIF in the extended view of the push notification.
- Media URL – The URL of the file you want to use for your rich media content. The URL must be a valid and HTTPS URL and include a file extension. If required, you can customize the media that’s include in the notification.
- Video Thumbnail URL – For notifications that include a video, the URL of the thumbnail image that will be displayed on the notification in locked or banner view.
- Buttons – Lets you include up to three buttons to give your users custom options for interacting with the notification in extended view. Select Add Button and complete the following for each button:
- Button Text – The text for the button label.
- Action Type – The button action. The options are Open App, Open URL (directs the user to a custom location), or Dismiss.
- URL / Deeplink – If you select Open URL, enter the deeplink or URL address for the button action.
- Media Type – The type of media you want to include in your notification content. The available options are:
- To complete the activity configuration, select Create Activity. The new activity displays in the list of available Activity Configurations.

Send Swrve event
Use the Swrve Event activity to send custom events from Service Cloud to the Swrve system. Events sent from Salesforce can be used in Swrve to define target audiences and segments, and build reports from a combination of mobile behavioral data and Salesforce data.
To create a Swrve Send event activity in Service Cloud:
- Create a new activity as described above and for the Activity Type, select Swrve Event.
- In the Swrve Campaign section, enter or select the following details as required:
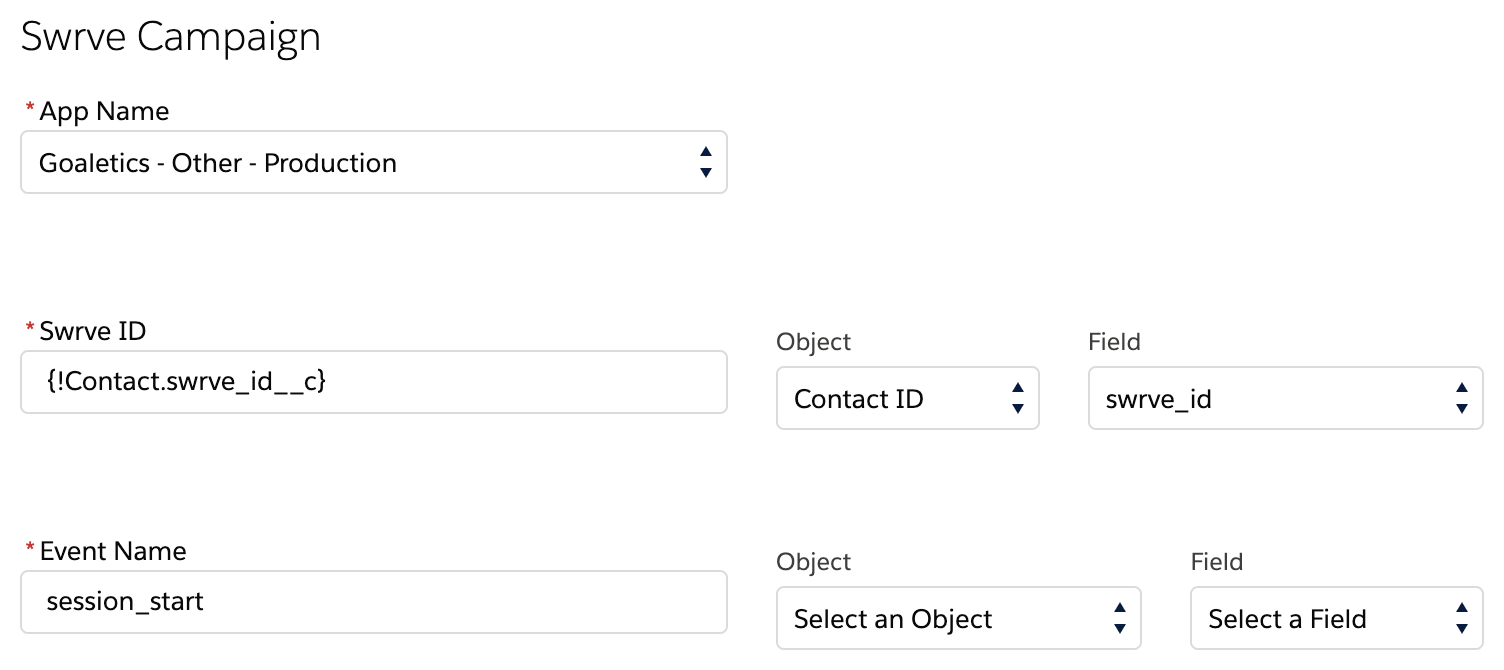
- App Name – Displays a list of your Swrve apps that are linked with your Salesforce account (including sandbox and production apps). Select the app you want to use for the activity.
- Swrve ID – The Swrve user ID. Select the Object and Field values that you’ve configured to hold the Swrve user ID.
- Event Name – The name of the action or behavior Swrve records for this user; for example, session_start. Note that you should not include dynamic values in the event name. Swrve tracks up to a maximum of 1000 unique events for your app and you could easily exceed this limit if your events included user-specific data in the value. For this reason, only include static values in the the event name.
- In the Event Content section, you have the option to include additional information about the events in the form of event payloads. Use event payloads for more detailed reporting around events or to create more granular target audiences in your Swrve campaigns. As with push notification content, event content values can contain field data from the Objects you have added to your activity configuration.
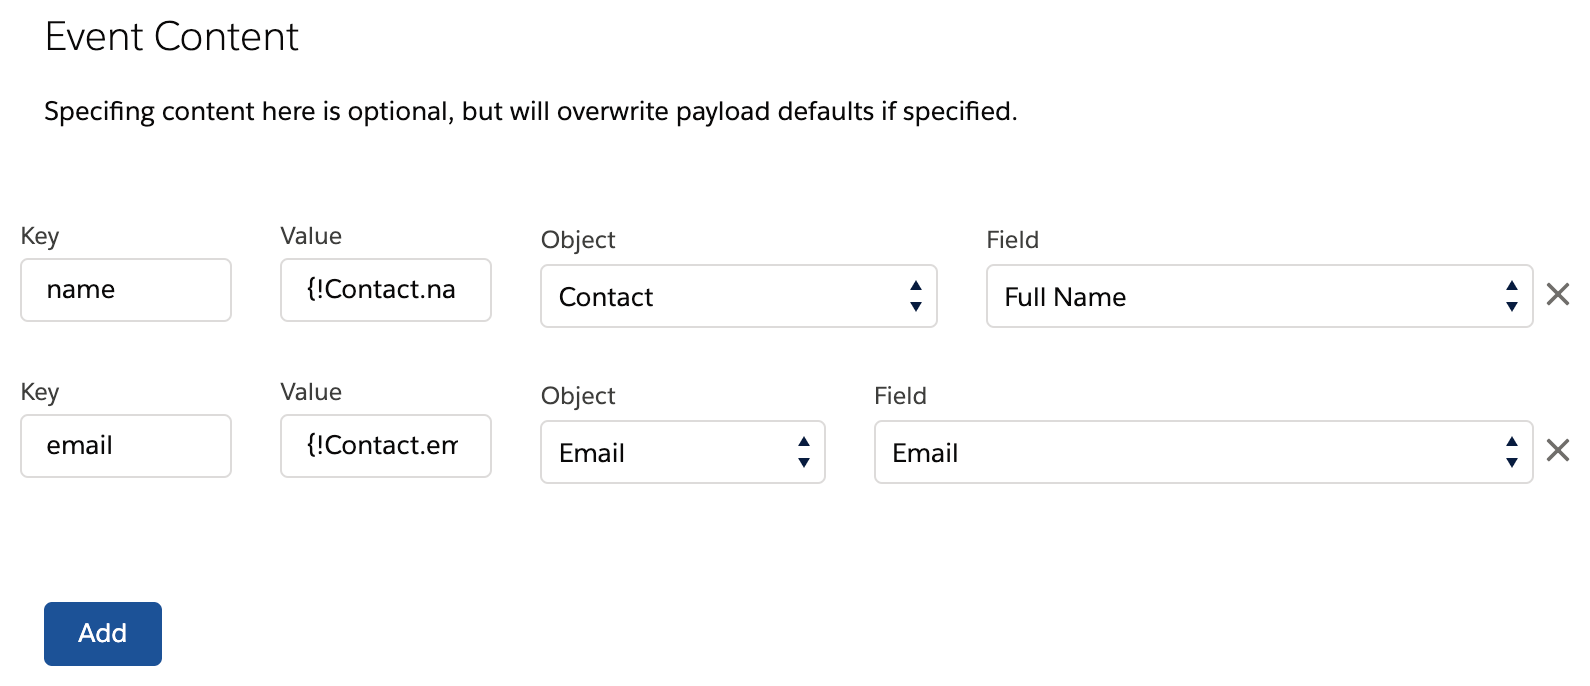
- To complete the activity configuration, select Create Activity. The new activity displays in the list of available Activity Configurations.

User update
Use the User Update action to send data you have in Service Cloud to update a user’s profile in Swrve. Swrve can immediately change how it engages with the user based on this new information. For example, Swrve can stop sending the user marketing based messages until the case is resolved in Service Cloud. Additionally, use the custom property values received through the User Update action to personalize the content of your Swrve push notification campaigns.
To create a Swrve User Update activity in Service Cloud:
- Create a new activity as described above and for the Activity Type, select User Update.
- In the Swrve Campaign section, enter or select the following details as required:
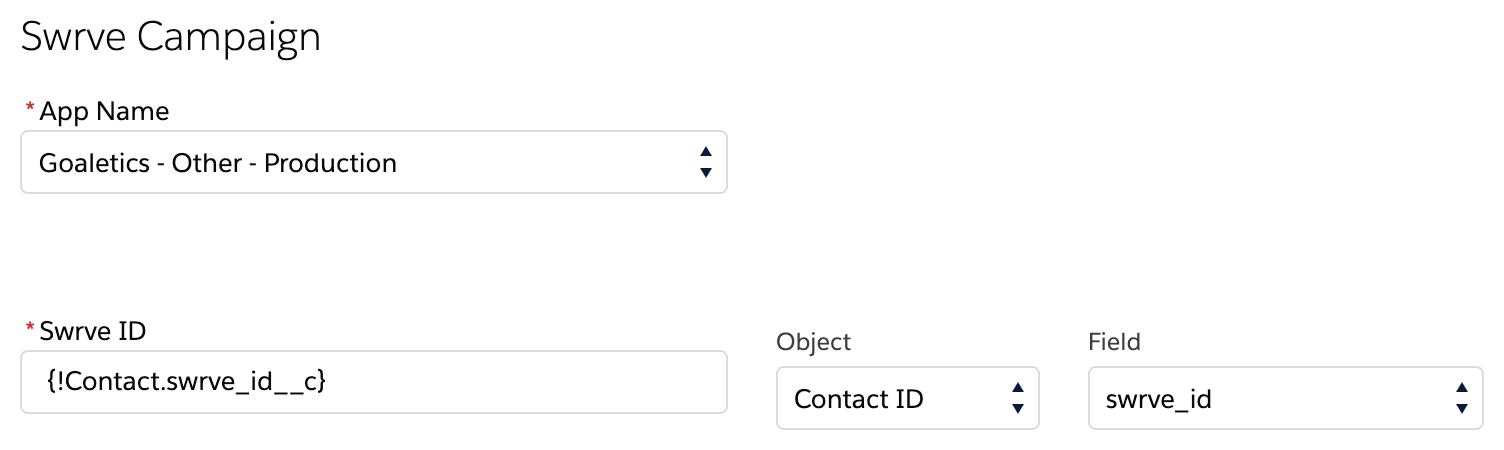
- App Name – Displays a list of your Swrve apps that are linked with your Salesforce account (including sandbox and production apps). Select the app you want to use for the activity.
- Swrve ID – The Swrve user ID. Select the Object and Field values that you’ve configured to hold the Swrve user ID.
- In the User Properties section, enter the property name (Key) and Value you want to update. As with Event Content, user property values can contain field data from the Objects you have added to your activity configuration. To add more values, select Add.
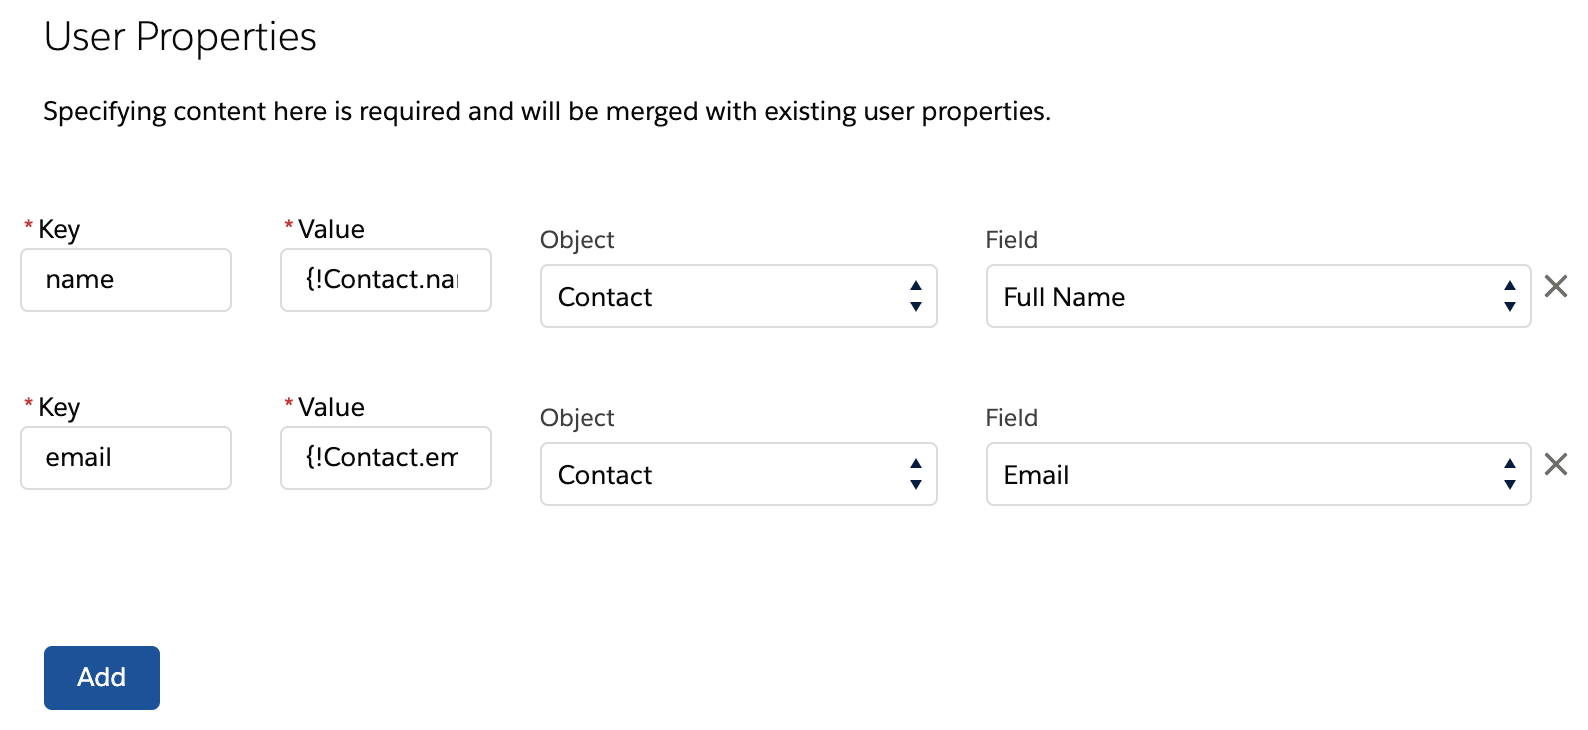
- To complete the activity configuration, select Create Activity. The new activity displays in the list of available Activity Configurations.

In-app message campaigns
Use the In-App Messages activities to add and remove users from in-app messages campaign target audiences as part of a process.
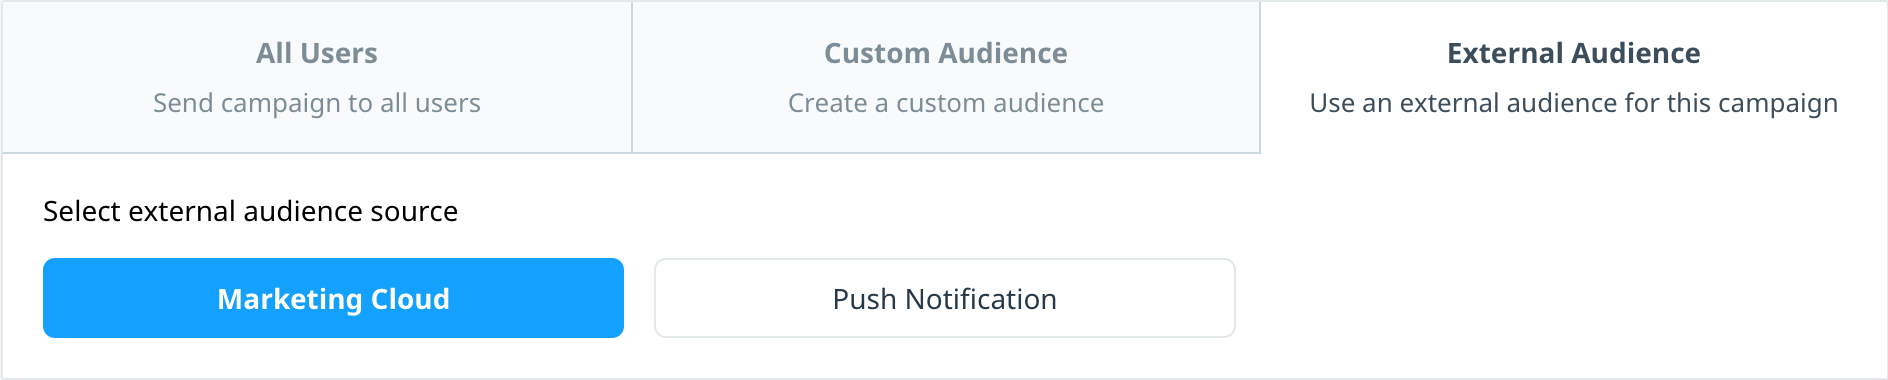
To make an in-app message or available in your activity configurations, you must first create the campaign in Swrve. On the Define Target Audience step of the campaign workflow, select External Audience, and then select Marketing Cloud. For more information, see Creating in-app messages.
If you intend to include an in-app message or as part of your process, you must configure two separate activities—one that adds the user to the audience for the associated Swrve campaign and one that removes them.
To add or remove a user from an in-app message campaign audience:
- Create a new activity as described above and for the Activity Type, select Swrve In-App Message.
- In the Swrve Campaign section, enter or select the following details as required:

- App Name – Displays a list of your Swrve apps that are linked with your Salesforce account and that have active or in-app message campaigns (including sandbox and production apps). Select the app you want to use for the activity.
- In-App Messages Campaign – Select the campaign you created in Swrve. Ensure the audience for the campaign you want to use is set to Marketing Cloud.
- Swrve ID – The Swrve user ID. Select the Object and Field values that you’ve configured to hold the Swrve user ID.
- Action – Select the relevant action to add or remove the user from the campaign audience.
- To complete the activity configuration, select Create Activity. The new activity displays in the list of available Activity Configurations.
Using Swrve activities in Process Builder
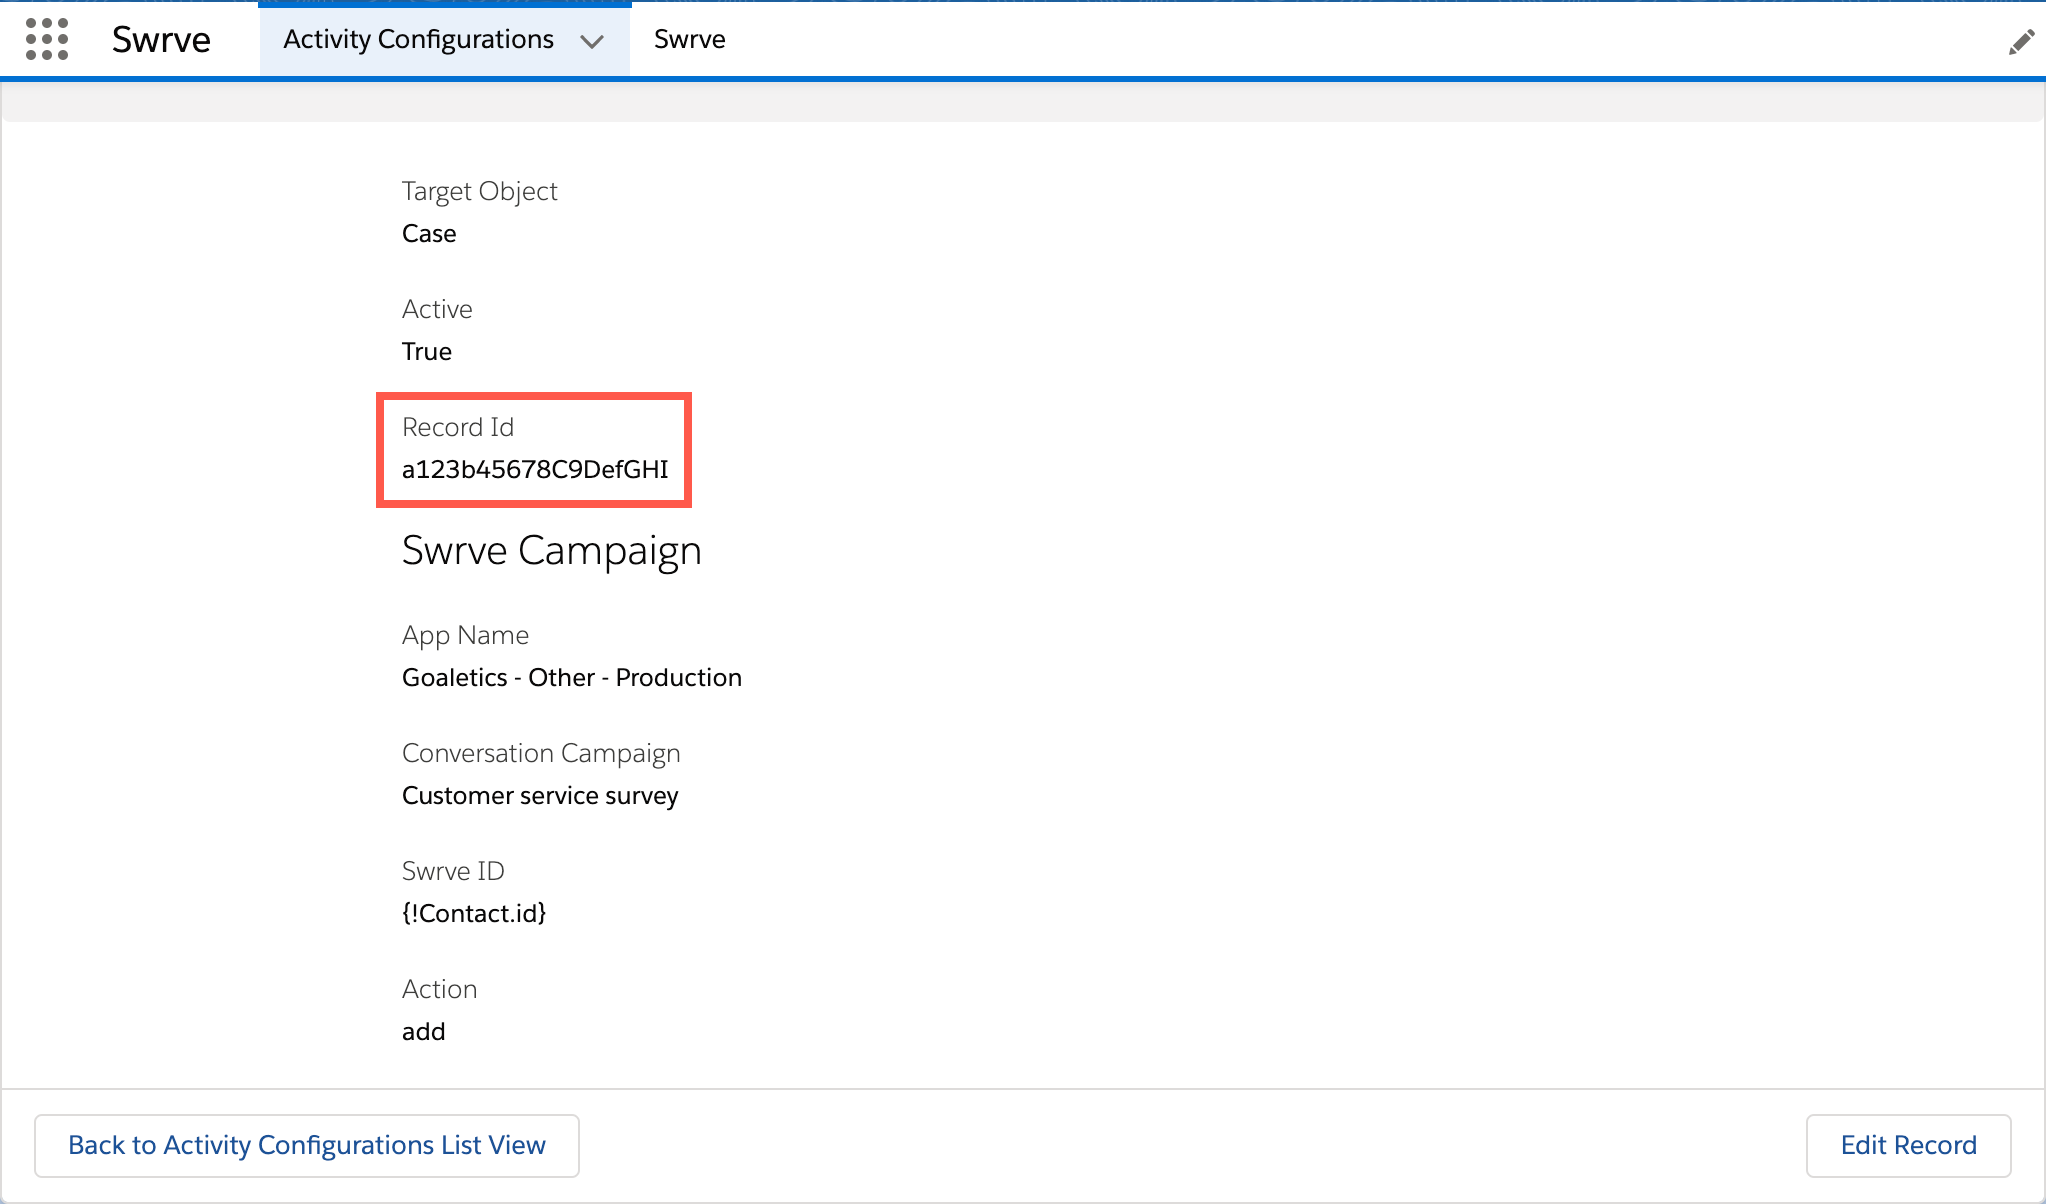
To include a Swrve activity in your process, first create the activity and then make a note of the the Record ID for the activity you want to use.
Finding the activity Record ID
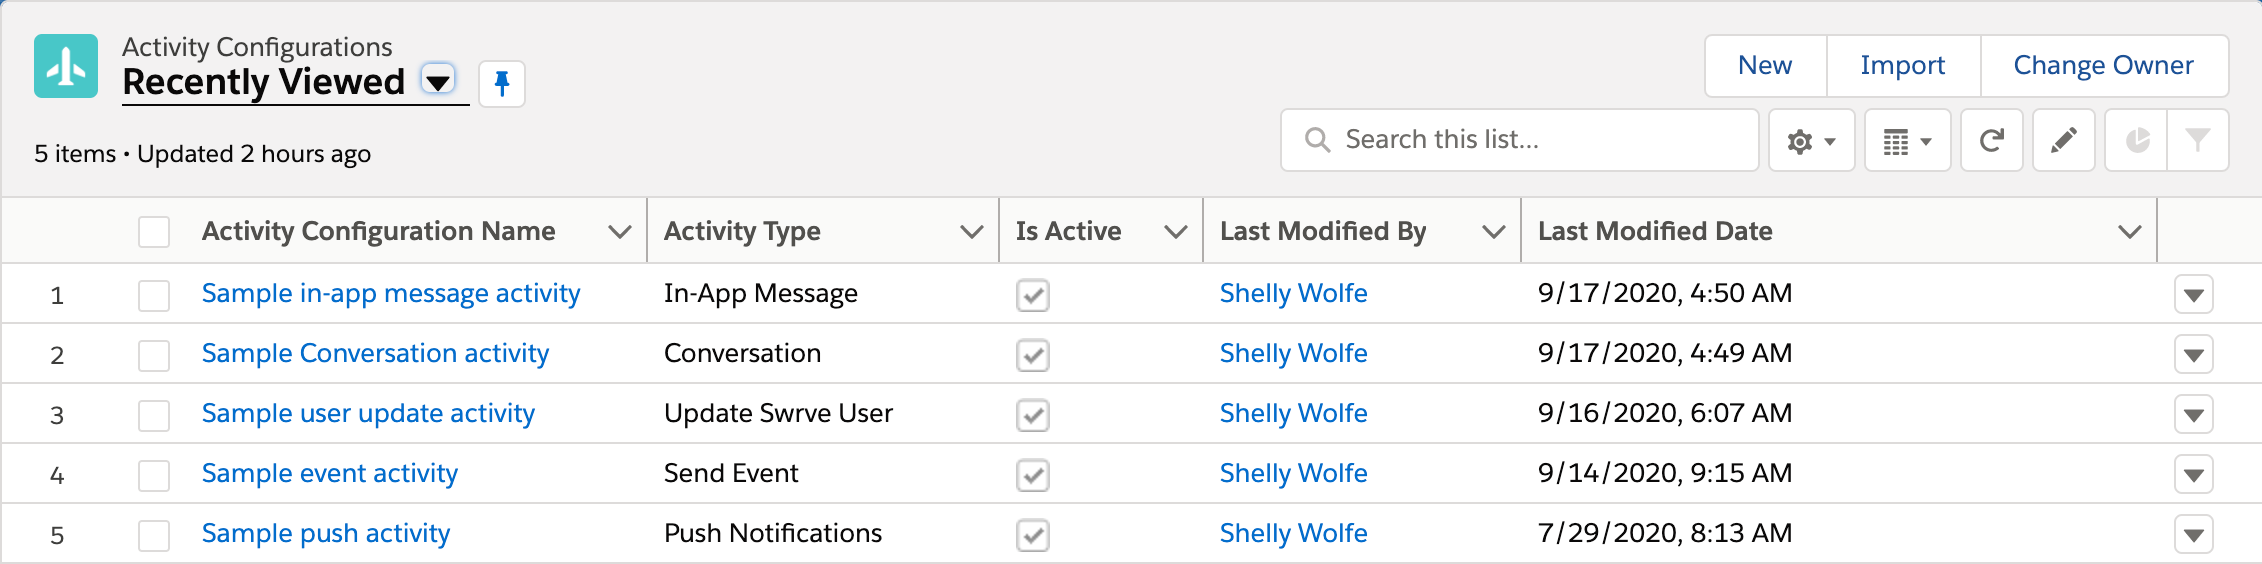
- On the Activity Configurations tab, select the activity.
- Make a note of the Record Id.
Creating a process
Once you’ve created your Activities and noted the activity Record Id of the activities you want to use, you can include them in a Process. The process dictates when and under what conditions the activities you previously configured are executed as part of actions. To access Process Builder, select the Setup icon, and then select Setup. On the Setup Home screen navigation, under Platform Tools, select Process Automation, and then Process Builder.
There are five main steps to creating a process. For detailed information on creating a process, see the Salesforce help article Create a Process, or the relevant links for each step below.
- Create a new process and define the properties.
- Configure the process trigger.
- Define the criteria that triggers the Swrve activity.
- Add Swrve actions to your process.
- Define how your process actions execute for specific criteria.
Swrve activities only apply to step 4.
We can't save this record because the “QA Rule Process” process failed. Give your Salesforce admin these details. An Apex error occurred: System.StringException: Invalid id: test\n Error ID: 1453033990-65710 (-1919595013)To create an action using a Swrve activity
- On your Process canvas, select + Add Action.
- In the Select and Define Action window, select or enter following:
- Action Type – select Apex.
- Action Name – enter a name for the action.
- Apex Class – select Swrve Process Builder Action.
- Under Set Apex Variables, select or enter the required field, type, and values:
- Record ID – select Field Reference as the Type, and then select the Value for the Swrve user ID.
- Swrve Activity Configuration – select ID as the Type, and then enter the Record ID of the Swrve Activity you want to use.
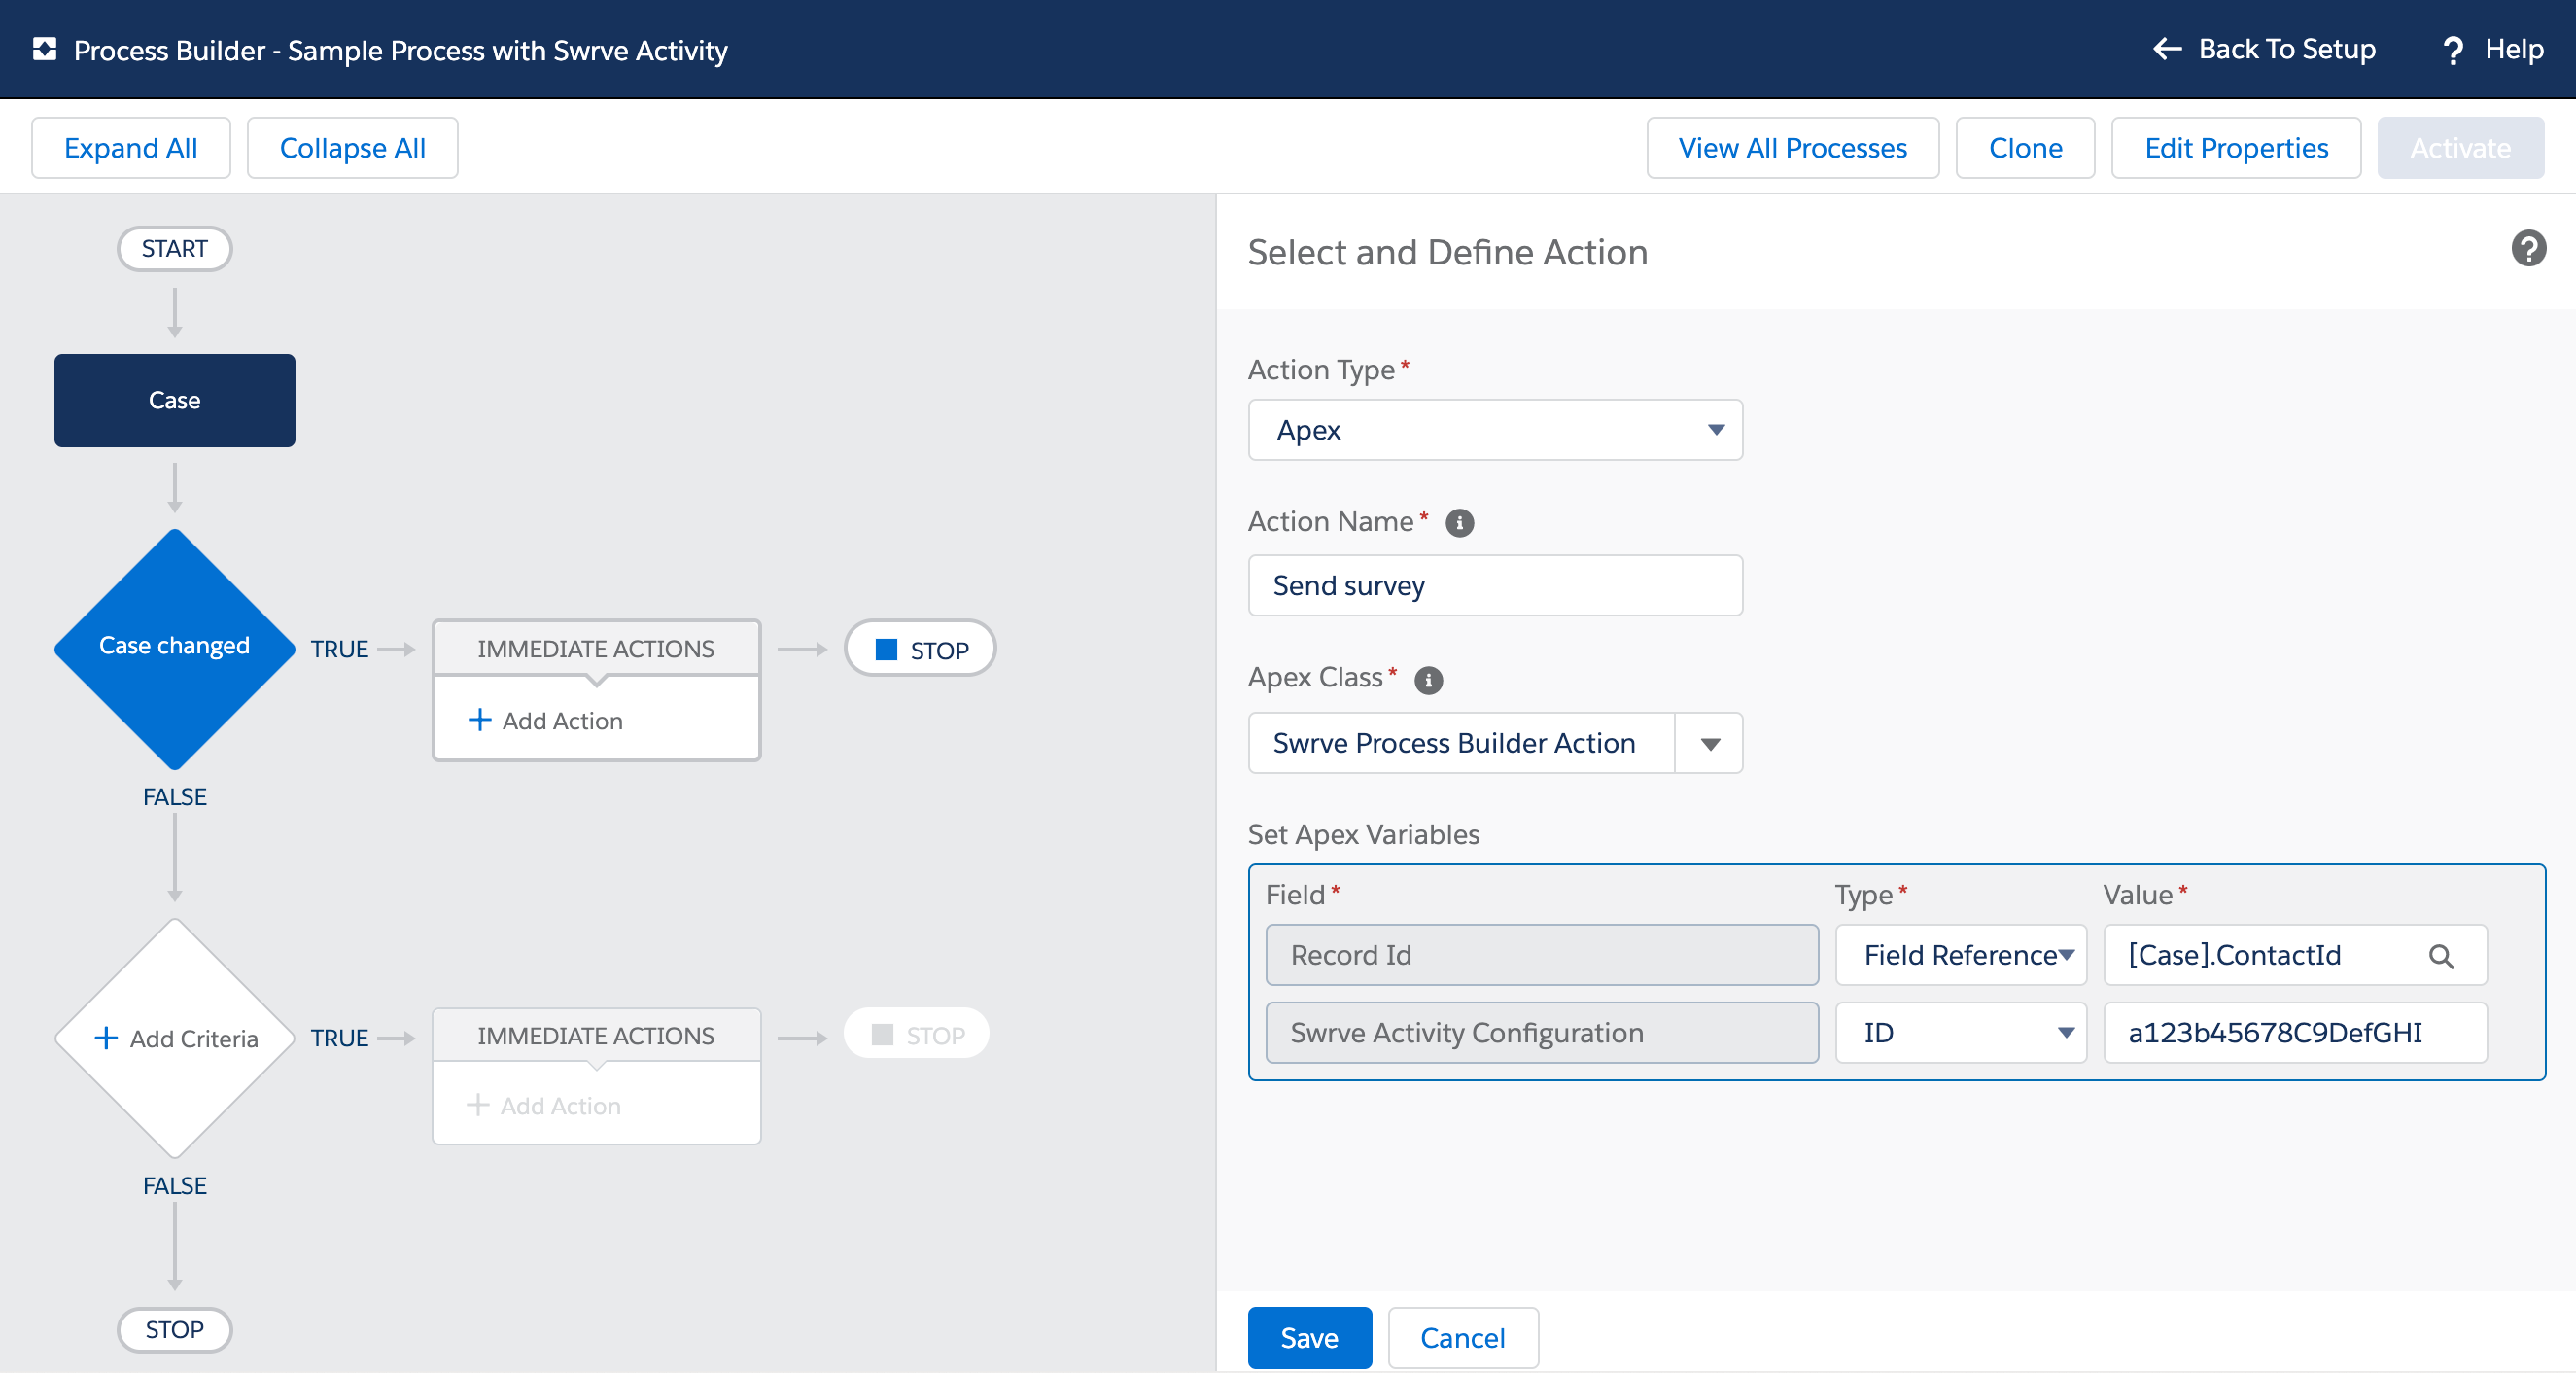
- To save the action definition and return to the process, select Save.
- Once you’ve added the required criteria and actions, to make the process active, select Activate.

Once the process is active, it moves to a read-only state. If you need to make changes to the process, select Clone to create a copy of the process and edit it as required. To deactivate an active process, select Deactivate.
Triggering a process
The exact steps to trigger a process depend on the object you selected as the process trigger. In this example, we selected Case as the object, and when a record is created or edited as the action that initiates the process. If your process trigger includes the criteria of creating or editing a case, you must specify the Contact Name and Account Name. If the contact and account don’t exist yet, you can create a new account or contact from the respective tabs, or as part of creating the case.
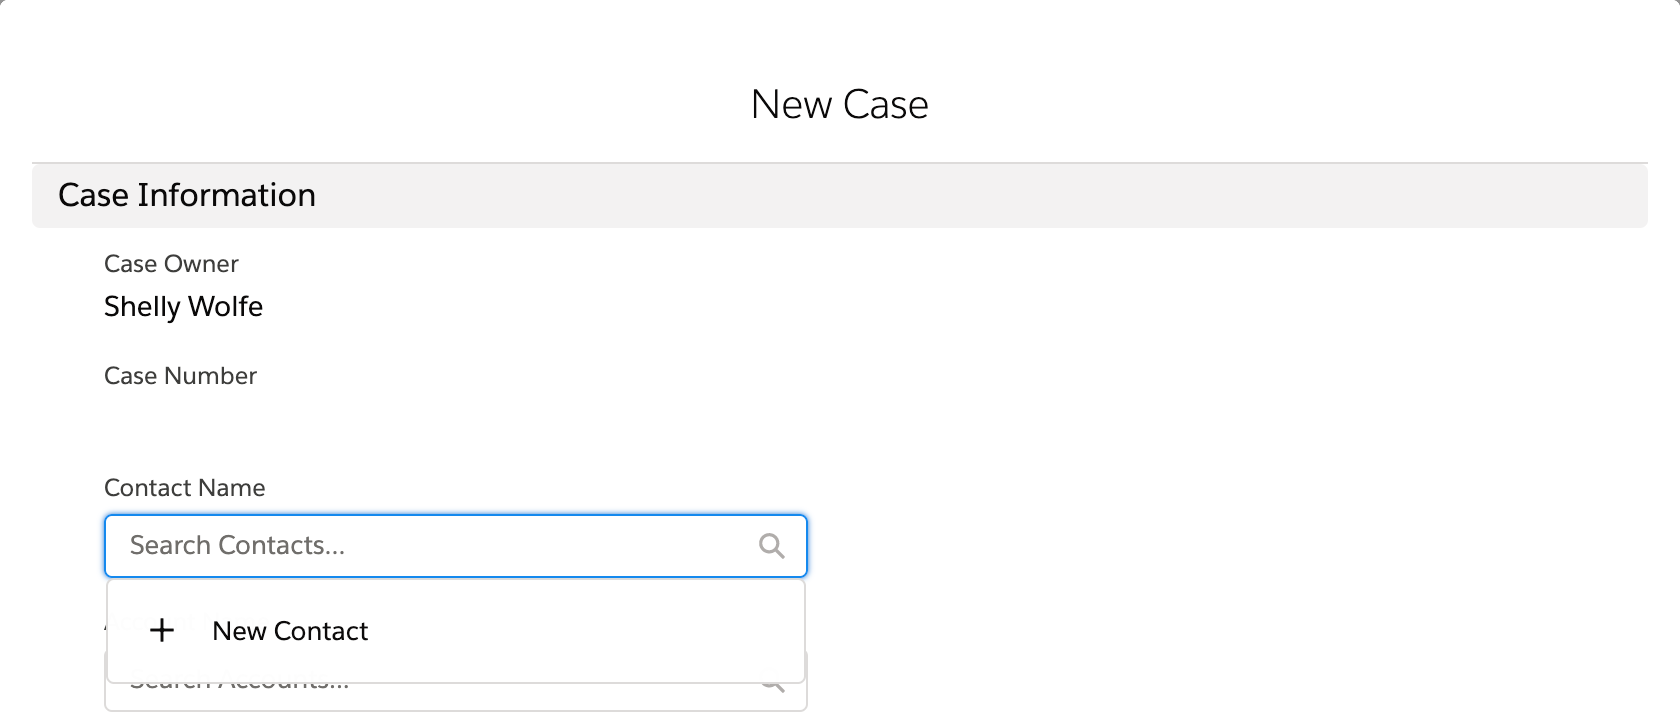
Creating a new case
To create a new case that triggers your process:
- On the Cases tab, select New.
- In the New Case window, complete the following required fields:

- Contact Name
- Account Name
- Status
- Case Origin
- Select or enter any additional information as relevant.
- To trigger the process, select Save.
Editing a case
If you configured your process to trigger when a record is created or edited, select the case you want to edit and then make the required changes. When you save your changes, the process is triggered again.