How do I set up a resource A/B test to split up my user base?
There are three main steps involved in splitting up your user base for A/B testing purposes within various campaigns:
- Create a new resource that represents the variable you want to A/B test.
- Run an A/B test on the new resource and determine the percentage of your audience you want exposed to each variant.
- Create campaigns for each variant and then monitor the A/B test performance.
Create a new resource
Step 1: On the Optimization menu, select Resources.
Step 2: On the Resources screen, select + New Resource.
Step 3: On the Resource Creation screen, enter the following details for the new resource:
- Resource name – the name of the resource you wish to create; for example, Pages.
- Description – for example, “audience resource”
- Resource class – for example, “audience”
- Resource UID – enter a unique identifier for the resource.
- Thumbnail URL – optionally, to add an icon for the resource, specify a URL that points to an image.
Step 4: To save the resource, select Make Resource.
Create an A/B test using the new resource
Step 1: On the Optimization menu, select Resource A/B testing.
Step 2: On the Resource A/B Testing screen, in the Enter a resource name box, enter and select the resource you created in the previous section from the list.
Step 3: To create a new A/B test using the resource, select +New Resource A/B Test.
Step 4: On the Choose Test Type screen of the wizard, select the test type and then select Build A/B Test to proceed.
- Conversion Test – select this option if you want to compare variants based on the proportion of users who send a given event (the conversion event). In conversion tests, each user can contribute at most once to the success of that variant.
- Engagement Test – select this option if you want to compare variants based on the total number of times users have sent an event (the counting event). For examples of the application of engagement tests, see Intro to resource A/B testing.
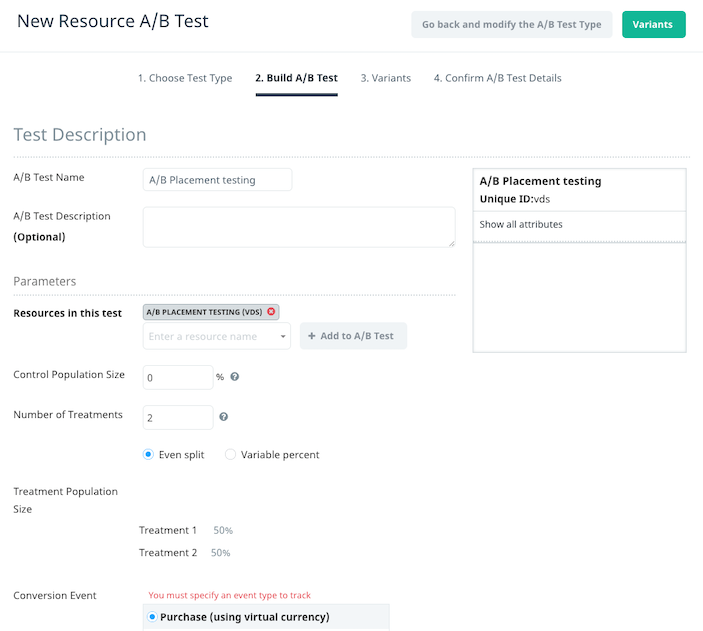
Step 5: On the Build A/B Test screen, enter the following details:
- A/B Test Name – enter a name for the A/B test; for example, A/B Placement Testing.
- In the Number of Treatments box, enter 2.
Note: This number of treatments value is in addition to the control. So, if you enter “2” treatments in the box, you will have a total of three treatments. - In the Control Population Size box, enter 0.
Note: you can increase this number to limit the exposure of the campaigns you’re A/B testing. For example, if you only want to expose 20 percent of your user base to the campaigns, set this number to ’80’. The - Depending on your preference or goal, select the Conversion Event.
- In the Target Users section, there are three buckets of users you can target:
- All users
- Only new users who join after the start of the A/B test
- Only users who belong to a predefined segment
Step 6: After you have completed the Test Description, select Variants to proceed.
Step 7: The control variant displays by default. Leave the Name of Variant as Control, and select Define Treatment 1.
Step 8: In the Name of Variant box, enter the name of the variant you want to test (for example, you could enter the location of the trigger as [input_name_first_variant]). Then select Define Treatment 2, and repeat the process.
Step 9: On the Confirm A/B Test Details screen, confirm the Variants in the test have the correct user breakdown, as illustrated below. If everything looks okay, select Create A/B Test.
Create campaigns for each variant
For details on the types of campaigns you can run using the A/B test variants, see How do I A/B test in-app message location?
Swrve’s redesigned campaign workflow supports A/B testing and localizing content in a single campaign, so it’s not necessary to use the above solution to A/B test a localized push notification or in-app message campaign. For more information, see Creating a multi-platform push campaign and In-app messages.

